Hisense C1 Mini Projector User Manual - Page 25
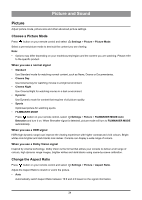
Picture and Sound, Picture, Choose a Picture Mode, When you use a normal signal
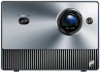 |
View all Hisense C1 manuals
Add to My Manuals
Save this manual to your list of manuals |
Page 25 highlights
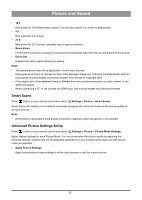
Picture and Sound Picture Adjust picture mode, picture size and other advanced picture settings. Choose a Picture Mode Press button on your remote control and select Settings > Picture > Picture Mode. Select a pre-set picture mode to best suit the content you are viewing. Note: • Options may differ depending on your model/country/region and the content you are watching. Please refer to the specific product. When you use a normal signal • Standard Use Standard mode for watching normal content, such as News, Drama or Documentaries. • Cinema Day Use Cinema Day for watching movies in a bright environment. • Cinema Night Use Cinema Night for watching movies in a dark environment. • Dynamic Use Dynamic mode for content that requires vivid picture quality. • Sports Optimised picture for watching sports. • FILMMAKER MODE Press button on your remote control, select Settings > Picture > FILMMAKER MODE Auto Detection and turn it on. When filmmaker signal is detected, picture mode will turn to FILMMAKER MODE automatically. When you use a HDR signal HDR (high dynamic range) can improve the viewing experience with higher contrast and vivid colours. Bright whites look brighter and dark blacks look darker. Console can display a wide range of colours. When you use a Dolby Vision signal Inspired by cinema technology, Dolby Vision is the format that allows your console to deliver a full range of colours, high dynamic range images, brighter whites and dark blacks using scene-by-scene calibration. Change the Aspect Ratio Press button on your remote control and select Settings > Picture > Aspect Ratio. Adjust the Aspect Ratio to stretch or zoom the picture. • Auto Automatically switch Aspect Ratio between 16:9 and 4:3 based on the signal information. 24
-
 1
1 -
2
-
3
-
4
-
5
-
6
-
7
-
8
-
9
-
10
-
11
-
12
-
13
-
14
-
15
-
16
-
17
-
18
-
19
-
 20
20 -
 21
21 -
 22
22 -
 23
23 -
 24
24 -
 25
25 -
 26
26 -
 27
27 -
 28
28 -
 29
29 -
 30
30 -
31
-
32
-
33
-
34
-
35
-
36
-
37
-
38
-
39
-
40
-
41
-
42
-
43
-
44
-
45
-
46
-
47
-
48
-
49
-
50
-
51
-
52
-
53
-
54
-
55
-
56
 |
 |
