Hitachi DZ-HS803A Owners Guide - Page 139
Help H F1, while ImageMixer
 |
View all Hitachi DZ-HS803A manuals
Add to My Manuals
Save this manual to your list of manuals |
Page 139 highlights
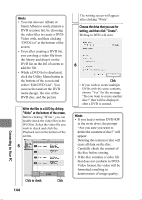
Notes • If you load a written DVD-RW into the write drive, the dialog "Are you sure you want to delete the content of disc?" will appear. Deleting the content of the disc will erase all data on the disc. Carefully check the contents of the disc beforehand. Choosing "Yes" will display the disc erasure screen. After checking it, click the "OK" button. Once the contents on the disc have been deleted, the disc compartment on the camcorder will open. Close the cover following the message instructions. • If the disc contains a video file that does not conform to DVDVideo format, the video will be reformatted, resulting in deterioration of image quality. • If you click "File" - "Save project" before writing is complete, the operation status can be saved as a project file. You can open this saved project file later to restart the operation from the saved status. • A project file will be saved in the project folder that was designated when images were saved, and the file name will be automatically attached. • If a video recorded on the HDD in this camcorder for extended hours is too long for one disc, cut/ edit the video so that it can be recorded on one disc. See the online instruction manual of ImageMixer 3 for cut-editing of videos. To display the ImageMixer 3 manual, choose "Help", and then "ImageMixer 3 Help (H) F1", while ImageMixer 3 is being executed. Connecting to Your PC 139
-
 1
1 -
2
-
3
-
4
-
5
-
6
-
7
-
8
-
9
-
10
-
11
-
12
-
13
-
14
-
15
-
16
-
17
-
18
-
19
-
20
-
21
-
22
-
23
-
24
-
25
-
26
-
27
-
28
-
29
-
30
-
31
-
32
-
33
-
34
-
35
-
36
-
37
-
38
-
39
-
40
-
41
-
42
-
43
-
44
-
45
-
46
-
47
-
48
-
49
-
50
-
51
-
52
-
53
-
54
-
55
-
56
-
57
-
58
-
59
-
60
-
61
-
62
-
63
-
64
-
65
-
66
-
67
-
68
-
69
-
70
-
71
-
72
-
73
-
74
-
75
-
76
-
77
-
78
-
79
-
80
-
81
-
82
-
83
-
84
-
85
-
86
-
87
-
88
-
89
-
90
-
91
-
92
-
93
-
94
-
95
-
96
-
97
-
98
-
99
-
100
-
101
-
102
-
103
-
104
-
105
-
106
-
107
-
108
-
109
-
110
-
111
-
112
-
113
-
114
-
115
-
116
-
117
-
118
-
119
-
120
-
121
-
122
-
123
-
124
-
125
-
126
-
127
-
128
-
129
-
130
-
131
-
132
-
133
-
 134
134 -
 135
135 -
 136
136 -
 137
137 -
 138
138 -
 139
139 -
 140
140 -
 141
141 -
 142
142 -
 143
143 -
 144
144 -
145
-
146
-
147
-
148
-
149
-
150
-
151
-
152
-
153
-
154
-
155
-
156
-
157
-
158
-
159
-
160
-
161
-
162
-
163
-
164
-
165
-
166
-
167
-
168
-
169
-
170
-
171
-
172
-
173
-
174
-
175
-
176
-
177
-
178
-
179
-
180
-
181
-
182
-
183
-
184
-
185
-
186
-
187
-
188
-
189
-
190
-
191
 |
 |
