Hitachi NV65AH Instruction Manual - Page 14
Adjusting The Nailing Depth, Changing The Exhaust, Direction, Cutting Off The Sheet, Using The Nose - siding nails
 |
UPC - 717709004689
View all Hitachi NV65AH manuals
Add to My Manuals
Save this manual to your list of manuals |
Page 14 highlights
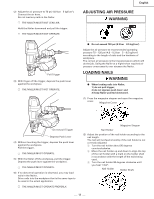
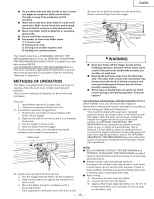
English 4) open the petcock on the air compressor tank to drain any moisture. ADJUSTING THE NAILING DEPTH To assure that each nail penetrates to the same depth, be sure that: 1) the air pressure to the Nailer remains constant (regulator is installed and working properly), and 2) the Nailer is always held firmly against the workpiece. If nails are driven too deep or shallow into the workpiece, adjust the nailing in the following order. 1 DISCONNECT AIR HOSE FROM NAILER. Adjuster CHANGING THE EXHAUST DIRECTION The direction of the exhaust vent can be changed by turning the top cover. Top Cover Exhaust Vent 15 Disconnect air hose CUTTING OFF THE SHEET Tear off the output sheet in the direction of the arrow when using the sheet collated nails. 2 If nails are driven too deep, turn the adjuster to the shallow side. Adjustments are in half-turn increments. Turn Adjuster Too Deep Flush If nails are driven too shallow, turn the adjuster to the deep side. Turn Adjuster Too Shallow Flush USING THE NOSE CAP If you like to protect the surface of workpiece against scratches or markings made by the push lever, attach the accessory nose cap to the push lever. 1 DISCONNECT AIR HOSE FROM NAILER. 2 Put the nose cap to the toe of the push lever. NOTE: ⅷ The nose cap may reduce nailing depth due to its thickness. Re-adjustment of nailing depth is required. 3 Stop turning the adjuster when a suitable position is reached for a nailing test. 4 Connect the air hose. ALWAYS WEAR EYE PROTECTOR. Perform a nailing test. 5 DISCONNECT AIR HOSE FROM NAILER. 6 Choose a suitable position for the adjuster. Push Lever 2 Nose Cap - 14 - 1 Do not connect air hose
-
 1
1 -
2
-
3
-
4
-
5
-
6
-
7
-
8
-
 9
9 -
 10
10 -
 11
11 -
 12
12 -
 13
13 -
 14
14 -
 15
15 -
 16
16 -
 17
17 -
 18
18 -
 19
19 -
20
-
21
-
22
-
23
-
24
-
25
-
26
-
27
-
28
-
29
-
30
-
31
-
32
-
33
-
34
-
35
-
36
-
37
-
38
-
39
-
40
-
41
-
42
-
43
-
44
-
45
-
46
-
47
-
48
-
49
-
50
-
51
-
52
 |
 |