Hitachi VB16Y Instruction Manual - Page 18
Warning
 |
UPC - 717709006256
View all Hitachi VB16Y manuals
Add to My Manuals
Save this manual to your list of manuals |
Page 18 highlights
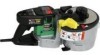
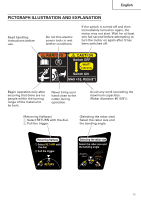
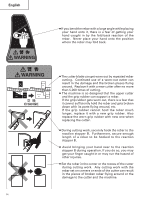
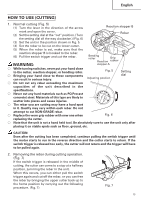
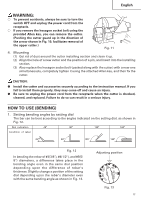
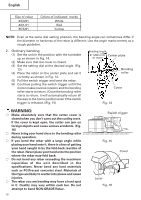
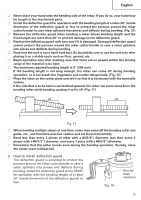
English Size of rebar #3(3/8") #4(1/2") #5(5/8") Colors of indicated marks White Red Yellow NOTE: Even at the same dial setting position, the bending angle can sometimes differ if the diameter or hardness of the rebar is different. Use the angle marks merely as a rough guideline. 2. Ordinary bending (1) Set the unit in the position with the turntable up as shown in Fig. 14. (2) Make sure that the cover is closed. (3) Set the setting dial at the desired angle. (Fig. 13) (4) Place the rebar on the center plate and set it correctly as shown in Fig. 14. (5) Pull the switch trigger and bent the rebar. (6) Continue pulling the switch trigger untill the motor makes reverse rotation and the bending roller starts to return. (Once the bending roller starts to return, it will automatically return all the way to the home position even if the switch trigger is released.)(Fig. 15) Bending length 8" (200 mm) Center plate or more Bending roller Cover Fig. 14 WARNING: ⅜ Make absolutely sure that the cutter cover is closed when you don't carry out the cutting work. If the cover is kept open, the cutter can jam on foreign objects and cause serious accidents. (Fig. 16) ⅜ Never bring your hand close to the bending roller during operation. ⅜ If you bend the rebar with a large angle while placing your hand onto it, there is a fear of getting your hand caught in by the fold-back reaction of the rebar. Never place your hand onto the position where the rebar may fold back. ⅜ Do not bend any rebar exceeding the maximum capacities of the unit described in the specifications. Never bend any hard materials such as PC(Precast concrete) steel. Materials of this type are likely to scatter into pieces and cause injuries. ⅜ The rebar you are bending may have a hard spot in it. Quality may vary within each bar. Do not attempt to bend NON-GRADE Rebar. 18 Switch trigger Fig. 15 Cover Lever Fig. 16
-
 1
1 -
2
-
3
-
4
-
5
-
6
-
7
-
8
-
9
-
10
-
11
-
12
-
 13
13 -
 14
14 -
 15
15 -
 16
16 -
 17
17 -
 18
18 -
 19
19 -
 20
20 -
 21
21 -
 22
22 -
 23
23 -
24
-
25
-
26
-
27
-
28
-
29
-
30
-
31
-
32
-
33
-
34
-
35
-
36
-
37
-
38
-
39
-
40
-
41
-
42
-
43
-
44
-
45
-
46
-
47
-
48
-
49
-
50
-
51
-
52
-
53
-
54
-
55
-
56
-
57
-
58
-
59
-
60
-
61
-
62
-
63
-
64
-
65
-
66
-
67
-
68
 |
 |