Husqvarna GT52XLSi Owners Manual - Page 12
Battery Indicator/charging Plug, See Fig. 15, Battery Indicator Button See Fig. 16, To Transport See
 |
View all Husqvarna GT52XLSi manuals
Add to My Manuals
Save this manual to your list of manuals |
Page 12 highlights
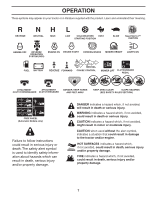
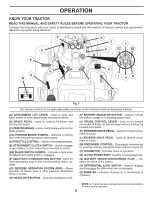
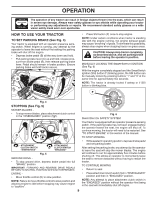
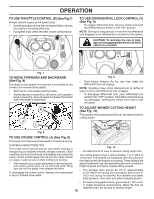
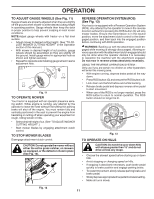
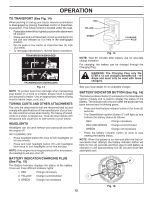
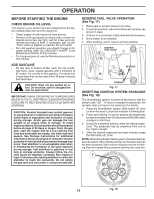
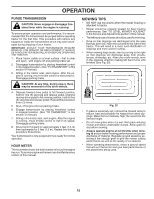
OPERATION TO TRANSPORT (See Fig. 14) When pushing or towing your tractor, ensure transmission is disengaged by placing freewheel control in freewheeling position. Free wheel control is located under the seat. • Raise attachment lift to highest position with attachment lift control. • Raise seat and pull freewheel control up and back into the slot and release so it is held in the disengaged position. • Do not push or tow tractor at more than two (2) mph (3,2 km/h). • To reengage transmission, reverse above procedure. TRANSMISSION ENGAGED RED YELLOW GREEN CHARGING PLUG Fig. 15 NOTE: Wait 30 minutes after battery use for accurate charge indication. For charging, the battery can be charged through the Charging Plug. TRANSMISSION DISENGAGED Fig. 14 NOTE: To protect hood from damage when transporting your tractor on a truck or a trailer, ensure hood is closed and secured to tractor. Use an appropriate means of tying hood to tractor (rope, cord, etc.). TOWING CARTS AND OTHER ATTACHMENTS Tow only the attachments that are recommended by and comply with specifications of the manufacturer of your tractor. Use common sense when towing. Too heavy of a load, while on a slope, is dangerous. Tires can lose traction with the ground and cause you to lose control of your tractor. HEADLIGHTS Headlights can be used without your passcode and with the engine off. WITH ENGINE OFF: • Press headlight button (H) once to turn headlights on for one minute. • Press and hold headlight button (H) until headlights blink twice to turn headlights on for five minutes. NOTE: If the engine is running and shuts off for any reason, the headlights will also shut off. BATTERY INDICATOR/CHARGING PLUG (See Fig. 15) The Battery Indicator displays the status of the battery. There are three different indicator lights: 1. RED Charge necessary 2. YELLOW Charge recommended 3. GREEN Charge not necessary WARNING: The Charging Plug only fits CTEK's 12 volt chargers between 0.8 - 10 Amps and must only be used with these chargers. See your local dealer for an available charger. BATTERY INDICATOR BUTTON (See Fig. 16) The battery indicator button (I) is located on the SmartSwitch Ignition module and is used to display the status of the battery. The indicator will only work after the passcode has been entered and is blinking green. • Press and hold battery indicator button (I) for three (3) seconds. • The SmartSwitch Ignition Button (F) will light up and indicate the battery status as follows: RED Charge necessary RED AND GREEN Charge recommended GREEN Charge not necessary • Press the battery indicator button (I) once to stop viewing the battery status. NOTE: When the battery is too low and after the first unsuccessful start attempt, the battery indicator button will blink for two (2) seconds and then stay lit until battery is charged or until approximately five (5) minutes since last attempted start. F I Fig. 16 12
-
 1
1 -
2
-
3
-
4
-
5
-
6
-
 7
7 -
 8
8 -
 9
9 -
 10
10 -
 11
11 -
 12
12 -
 13
13 -
 14
14 -
 15
15 -
 16
16 -
 17
17 -
18
-
19
-
20
-
21
-
22
-
23
-
24
-
25
-
26
-
27
-
28
-
29
-
30
-
31
-
32
-
33
-
34
-
35
-
36
-
37
-
38
-
39
-
40
-
41
-
42
-
43
-
44
-
45
-
46
-
47
-
48
-
49
-
50
-
51
-
52
-
53
-
54
-
55
-
56
-
57
-
58
-
59
-
60
-
61
-
62
-
63
-
64
-
65
-
66
-
67
-
68
-
69
-
70
-
71
-
72
 |
 |
