IBM 88632SU User Manual - Page 42
Installing, hot-swap, drive
 |
View all IBM 88632SU manuals
Add to My Manuals
Save this manual to your list of manuals |
Page 42 highlights
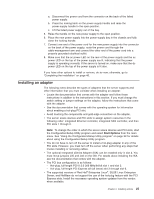
If you have other options to install or remove, do so now; otherwise, go to "Completing the installation" on page 46. Installing a hot-swap hard disk drive The following notes describe the types of hard disk drives that the server supports and other information that you must consider when installing a hard disk drive: v The server supports up to six 1-inch (26 mm) slim-high, 2.5-inch, hot-swap hard disk drives in the standard hot-swap bays. v The hot-swap bays are arranged horizontally in the standard hard disk drive cage; the server scans the hard disk drives and assigns drive IDs in the following order: 0 through 2 then, 4 through 6. v For a list of supported options for the server, see http://www.ibm.com/servers/ eserver/serverproven/compat/us/. v Inspect the drive tray for signs of damage. v Make sure that the drive is correctly installed in the tray. v If a RAID controller is installed in the server, see the documentation that comes with the controller for instructions for installing a hard disk drive. v All hot-swap drives in the server should have the same throughput speed rating; mixing speed ratings might cause all drives to operate at the lower throughput speed. v To minimize the possibility of damage to the hard disk drives when you are installing the server in a rack configuration, install the server in the rack before installing the hard disk drives. v You do not have to turn off the server to install hot-swap drives in the hot-swap drive bays. However, you must turn off the server when performing any steps that involve installing or removing cables. v Some filler panels come with a slim filler. v The ID for each hot-swap hard disk drive is printed on the bezel. The following illustration shows how to install a hot-swap hard disk drive. Filler panel Drive-tray assembly xSerier 365 Drive handle (in open position) To install a hot-swap hard disk drive, complete the following steps: 30 IBM System x3850 Type 8864: User's Guide
-
 1
1 -
2
-
3
-
4
-
5
-
6
-
7
-
8
-
9
-
10
-
11
-
12
-
13
-
14
-
15
-
16
-
17
-
18
-
19
-
20
-
21
-
22
-
23
-
24
-
25
-
26
-
27
-
28
-
29
-
30
-
31
-
32
-
33
-
34
-
35
-
36
-
 37
37 -
 38
38 -
 39
39 -
 40
40 -
 41
41 -
 42
42 -
 43
43 -
 44
44 -
 45
45 -
 46
46 -
 47
47 -
48
-
49
-
50
-
51
-
52
-
53
-
54
-
55
-
56
-
57
-
58
-
59
-
60
-
61
-
62
-
63
-
64
-
65
-
66
-
67
-
68
-
69
-
70
-
71
-
72
-
73
-
74
-
75
-
76
-
77
-
78
-
79
-
80
-
81
-
82
-
83
-
84
-
85
-
86
-
87
-
88
-
89
-
90
-
91
-
92
-
93
-
94
-
95
-
96
-
97
-
98
-
99
-
100
 |
 |
