IBM HS20 User Guide
IBM HS20 - BladeCenter - 8832 Manual
 |
UPC - 087944983033
View all IBM HS20 manuals
Add to My Manuals
Save this manual to your list of manuals |
IBM HS20 manual content summary:
- IBM HS20 | User Guide - Page 1
BladeCenter HS20 Type 8832 Installation and User's Guide Install options: • Drives • Microprocessors • Storage expansion unit • Memory • I/O expansion Welcome. . . Thank you for buying an IBM server. Your server is based on Enterprise X-Architecture, and it features superior performance, - IBM HS20 | User Guide - Page 2
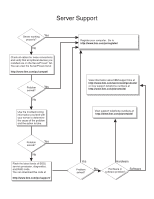
IBM support line at http://www.ibm.com/services/sl/products/ or view support telephone numbers at http://www.ibm.com/planetwide/ View support telephone numbers at http://www.ibm.com/planetwide/ Problem Yes solved? No Flash the latest levels of BIOS, service processor, diagnostics, and RAID - IBM HS20 | User Guide - Page 3
ERserver BladeCenter HS20 Type 8832 Installation and User's Guide - IBM HS20 | User Guide - Page 4
Note: Before using this information and the product it supports, read the general information in Appendix B, "IBM Statement of Limited Warranty Z125-4753-07 11/2002," on page 71 and Appendix C, Restricted Rights - Use, duplication or disclosure restricted by GSA ADP Schedule Contract with IBM Corp. - IBM HS20 | User Guide - Page 5
expansion card 30 Installing an optional expansion unit 31 Replacing the battery 33 Completing the installation 35 Installing the blade server bezel assembly 36 Closing the blade server cover 36 Installing the blade server in the BladeCenter unit 37 Updating your blade server configuration - IBM HS20 | User Guide - Page 6
utility program 48 Firmware updates 49 Configuring the Gigabit Ethernet controllers 51 Blade server Ethernet controller enumeration 51 Configuring an IDE RAID 52 Creating an IDE RAID array configuration 52 Deleting an IDE RAID array configuration 54 Chapter 5. Installing the operating system - IBM HS20 | User Guide - Page 7
United Kingdom telecommunications safety requirement 90 European Union EMC Directive conformance statement 90 Taiwanese Class A warning statement 91 Chinese Class A warning statement 91 Japanese Voluntary Control Council for Interference (VCCI) statement . . . 91 Index 93 Contents v - IBM HS20 | User Guide - Page 8
vi BladeCenter HS20 Type 8832: Installation and User's Guide - IBM HS20 | User Guide - Page 9
lue turvaohjeet kohdasta Safety Information. Avant d'installer ce produit, lisez les consignes de sécurité. Vor der Installation dieses Produkts die Sicherheitshinweise lesen. Prima di produktet. Antes de instalar este produto, leia as Informações sobre Segurança. © Copyright IBM Corp. 2004 vii - IBM HS20 | User Guide - Page 10
statement 1. Be sure to read all caution and danger statements in this documentation before performing the instructions. Read any additional safety information that comes with your server or optional device before you install the device. viii BladeCenter HS20 Type 8832: Installation and User's Guide - IBM HS20 | User Guide - Page 11
of fire, water, or structural damage. v Disconnect the attached power cords, telecommunications systems, networks, and modems before you open the device covers, unless instructed otherwise in the installation and configuration procedures. v Connect and disconnect cables as described in the following - IBM HS20 | User Guide - Page 12
installed, note the following: v Do not remove the covers. Removing the covers of the laser product could result in exposure to hazardous laser radiation. There are no serviceable parts 1 Luokan 1 Laserlaite Appareil A` Laser de Classe 1 x BladeCenter HS20 Type 8832: Installation and User's Guide - IBM HS20 | User Guide - Page 13
(39.7 lb) ≥ 32 kg (70.5 lb) CAUTION: Use safe practices when lifting. Statement 5: ≥ 55 kg (121.2 lb) CAUTION: The power control button on the device and the power switch on the power supply do not turn off the electrical current supplied to the device. The device also might have more than one - IBM HS20 | User Guide - Page 14
information that is provided with your device for electrical specifications. Statement 21: CAUTION: Hazardous energy is present when the blade is connected to the power source. Always replace the blade cover before installing the blade. xii BladeCenter HS20 Type 8832: Installation and User's Guide - IBM HS20 | User Guide - Page 15
troubleshooting of the blade server Packaged with the Installation and User's Guide are software CDs that help you to configure hardware, install device drivers, and install the operating system. To download the latest device drivers, go to the IBM Support Web site at http://www.ibm.com/pc/support - IBM HS20 | User Guide - Page 16
server in the BladeCenter unit, write identifying information on a label and place the label on the BladeCenter unit bezel. The following illustration shows the placement of the label, just below the blade server, on the BladeCenter unit. 2 BladeCenter HS20 Type 8832: Installation and User's Guide - IBM HS20 | User Guide - Page 17
your language in the Safety Information document. v BladeCenter HS20 Type 8832 Hardware Maintenance Manual and Troubleshooting Guide This document contains information to help you solve BladeCenter HS20 problems yourself, and it contains information for service technicians. Chapter 1. Introduction 3 - IBM HS20 | User Guide - Page 18
Maintenance Manual and Troubleshooting Guide This document contains information to help you solve BladeCenter T problems yourself, and information for service technicians. v BladeCenter Type 8677 Rack Installation Instructions This document contains instructions for installing the BladeCenter unit - IBM HS20 | User Guide - Page 19
features and specifications of the BladeCenter HS20 Type 8832 blade server operating in a non-NEBS/ETSI environment. Note: Power, cooling, removable-media drives, external ports, and advanced system management are provided by the IBM BladeCenter Type Eserver 8677 unit and BladeCenter T Types - IBM HS20 | User Guide - Page 20
and specifications of the BladeCenter HS20 Type 8832 blade server operating in a NEBS/ETSI environment. Note: Power, cooling, removable-media drives, external ports, and advanced system management are provided by the IBM BladeCenter T Type Eserver 8720 unit. Microprocessor: Supports up - IBM HS20 | User Guide - Page 21
and software requirements The IBM BladeCenter and BladeCenter T Documentation CDs require the following minimum hardware and software: v Microsoft® Windows® NT 4.0 (with Service Pack 3 or later), Windows 98, or Windows 2000, or Red Hat Linux. v 100 MHz microprocessor. v 32 MB of RAM. v Adobe Acrobat - IBM HS20 | User Guide - Page 22
IBM technologies to build powerful, scalable, reliable Intel-processor-based servers. Enterprise X-Architecture technology includes features such as light path diagnostics, Predictive Failure Analysis (PFA), and Advanced System Management. 8 BladeCenter HS20 Type 8832: Installation and User's Guide - IBM HS20 | User Guide - Page 23
of data on the Ethernet local area network (LAN). The controllers support Wake on LAN® technology. v I/O expansion The blade server comes with two connectors on the system board for an optional I/O expansion card, such as the BladeCenter Fibre Channel Expansion Card, for adding more network - IBM HS20 | User Guide - Page 24
cache v ECC memory v Failover Ethernet support v Hot-swap drives on optional small computer system interface (SCSI) storage expansion unit v Light path diagnostics feature v Power-on self-test (POST) v Predictive Failure Analysis (PFA) alerts v Processor serial number access v Service processor that - IBM HS20 | User Guide - Page 25
and users v Reduced service and support costs For more information about IBM Director, see the documentation on the IBM Director CD that comes with the BladeCenter unit or go to the IBM xSeries Systems Management Web page at http://www.ibm.com/servers/eserver/xseries/systems_management/xseries_sm - IBM HS20 | User Guide - Page 26
unless an expansion option is connected to it. System-board LED locations The following illustration shows the LEDs on the system board for the BladeCenter HS20 blade server. Refer to this illustration when solving problems with the blade servers. You have to remove the blade server from the - IBM HS20 | User Guide - Page 27
(CR28) DIMM 1 error LED (CR3) Processor 1 error LED (CR12) DIMM 2 error LED (CR5) DIMM 3 error LED (CR4) DIMM 4 error LED (CR6) Switches and jumpers The following illustration shows the switches and jumpers on the system board for the blade server. Switch block (SW2) BIOS code page jumper (J12 - IBM HS20 | User Guide - Page 28
power-on password. Jumpers When the BIOS code page jumper (J12) is moved from pins 1 and 2 to pins 2 and 3, you can start the blade server from a backup BIOS page. The default position is pins 1 and 2. See the blade server Hardware Maintenance Manual and Troubleshooting Guide on the IBM BladeCenter - IBM HS20 | User Guide - Page 29
power-on LED states. v If a power failure occurs, the BladeCenter unit and then the blade server can start automatically when power is restored (if the blade server is configured through the management module to do so). v You can turn on the blade server remotely by means of the service processor - IBM HS20 | User Guide - Page 30
, wait at least 30 seconds for its hard disk drives or flash drives to stop spinning before you remove the blade server from the BladeCenter unit. Controls and LEDs This section describes the controls and LEDs on your BladeCenter HS20 blade server. Notes: 1. The illustrations in this document might - IBM HS20 | User Guide - Page 31
service processor on the blade server is handshaking with the management module. v Flashing slowly - The blade server has power but is not turned on. v Lit continuously - The blade server has power and is turned on. Activity LED: When this green LED is lit, it indicates that there is hard disk drive - IBM HS20 | User Guide - Page 32
-module Web interface or the IBM Director console. Blade-error LED: When this amber LED is lit, it indicates that a system error has occurred in the blade server. The blade-error LED will turn off only after the error is corrected. 18 BladeCenter HS20 Type 8832: Installation and User's Guide - IBM HS20 | User Guide - Page 33
hot-swap components.) See the instructions for removing or installing a specific hot-swap component for any additional procedures that you might have to perform before you remove or install the component. v For a list of supported options for your blade server, go to http://www.ibm.com/pc/us/compat - IBM HS20 | User Guide - Page 34
blade server from the BladeCenter unit. Notes: 1. The illustrations in this document might differ slightly from your hardware. 2. Unless otherwise stated, references to the BladeCenter unit also apply to the BladeCenter T unit. Type 8677 20 BladeCenter HS20 Type 8832: Installation and User's Guide - IBM HS20 | User Guide - Page 35
Carefully set the bezel assembly aside in a safe place. (See the BladeCenter T Types 8720 and 8730 Installation and User's Guide for detailed instructions about removing the bezel assembly.) 3. Pull the blade server out of the bay. Spring-loaded doors farther back in the bay move into place to cover - IBM HS20 | User Guide - Page 36
. 4. Lay the cover flat, or lift it from the blade server. Statement 21: CAUTION: Hazardous energy is present when the blade server is connected to the power source. Always replace the blade cover before installing the blade server. 22 BladeCenter HS20 Type 8832: Installation and User's Guide - IBM HS20 | User Guide - Page 37
. If your blade server is equipped with one IDE hard disk drive, you can install an additional IDE hard disk drive. These two IDE hard disk drives can be used to implement and manage redundant array of independent disks (RAID) level-1 under both the Linux and Microsoft Windows 2000 operating systems - IBM HS20 | User Guide - Page 38
card. The I/O expansion card occupies the same area as the second IDE drive. Complete the following steps to install a 2.5-inch IDE drive: 1. Read the safety information beginning on page vii and "Installation guidelines" on page 19. 2. Shut down the operating system, turn off the blade server - IBM HS20 | User Guide - Page 39
. The drive clicks into place. 10. If you have other options to install or remove, do so now; otherwise, go to "Completing the installation" on page 35. Installing memory modules The following notes describe the types of dual inline memory modules (DIMMs) that your blade server supports and other - IBM HS20 | User Guide - Page 40
page vii and "Installation guidelines" on page 19. 2. Shut down the operating system, turn off the blade server, and remove the blade server from the BladeCenter unit (see "Removing the blade server from the BladeCenter unit" on page 20 for instructions). 3. Carefully lay the blade server on a flat - IBM HS20 | User Guide - Page 41
can distribute the processing load between the microprocessors. If your blade server comes with one microprocessor, you can install a second microprocessor. To use SMP, obtain an SMP-capable operating system. For a list of supported operating systems and other options, go to http://www.ibm.com/pc/us - IBM HS20 | User Guide - Page 42
page vii and "Installation guidelines" on page 19. 2. Shut down the operating system, turn off the blade server, and remove the blade server from the BladeCenter unit (see "Removing the blade server from the BladeCenter unit" on page 20 for instructions). 3. Carefully lay the blade server on a flat - IBM HS20 | User Guide - Page 43
d. Center the Carefully close the lever to secure the microprocessor in the socket. 9. Install a heat sink on the microprocessor: Attention: v Do not set down on the microprocessor or heat sink becomes contaminated, contact your service technician. Heat sink Thermal grease a. Remove the plastic - IBM HS20 | User Guide - Page 44
support the I/O expansion card network-interface type. For example, if you add an Ethernet expansion card to your blade server, the modules in I/O module bays 3 and 4 on the BladeCenter unit must both be compatible with the Ethernet expansion card. All other I/O expansion cards that are installed - IBM HS20 | User Guide - Page 45
device driver and configuration information to complete the installation of the I/O expansion card, see the documentation that comes with the option. Some documentation might also be on the IBM BladeCenter Documentation CD or the IBM BladeCenter T Documentation CD that comes with the blade server - IBM HS20 | User Guide - Page 46
server. PCI I/O Expansion Unit option Cover pins Terminator Blade expansion connector For complete information about installing and operating these expansion units, see the IBM documentation that comes with the optional expansion units. 32 BladeCenter HS20 Type 8832: Installation and User's Guide - IBM HS20 | User Guide - Page 47
handling and installation instructions supplied with the battery. 3. Turn off the blade server and remove it from the BladeCenter unit (see "Removing the blade server from the BladeCenter unit" on page 20 for instructions). 4. Open the blade server cover (see "Opening the blade server cover" on - IBM HS20 | User Guide - Page 48
insert it into the socket, under the battery clip. b. As you slide it under the battery clip, press the battery down into the socket. 34 BladeCenter HS20 Type 8832: Installation and User's Guide - IBM HS20 | User Guide - Page 49
blade server into the BladeCenter unit (see "Installing the blade server in the BladeCenter unit" on page 37). 4. Turn on the blade server (see "Turning on the blade server" on page 15). 5. For certain options, run the blade server Configuration/Setup Utility program (see "Updating your blade server - IBM HS20 | User Guide - Page 50
into place. Closing the blade server cover Important: The blade server cannot be inserted into the BladeCenter unit until the cover is installed and closed or an expansion unit is installed. Do not attempt to override this protection. 36 BladeCenter HS20 Type 8832: Installation and User's Guide - IBM HS20 | User Guide - Page 51
or parts inside the blade server. 4. Pivot the cover to the closed position, as shown in the illustration, until it clicks into place. Installing the blade server in the BladeCenter unit The following illustration shows how to install the blade server into the BladeCenter unit. Type 8677 Chapter - IBM HS20 | User Guide - Page 52
or memory, in the blade server. 3. Select the bay for the blade server. Notes: a. If the blade server has an expansion unit installed on it, the blade server and expansion option require two adjacent bays. b. When any blade server or option is in either blade bay 7 through 14 (in the BladeCenter - IBM HS20 | User Guide - Page 53
on the front of the blade server closed. 7. Turn on the blade server (see "Turning on the blade server" on page 15 for instructions). 8. Make sure that the power-on LED on the blade control panel is lit continuously, indicating that the blade server is receiving power and is turned on. 9. (Optional - IBM HS20 | User Guide - Page 54
T unit after you have finished installing the blade servers (see the BladeCenter T Types 8720 and 8730 Installation and User's Guide for detailed instructions about reinstalling the bezel assembly). However, if you installed an option such as a PCI I/O Expansion Unit with PCI adapters that require - IBM HS20 | User Guide - Page 55
the network through the Ethernet-compatible switch modules on the BladeCenter unit. Network signals to and from the blade server or any I/O expansion cards are automatically routed to a same-network-interface switch module through circuitry in the BladeCenter unit. Chapter 3. Installing options 41 - IBM HS20 | User Guide - Page 56
42 BladeCenter HS20 Type 8832: Installation and User's Guide - IBM HS20 | User Guide - Page 57
the IBM Director products, depending on your blade server, see the IBM BladeCenter Planning and Installation Guide or the Eserver IBM BladeCenter T Planning and Installation Guide. You can obtain the Eserver planning guides from http://www.ibm.com/pc/support/. Using the Configuration/Setup - IBM HS20 | User Guide - Page 58
in the start options take effect when you start your blade server. Note: To set the startup sequence, which is the order in which the blade server checks devices to find a boot record, you must use the management-module Web interface. 44 BladeCenter HS20 Type 8832: Installation and User's Guide - IBM HS20 | User Guide - Page 59
Settings Select this choice to manually enable a pair of memory DIMMs. If a memory error is detected during POST or memory configuration, the blade server automatically disables the failing memory pair and continues operating with reduced memory capacity. After the problem is corrected, you must - IBM HS20 | User Guide - Page 60
for your IBM blade server. The ServerGuide program detects the blade server model and hardware options that are installed and uses that information during setup to configure the hardware. The ServerGuide program simplifies operating-system installations by providing updated device drivers and, in - IBM HS20 | User Guide - Page 61
use the CD to configure any supported IBM blade server model. The setup program provides a list of tasks that are required to set up your blade server model. On a blade server with an optional SCSI storage expansion unit, you can run the SCSI RAID configuration program to create logical drives. Note - IBM HS20 | User Guide - Page 62
-system installation instructions from the IBM Support Web page: 1. Go to http://www.ibm.com/pc/support/. 2. In the Download section, click Downloads & drivers. 3. On the "Downloads and drivers" page, in the Brand field, select Servers. 4. In the Family field, select BladeCenter HS20. 5. Click - IBM HS20 | User Guide - Page 63
use to install these firmware updates. Important: To avoid problems and to maintain proper system performance, always make sure that the blade server BIOS, service processor, and diagnostic firmware levels are consistent for all blade servers within the BladeCenter unit. Update Firmware diskette - IBM HS20 | User Guide - Page 64
latest firmware for your blade server service processor from the IBM Support Web site at http://www.ibm.com/pc/support/. Use the management-module Web interface to flash the service processor. The Web interface is described in the IBM BladeCenter Type 8677 Installation and Eserver User's Guide - IBM HS20 | User Guide - Page 65
drivers and information about configuring your Ethernet controllers, see the Broadcom NetXtreme Gigabit Ethernet Software CD that comes with your blade server. For updated information about configuring the controllers, go to the IBM Support Web site at http://www.ibm.com/pc/support/. Your Ethernet - IBM HS20 | User Guide - Page 66
information about IDE hard disk drive RAID configuration. The latest version of the MegaRAID IDEal Software RAID Utility program and documentation are available for download from the IBM Support Web site at http://www.ibm.com/pc/support/. 52 BladeCenter HS20 Type 8832: Installation and User's Guide - IBM HS20 | User Guide - Page 67
that two IDE hard disk drives are installed in the blade server (see the "Installing an IDE drive option" on page 23 for instructions). Important: To avoid potential performance and reliability problems when configuring or replacing hard disk drives in a mirrored RAID configuration, make sure that - IBM HS20 | User Guide - Page 68
Set the IDE RAID feature to Disabled. e. Select Save Settings from the Configuration/Setup Utility main menu. f. Exit the Configuration/Setup Utility program, making sure that you save the settings. The blade server restarts automatically. 54 BladeCenter HS20 Type 8832: Installation and User's Guide - IBM HS20 | User Guide - Page 69
installation instructions for Windows 2000 on the IBM Support Web page. Important: 1. The operating system in the blade server must provide USB support for the blade server to recognize and use the keyboard, mouse, CD-ROM drive, and diskette drive (or external diskette drive on the BladeCenter - IBM HS20 | User Guide - Page 70
Advanced Server 2.1 on a blade server. Follow the instructions in the documentation that comes with the RDM program to install a supported Microsoft Windows operating system. Note: To determine if the operating system you plan to install supports RDM, go to http://www.ibm.com/pc/ww/eserver/xseries - IBM HS20 | User Guide - Page 71
and correct the problem using the information in this section, see the blade server Hardware Maintenance Manual and Troubleshooting Guide on the IBM BladeCenter Documentation CD or the IBM BladeCenter T Documentation CD that comes with your blade server, and the "Server Support" flowchart in the - IBM HS20 | User Guide - Page 72
the blade server. If the problem remains, call for service. 1. Make sure that the system memory modules are installed correctly. 2. Turn off the blade server; then, restart the blade server. If the problem remains, call for service. 58 BladeCenter HS20 Type 8832: Installation and User's Guide - IBM HS20 | User Guide - Page 73
Manual and Troubleshooting Guide on the IBM BladeCenter Documentation CD or the IBM BladeCenter T Documentation CD that comes with the blade server for more information about the POST error messages. Table 3. Abbreviated list of POST error messages POST message Failing device or problem - IBM HS20 | User Guide - Page 74
server. If the operating installed; the option is not system is supported, either there is no logical drive defined (SCSI RAID systems) available. or the ServerGuide System Partition is not present. Run the ServerGuide program and make sure that setup is complete. 60 BladeCenter HS20 Type 8832 - IBM HS20 | User Guide - Page 75
symptoms and suggested solutions. See the blade server Hardware Maintenance Manual and Troubleshooting Guide on the IBM BladeCenter Documentation CD or the IBM BladeCenter T Documentation CD for more detailed troubleshooting charts. If you cannot find the problem in these charts, run the diagnostic - IBM HS20 | User Guide - Page 76
the problem remains, call for service. If the wrong language is displayed, update the firmware or operating system with the correct language in the blade server that has ownership of the monitor. If the problem remains, call for service. 62 BladeCenter HS20 Type 8832: Installation and User's Guide - IBM HS20 | User Guide - Page 77
8730 Hardware Maintenance Manual and Troubleshooting Guide on the IBM BladeCenter T Documentation CD for details. v The settings in the switch module are correct for the blade server (settings in the switch module are blade server specific). If you installed an optional I/O expansion card, make sure - IBM HS20 | User Guide - Page 78
turns on, troubleshoot the option (see the documentation that comes with the option for information). 3. Try another blade server in the blade bay; if it works, replace the faulty blade server. 4. If the problem remains, call for service. 64 BladeCenter HS20 Type 8832: Installation and User's Guide - IBM HS20 | User Guide - Page 79
Service processor problems Symptom Suggested action The service processor reports Shut down the operating system and turn off the blade server; then, remove the a general monitor failure. blade server from the BladeCenter unit, wait for 30 seconds, reinstall the blade server in the BladeCenter - IBM HS20 | User Guide - Page 80
(CR111) Reserved (SW3) Light path diagnostics button (SW4) IDE bus 1 error LED (CR14) IDE bus 2 error LED (CR28) DIMM 1 error LED (CR3) Processor 1 error LED (CR12) DIMM 2 error LED (CR5) DIMM 3 error LED (CR4) DIMM 4 error LED (CR6) 66 BladeCenter HS20 Type 8832: Installation and User's Guide - IBM HS20 | User Guide - Page 81
Processor x error The microprocessor has failed. If the problem remains, have the blade server serviced. Make sure that the microprocessor that is indicated by the lit LED is installed correctly (see "Installing an additional microprocessor" on page 27 for installation instructions). Temperature - IBM HS20 | User Guide - Page 82
68 BladeCenter HS20 Type 8832: Installation and User's Guide - IBM HS20 | User Guide - Page 83
Hardware Maintenance Manual and Troubleshooting Guide on either the IBM BladeCenter Documentation CD, the IBM BladeCenter T Documentation CD, or in the IntelliStation Hardware Maintenance Manual at the IBM Support Web site. v Go to the IBM Support Web site at http://www.ibm.com/pc/support/ to check - IBM HS20 | User Guide - Page 84
U.S. and Canada, call 1-800-IBM-SERV (1-800-426-7378). In the U.S. and Canada, hardware service and support is available 24 hours a day, 7 days a week. In the U.K., these services are available Monday through Friday, from 9 a.m. to 6 p.m. 70 BladeCenter HS20 Type 8832: Installation and User's Guide - IBM HS20 | User Guide - Page 85
defects in materials and workmanship and 2) conforms to IBM's Official Published Specifications ("Specifications") which are available on request. The warranty period for the Machine starts on the original Date of Installation and is specified in Part 3 Warranty Information. The date on your invoice - IBM HS20 | User Guide - Page 86
software updates from an IBM Internet Web site or from other electronic media, and following the instructions that IBM provides. If your problem can be resolved with a Customer Replaceable Unit ("CRU") (e.g., keyboard, mouse, speaker, memory, hard disk drive and other easily replaceable parts), IBM - IBM HS20 | User Guide - Page 87
all features, parts, options, alterations, and attachments not under warranty service. You also agree to: 1. ensure that the Machine is free of any legal obligations or restrictions that prevent its exchange; 2. obtain authorization from the owner to have IBM or your reseller service a Machine that - IBM HS20 | User Guide - Page 88
THESE WARRANTIES GIVE YOU SPECIFIC LEGAL RIGHTS AND the Machine. Part 2 - Country Service: The following is added to this Section: To obtain warranty service from IBM in Canada or the United States, call 1-800-IBM-SERV (426-7378). CANADA 74 BladeCenter HS20 Type 8832: Installation and User's Guide - IBM HS20 | User Guide - Page 89
1974 or other similar legislation, IBM's liability is limited to the repair or replacement of the goods or the supply of equivalent goods. Where that in accordance with the Arbitration Rules of Singapore International Arbitration Center ("SIAC Rules") then in effect. The arbitration award shall - IBM HS20 | User Guide - Page 90
property will be limited to that caused by IBM's negligence; and 2. as to any other actual damage arising in any situation involving nonperformance by IBM pursuant to, or in any way related to accordance with the principle of mutual trust. 76 BladeCenter HS20 Type 8832: Installation and User's Guide - IBM HS20 | User Guide - Page 91
Consumer Guarantees Act 1993 will not apply in respect of any goods which IBM provides, if you require the goods for the purposes of a business as chairman shall be filled by the president of the Philippine Dispute Resolution Center, Inc. Other vacancies shall be filled by the respective nominating - IBM HS20 | User Guide - Page 92
Statement of Limited Warranty apply to Machines purchased from IBM or an IBM reseller. How to Obtain Warranty Service: If you purchase a Machine in Austria, Belgium, , Tajikistan, Turkmenistan, Ukraine, Uzbekistan, and FR Yugoslavia; 2) 78 BladeCenter HS20 Type 8832: Installation and User's Guide - IBM HS20 | User Guide - Page 93
. Arbitration: The following is added under this heading: In Albania, Armenia, Azerbaijan, Belarus, Bosnia-Herzegovina, Bulgaria, Croatia, Georgia, Hungary, Kazakhstan, Kyrgyzstan, FYR Macedonia, Moldova, Appendix B. IBM Statement of Limited Warranty Z125-4753-07 11/2002 79 - IBM HS20 | User Guide - Page 94
of such obligations (if IBM is at fault) or of such cause, for a maximum amount equal to the charges you paid for the Machine. For purposes of this item, the term "Machine" includes Machine Code and Licensed Internal Code ("LIC"). 80 BladeCenter HS20 Type 8832: Installation and User's Guide - IBM HS20 | User Guide - Page 95
replaces the first sentence of the first paragraph of this section: The warranty for an IBM Machine covers the functionality of the Machine for its normal use and the Machine's conformity to its Specifications. The following paragraphs are added to this section: The warranty period for Machines is - IBM HS20 | User Guide - Page 96
warranty for an IBM Machine covers the functionality of the Machine for its normal use and the Machine's conformity to its Specifications. The following apply. What IBM Will Do to Correct Problems: The following is added to this section: 82 BladeCenter HS20 Type 8832: Installation and User's Guide - IBM HS20 | User Guide - Page 97
of Services Act 1980 are hereby excluded. Limitation of Liability: The following replaces the terms of this section in its entirety: For the purposes of this section, a "Default" means any act, statement, omission, or negligence on the part of IBM in connection with, or in relation to, the subject - IBM HS20 | User Guide - Page 98
damage to your tangible property resulting from the negligence of IBM. 3. IBM's entire liability for actual damages for any one Default will not in any event, except as provided in items 1 and 2 above, exceed the greater of 1) Pounds 84 BladeCenter HS20 Type 8832: Installation and User's Guide - IBM HS20 | User Guide - Page 99
Administrative Region of China. Machine - IBM BladeCenter HS20 Type 8832 ERserver Country or Region of Purchase Warranty Period Type of Warranty Service* Worldwide Japan 3 years 2 Parts - 3 years, labor - 1 year 1, 2 * See "Types of Warranty Service" for the legend and explanations of - IBM HS20 | User Guide - Page 100
installation and verification of the Machine. * This type of service is called ThinkPad® EasyServ or EasyServ in some countries. The IBM Machine Warranty World Wide Web site at http://www.ibm.com/servers/support Kingdom -- 01475-555-055 86 BladeCenter HS20 Type 8832: Installation and User's Guide - IBM HS20 | User Guide - Page 101
operation of any non-IBM product, program, or service. IBM may have patents to: IBM Director of Licensing IBM Corporation North Castle Drive Armonk, part of the materials for this IBM product, and use of those Web sites is at your own risk. IBM may use or distribute any of the information you supply - IBM HS20 | User Guide - Page 102
Alert on LAN BladeCenter C2T Interconnect Chipkill EtherJet e-business logo Eserver FlashCopy IBM IBM (logo) IntelliStation NetBAY Netfinity NetView OS/2 WARP Predictive Failure Analysis PS/2 ServeRAID ServerGuide ServerProven TechConnect ThinkPad Tivoli Tivoli Enterprise Update Connector Wake on - IBM HS20 | User Guide - Page 103
hard disk drives and population of all hard disk drive bays with the largest currently supported drives available from IBM. Maximum memory may require replacement of the standard memory with an optional memory module. IBM makes no representation or warranties regarding non-IBM products and services - IBM HS20 | User Guide - Page 104
Part 15 installed and used in accordance with the instruction manual IBM option cards. This product has been tested and found to comply with the limits for Class A Information Technology Equipment according to CISPR 22/European Standard EN 90 BladeCenter HS20 Type 8832: Installation and User's Guide - IBM HS20 | User Guide - Page 105
55022. The limits for Class A equipment were derived for commercial and industrial environments to provide reasonable protection against interference with licensed communication equipment. Attention: This is a Class A product. In a domestic environment this product may cause radio interference in - IBM HS20 | User Guide - Page 106
92 BladeCenter HS20 Type 8832: Installation and User's Guide - IBM HS20 | User Guide - Page 107
firmware updates 49 forgotten power-on password, bypassing 46 H hardware problems 57 I IBM Director 8, 10 IDE RAID configure an array 52 create an array configuration 52 delete an array configuration 54 installation order memory modules 25 installing bezel assembly 36 I/O expansion card 30 IDE hard - IBM HS20 | User Guide - Page 108
18 location 18 power-on 17 system board 12 Light Path Diagnostics feature 65 Light Path Diagnostics table 66 M major components 11 memory configuration changes 25 problems 61 specifications 5, 6 memory module installing 25 order of installation 25 specifications 5, 6, 9 supported 5, 6, 25 - IBM HS20 | User Guide - Page 109
material heat sink 29 trademarks 88 troubleshooting 57 charts 61 turning off the blade server 15 turning on the blade server 15 U United States electronic emission Class A notice 90 United States FCC Class A notice 90 updating firmware 49 utility Configuration/Setup Utility program 43 PXE boot - IBM HS20 | User Guide - Page 110
96 BladeCenter HS20 Type 8832: Installation and User's Guide - IBM HS20 | User Guide - Page 111
- IBM HS20 | User Guide - Page 112
Part Number: 90P3100 Printed in USA (1P) P/N: 90P3100
-
 1
1 -
 2
2 -
 3
3 -
 4
4 -
 5
5 -
 6
6 -
 7
7 -
8
-
9
-
10
-
11
-
12
-
13
-
14
-
15
-
16
-
17
-
18
-
19
-
20
-
21
-
22
-
23
-
24
-
25
-
26
-
27
-
28
-
29
-
30
-
31
-
32
-
33
-
34
-
35
-
36
-
37
-
38
-
39
-
40
-
41
-
42
-
43
-
44
-
45
-
46
-
47
-
48
-
49
-
50
-
51
-
52
-
53
-
54
-
55
-
56
-
57
-
58
-
59
-
60
-
61
-
62
-
63
-
64
-
65
-
66
-
67
-
68
-
69
-
70
-
71
-
72
-
73
-
74
-
75
-
76
-
77
-
78
-
79
-
80
-
81
-
82
-
83
-
84
-
85
-
86
-
87
-
88
-
89
-
90
-
91
-
92
-
93
-
94
-
95
-
96
-
97
-
98
-
99
-
100
-
101
-
102
-
103
-
104
-
105
-
106
-
107
-
108
-
109
-
110
-
111
-
112
 |
 |
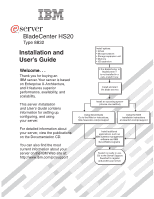
Welcome. . .
Thank you for buying an
IBM server.
This server
contains
information for setting up,
configuring, and using
your server.
For detailed information about
your server, view the publications
on the
You can also find the most
current information about your
server on the IBM Web site at:
Your server is based
on Enterprise X-Architecture,
and it features superior
performance, availability, and
scalability.
Documentation CD.
Installation
Guide
and User’s
Installation and
User’s Guide
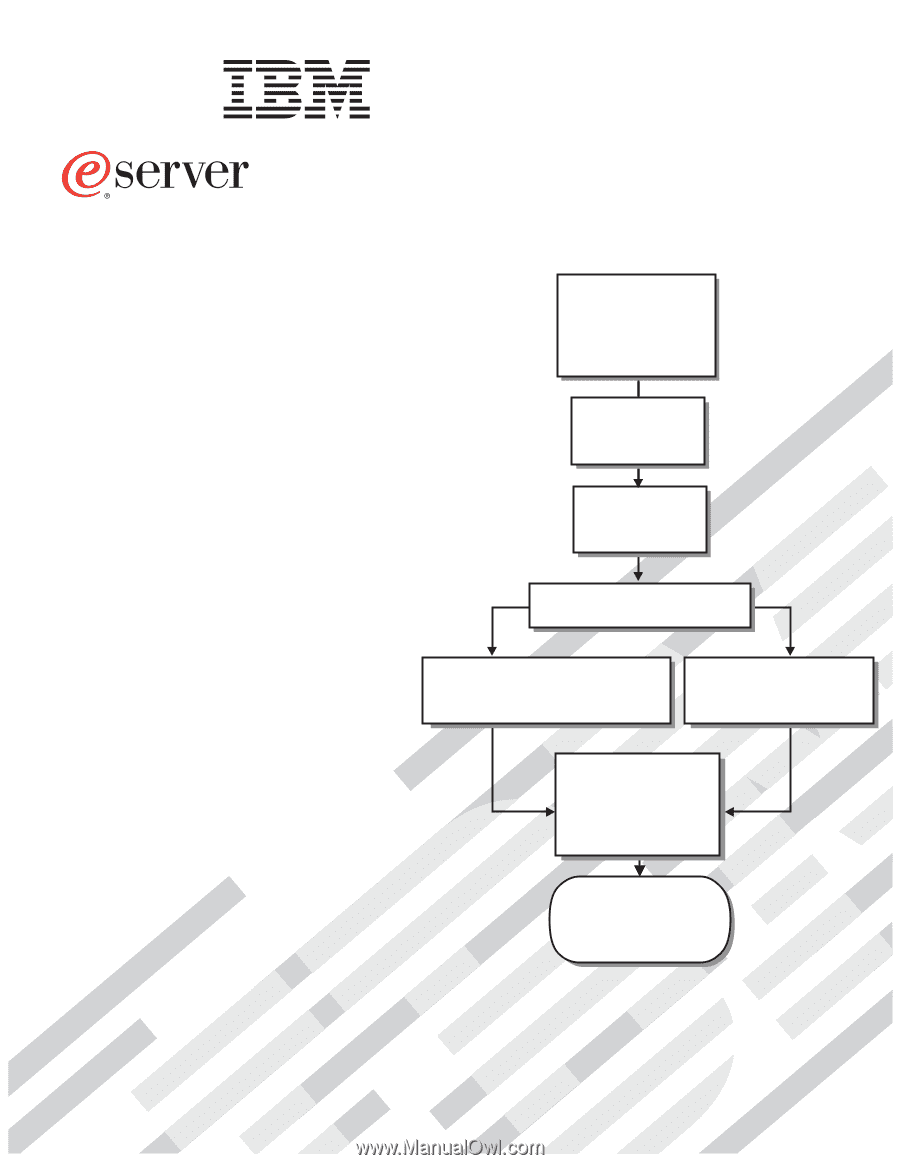
Install and start
the blade servers
Install addtional
applications, such as
IBM systems management
software and IBM
ServeRAID programs
System is ready to use.
Go to the Server Support
flowchart to register
and profile your server.
Install options:
• Drives
• Microprocessors
• Storage expansion unit
• Memory
• I/O expansion
If the BladeCenter or
BladeCenter T
is not installed in a
rack, install it now
BladeCenter HS20
Type 8832
Using ServerGuide
Go to the Web for instructions,
Using the NOS
installation instructions
at www.ibm.com/pc/support
Install an operating system
(choose one method)