IBM LS41 User Guide - Page 40
protective
 |
UPC - 883436021159
View all IBM LS41 manuals
Add to My Manuals
Save this manual to your list of manuals |
Page 40 highlights
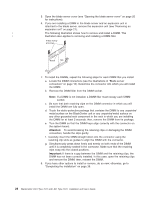
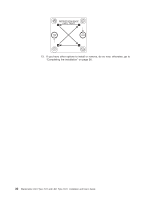
Heat Sink Microprocessor 2 Microprocessor 1 and Heat Sink Bezel assembly To install an additional microprocessor, complete the following steps: 1. Read the safety information beginning on page v and "Installation guidelines" on page 17. 2. Shut down the operating system, turn off the blade server, and remove the blade server from the BladeCenter unit. See "Removing the blade server from the BladeCenter unit" on page 19 for instructions. 3. Carefully lay the blade server on a flat, static-protective surface. 4. Open the blade server cover (see "Opening the blade server cover" on page 20 for instructions). 5. If you are installing a microprocessor in the blade server and an expansion unit is attached to the blade server, remove the expansion unit (see "Removing an expansion unit" on page 21). 6. Locate microprocessor socket one, if a microprocessor is already installed then locate the microprocessor socket two. 7. If you are installing a microprocessor in microprocessor socket two, remove the bezel assembly (see "Removing the bezel assembly" on page 22 for instructions). 8. Loosen the four captured screws that secure the heat-sink filler and then remove the filler from the microprocessor socket. 9. Use your fingers to remove the dust cover from the microprocessor socket. 10. Use your fingers to remove the protective cover from the microprocessor retainer. 11. Install the microprocessor: Microprocessor Alignment notches (both sides) Protective cover Microprocessor retainer Locking lever 28 BladeCenter LS21 Type 7971 and LS41 Type 7972: Installation and User's Guide
-
 1
1 -
2
-
3
-
4
-
5
-
6
-
7
-
8
-
9
-
10
-
11
-
12
-
13
-
14
-
15
-
16
-
17
-
18
-
19
-
20
-
21
-
22
-
23
-
24
-
25
-
26
-
27
-
28
-
29
-
30
-
31
-
32
-
33
-
34
-
 35
35 -
 36
36 -
 37
37 -
 38
38 -
 39
39 -
 40
40 -
 41
41 -
 42
42 -
 43
43 -
 44
44 -
 45
45 -
46
-
47
-
48
-
49
-
50
-
51
-
52
-
53
-
54
-
55
-
56
-
57
-
58
-
59
-
60
-
61
-
62
-
63
-
64
-
65
-
66
-
67
-
68
-
69
-
70
-
71
-
72
-
73
-
74
-
75
-
76
-
77
-
78
-
79
-
80
-
81
-
82
-
83
-
84
 |
 |
