IBM x3755 Installation Guide - Page 25
Do not press the DIMM at one end into the connector; then, press the other
 |
View all IBM x3755 manuals
Add to My Manuals
Save this manual to your list of manuals |
Page 25 highlights
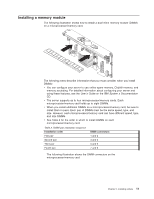
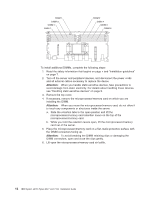
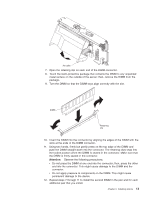
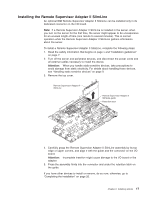
Air baffle 7. Open the retaining clip on each end of the DIMM connector. 8. Touch the static-protective package that contains the DIMM to any unpainted metal surface on the outside of the server; then, remove the DIMM from the package. 9. Turn the DIMM so that the DIMM keys align correctly with the slot. DIMM Retaining clip 10. Insert the DIMM into the connector by aligning the edges of the DIMM with the slots at the ends of the DIMM connector. 11. Using two hands, firmly but gently press on the top edge of the DIMM and push the DIMM straight down into the connector. The retaining clips snap into the locked position when the DIMM is seated in the connector. Make sure that the DIMM is firmly seated in the connector. Attention: Observe the following precautions: v Do not press the DIMM at one end into the connector; then, press the other end into the connector. This might cause damage to the DIMM and the connector. v Do not apply pressure to components on the DIMM. This might cause permanent damage to the device. 12. Repeat steps 7 through 11 to install the second DIMM in the pair and for each additional pair that you install. Chapter 2. Installing options 13
-
 1
1 -
2
-
3
-
4
-
5
-
6
-
7
-
8
-
9
-
10
-
11
-
12
-
13
-
14
-
15
-
16
-
17
-
18
-
19
-
 20
20 -
 21
21 -
 22
22 -
 23
23 -
 24
24 -
 25
25 -
 26
26 -
 27
27 -
 28
28 -
 29
29 -
 30
30 -
31
-
32
-
33
-
34
-
35
-
36
-
37
-
38
-
39
-
40
-
41
-
42
-
43
-
44
-
45
-
46
-
47
-
48
-
49
-
50
-
51
-
52
-
53
-
54
-
55
-
56
-
57
-
58
-
59
-
60
-
61
-
62
-
63
-
64
-
65
-
66
-
67
-
68
-
69
-
70
-
71
-
72
-
73
-
74
-
75
-
76
-
77
-
78
-
79
-
80
-
81
-
82
-
83
-
84
-
85
-
86
-
87
-
88
 |
 |
