IBM x3755 Installation Guide - Page 26
Installing a microprocessor/memory card, the same cache size and type.
 |
View all IBM x3755 manuals
Add to My Manuals
Save this manual to your list of manuals |
Page 26 highlights
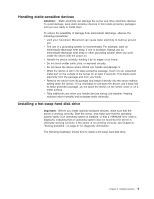
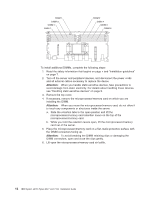
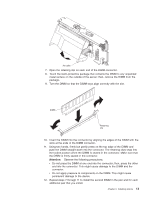
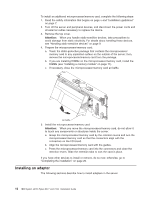
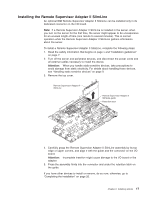
13. Close the microprocessor/memory card air baffle. 14. Install the microprocessor/memory card: a. Grasp the microprocessor/memory card by the retention levers and turn the microprocessor/memory card so that the connectors align with the connectors on the I/O board. b. Align the microprocessor/memory card with the guides. c. Press the microprocessor/memory card into the connectors and close the retention levers. Slide the retention tabs to lock the card in place. If you have other devices to install or remove, do so now; otherwise, go to "Completing the installation" on page 20. Installing a microprocessor/memory card The following notes describe information that you must consider when you install a microprocessor/memory card: v Each microprocessor/memory card comes with one AMD Opteron microprocessor installed and has eight DIMM connectors. v The server supports up to four microprocessor/memory cards with four microprocessors. If you are installing two or more microprocessors, all must be the same cache size and type. v At least three microprocessor/memory cards must be installed to support a HyperTransport adapter. v The server operates at the clock speed of the lowest speed microprocessor in the server. v When you install additional microprocessor/memory cards, populate the microprocessor/memory card connectors in numeric order on the I/O board, starting with connector 2. Install the microprocessor/memory cards in the order shown in the following illustration. 14 IBM System x3755 Types 8877 and 7163: Installation Guide
-
 1
1 -
2
-
3
-
4
-
5
-
6
-
7
-
8
-
9
-
10
-
11
-
12
-
13
-
14
-
15
-
16
-
17
-
18
-
19
-
20
-
 21
21 -
 22
22 -
 23
23 -
 24
24 -
 25
25 -
 26
26 -
 27
27 -
 28
28 -
 29
29 -
 30
30 -
 31
31 -
32
-
33
-
34
-
35
-
36
-
37
-
38
-
39
-
40
-
41
-
42
-
43
-
44
-
45
-
46
-
47
-
48
-
49
-
50
-
51
-
52
-
53
-
54
-
55
-
56
-
57
-
58
-
59
-
60
-
61
-
62
-
63
-
64
-
65
-
66
-
67
-
68
-
69
-
70
-
71
-
72
-
73
-
74
-
75
-
76
-
77
-
78
-
79
-
80
-
81
-
82
-
83
-
84
-
85
-
86
-
87
-
88
 |
 |