Insignia NS-BK2TBK8 User Guide - Page 12
Installing the CO2 regulator and tank
 |
View all Insignia NS-BK2TBK8 manuals
Add to My Manuals
Save this manual to your list of manuals |
Page 12 highlights
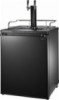
NS-BK2TBS8/NS-BK2TBK8 Installing the CO2 regulator and tank Before installing the CO2 regulator and tank, it's very important that you review this list of safety tips. WARNING Before installing the CO2 regulator and tank, it's very important that you review this list of safety tips: • ALWAYS connect the CO2 tank to a regulator. Failure to do so could result in explosion with possible death or injury when the tank valve is opened. • NEVER connect the CO2 tank directly to the beer keg. • ALWAYS follow correct procedures when tanks are changed. • ALWAYS secure the tank in an upright position. • NEVER drop or throw a CO2 tank. • ALWAYS keep a CO2 tank away from heat. Store extra tanks in a cool place (preferably 70°F). Securely fasten with a chain in an upright position when storing. • ALWAYS ventilate and leave the area immediately if CO2 leakage has occurred. • ALWAYS check the D.O.T. test date on the tank neck before installation. If the tank if over five (5) years old, do not use it. Return the tank to the gas supplier. • NEVER connect a product container unless there are two (2) safeties in the pressure system: • The CO2 regulator is unpressurized. • The product coupler and gas line are unpressurized. 1 Feed the hose clamp over one end of the CO2 gas line. 2 Attach that end to the gas line connector on the CO2 regulator. Shut-off valve CO2 tank regulator Sankey keg couplers Hose clamp CO2 gas line 3 Tighten the clamp to prevent leaks. Leave about ½ inch between the top of the clamp and the end of the hose. You may need to squeeze with a pliers or crimper. 12 www.insigniaproducts.com
-
 1
1 -
2
-
3
-
4
-
5
-
6
-
 7
7 -
 8
8 -
 9
9 -
 10
10 -
 11
11 -
 12
12 -
 13
13 -
 14
14 -
 15
15 -
 16
16 -
 17
17 -
18
-
19
-
20
-
21
-
22
-
23
-
24
-
25
-
26
-
27
 |
 |
