Insignia NS-TDRG75W1 User Guide - Page 32
Step 4: Install the dryer door on the other side, Carefully peel off open door sticker
 |
View all Insignia NS-TDRG75W1 manuals
Add to My Manuals
Save this manual to your list of manuals |
Page 32 highlights
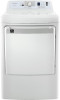
INSTALLATION INSTRUCTIONS Step 4: Install the dryer door on the other side 1 Align the hinges on the door with the hinge screw holes on the front of your dryer. Tip: The T-points on the door hinges slot into the body of the dryer to help with alignment and hold the door upright. 2 Secure the door with the four screws you removed in Step 1: Remove the dryer door on page 27. 3 Carefully peel off "open door" sticker, then move it to the other side of the door. 4 Plug in your dryer. 32 www.insigniaproducts.com
-
 1
1 -
2
-
3
-
4
-
5
-
6
-
7
-
8
-
9
-
10
-
11
-
12
-
13
-
14
-
15
-
16
-
17
-
18
-
19
-
20
-
21
-
22
-
23
-
24
-
25
-
26
-
 27
27 -
 28
28 -
 29
29 -
 30
30 -
 31
31 -
 32
32 -
 33
33 -
 34
34 -
 35
35 -
 36
36 -
 37
37 -
38
-
39
-
40
-
41
-
42
-
43
-
44
 |
 |

32
www.insigniaproducts.com
INSTALLATION INSTRUCTIONS
Step 4: Install the dryer door on the other side
1
Align the hinges on the door with the hinge screw holes on the front of your
dryer.
2
Secure the door with the four screws you removed in Step 1: Remove the dryer
door
on page 27
.
3
Carefully peel off “open door” sticker, then move it to the other side of the
door.
4
Plug in your dryer.
Tip
: The T-points on the door hinges slot into the body of the dryer to help with
alignment and hold the door upright.