Invacare CLTD Owners Manual - Page 38
Composite/Articulating Footplate Heel Loop Replacement, Disassembly, Composite, Articulating
 |
View all Invacare CLTD manuals
Add to My Manuals
Save this manual to your list of manuals |
Page 38 highlights
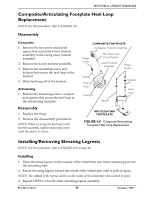
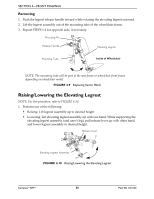
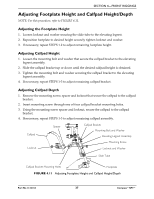
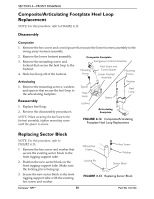
SECTION 4-FRONT RIGGINGS Composite/Articulating Footplate Heel Loop Replacement NOTE: For this procedure, refer to FIGURE 4.12. Disassembly Composite 1. Remove the hex screw and coved spacer that secure the lower footrest assembly to the swing away footrest assembly. 2. Remove the lower footrest assembly. 3. Remove the mounting screw and locknut that secure the heel loop to the footrest. 4. Slide heel loop off of the footrest. Articulating Composite Footplate Swingaway Footrest Assembly Mounting Screw Hex Screw and Coved Spacer Lower Footrest Assembly Mounting Screws Washer 1. Remove the mounting screws, washers Spacer Heel and spacers that secure the heel loop to the articulating footplate. Heel Loop Spacer Loop Reassembly Locknut 1. Replace heel loop. 2. Reverse the disassembly procedures. Articulating Footplate NOTE: When securing the heel loop to the footrest assembly, tighten mounting screw until the spacer is secure. FIGURE 4.12 Composite/Articulating Footplate Heel Loop Replacement Replacing Sector Block NOTE: For this procedure, refer to FIGURE 4.13. 1. Remove the hex screw and washer that secure the existing sector block to the front rigging support tube. 2. Position the new sector block on the front rigging support tube. Make sure the locking pin is facing up. 3. Secure the new sector block to the front rigging support tube with the existing hex screw and washer. Compass™SPT™ 38 Wheelchair Frame Locking Pin Hex Screw Washer Sector Block FIGURE 4.13 Replacing Sector Block Part No 1122134
-
 1
1 -
2
-
3
-
4
-
5
-
6
-
7
-
8
-
9
-
10
-
11
-
12
-
13
-
14
-
15
-
16
-
17
-
18
-
19
-
20
-
21
-
22
-
23
-
24
-
25
-
26
-
27
-
28
-
29
-
30
-
31
-
32
-
 33
33 -
 34
34 -
 35
35 -
 36
36 -
 37
37 -
 38
38 -
 39
39 -
 40
40 -
 41
41 -
 42
42 -
 43
43 -
44
-
45
-
46
-
47
-
48
-
49
-
50
-
51
-
52
-
53
-
54
-
55
-
56
-
57
-
58
-
59
-
60
-
61
-
62
-
63
-
64
-
65
-
66
-
67
-
68
 |
 |
