Invacare CLTD Owners Manual - Page 62
Installing/Adjusting Anti-Tippers, Installing Anti-Tippers
 |
View all Invacare CLTD manuals
Add to My Manuals
Save this manual to your list of manuals |
Page 62 highlights
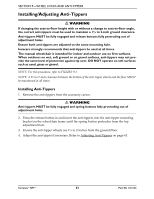
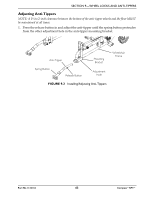
SECTION 9-WHEEL LOCKS AND ANTI-TIPPERS Installing/Adjusting Anti-Tippers ƽ WARNING If changing the seat-to-floor height with or without a change to seat-to-floor angle, the correct anti-tippers must be used to maintain a 1½ to 2-inch ground clearance. Anti-tippers MUST be fully engaged and release buttons fully protruding out of adjustment holes. Ensure both anti-tippers are adjusted to the same mounting hole. Invacare strongly recommends that anti-tippers be used at all times. The manual wheelchair is intended for indoor and outdoor use on firm surfaces. When outdoors on wet, soft ground or on gravel surfaces, anti-tippers may not provide the same level of protection against tip over. DO NOT operate on soft surfaces such as sand, grass or gravel. NOTE: For this procedure, refer to FIGURE 9.2. NOTE: A 1½ to 2-inch clearance between the bottom of the anti-tipper wheels and the floor MUST be maintained at all times. Installing Anti-Tippers 1. Remove the anti-tippers from the accessory carton. ƽ WARNING Anti-tippers MUST be fully engaged and spring buttons fully protruding out of adjustment holes. 2. Press the release button in and insert the anti-tippers into the anti-tipper mounting bracket on the wheelchair frame until the spring button protrudes from the top adjustment hole. 3. Ensure the anti-tipper wheels are 1½ to 2-inches from the ground/floor. 4. Adjust the anti-tipper if necessary. Refer to Adjusting Anti-Tippers on page 63. Compass™SPT™ 62 Part No 1122134
-
 1
1 -
2
-
3
-
4
-
5
-
6
-
7
-
8
-
9
-
10
-
11
-
12
-
13
-
14
-
15
-
16
-
17
-
18
-
19
-
20
-
21
-
22
-
23
-
24
-
25
-
26
-
27
-
28
-
29
-
30
-
31
-
32
-
33
-
34
-
35
-
36
-
37
-
38
-
39
-
40
-
41
-
42
-
43
-
44
-
45
-
46
-
47
-
48
-
49
-
50
-
51
-
52
-
53
-
54
-
55
-
56
-
 57
57 -
 58
58 -
 59
59 -
 60
60 -
 61
61 -
 62
62 -
 63
63 -
 64
64 -
 65
65 -
 66
66 -
 67
67 -
68
 |
 |
