Invacare TREX26RP User Manual - Page 45
Rear Wheels
 |
View all Invacare TREX26RP manuals
Add to My Manuals
Save this manual to your list of manuals |
Page 45 highlights
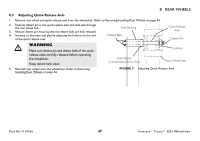
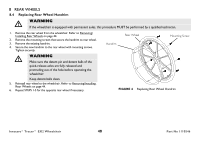
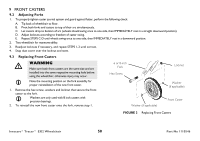
1. Remove the dust cap (SA Frame only), hex screw, washer (SA Frame only), spacer (if installed) and locknut that secure the rear wheel to the wheelchair frame. The spacer is used on wheelchairs with removable arms only. 2. Repeat STEP 1 for the opposite rear wheel if desired. 3. To reinstall the rear wheel(s) onto the wheelchair, reverse STEPS 1-2 and torque locknut to 40 ft.-lbs. 4. Adjust wheel locks. Refer to Using/Adjusting Patient Operated Wheel Locks on page 54. 8 REAR WHEELS Rear Wheel Washer (SA Frame ONLY) Axle Mounting Axle Locknut Dust Cap (SA Frame ONLY) Hex Screw Wheelchair Frame Spacer (Wheelchairs with Removable Arms ONLY) FIGURE 1 Removing/Installing Rear Wheels - Permanent Axles Quick-Release Axles If replacing the same size rear wheel, note the mounting position on the wheelchair frame for proper reinstallation of the new rear wheel. 1. Push in the detent pin of quick-release axle (with wheel) and pull the axle out through the opening in the center of the rear wheel and axle spacer. Axle spacer is used only if wheelchair is equipped with conventional arms. 2. Push in the detent pin of the quick-release axle again and pull the axle out of the rear wheel. 3. Repeat STEPS 1-2 for the opposite rear wheel. 4. To reinstall the rear wheel onto the wheelchair, reverse STEPS 1-3. Make sure axle spacer is between rear wheel and wheelchair frame if wheelchair is equipped with conventional arms. Part No 1110546 45 Invacare® Tracer™ EX2 Wheelchair
-
 1
1 -
2
-
3
-
4
-
5
-
6
-
7
-
8
-
9
-
10
-
11
-
12
-
13
-
14
-
15
-
16
-
17
-
18
-
19
-
20
-
21
-
22
-
23
-
24
-
25
-
26
-
27
-
28
-
29
-
30
-
31
-
32
-
33
-
34
-
35
-
36
-
37
-
38
-
39
-
 40
40 -
 41
41 -
 42
42 -
 43
43 -
 44
44 -
 45
45 -
 46
46 -
 47
47 -
 48
48 -
 49
49 -
 50
50 -
51
-
52
-
53
-
54
-
55
-
56
-
57
-
58
-
59
-
60
-
61
-
62
-
63
-
64
 |
 |
