JVC DLA-HD250PRO Instruction Manual - Page 12

Contents, What to Do When these Messages - mount

Page 12 highlights

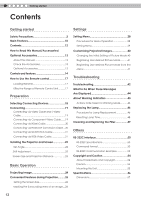
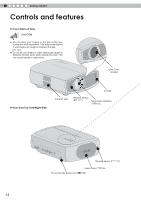
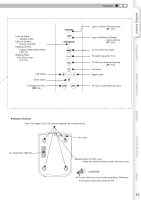
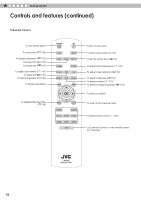
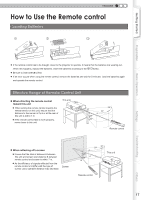
1 Getting started Contents Getting started Safety Precautions 2 Main Features 10 Contents 12 How to Read this Manual/Accessories/ Optional Accessories 13 About this Manual 13 Check the Accessories 13 Optional Accessories 13 Controls and features 14 How to Use the Remote control 17 Loading Batteries 17 Effective Range of Remote Control Unit...........17 Preparation Selecting Connecting Devices 18 Connecting 1 9 Connecting via Video Cable and S-Video Cable 19 Connecting via Component Video Cable........19 Connecting via HDMI Cable 20 Connecting via HDMI-DVI Conversion Cable...20 Connecting via SCART-RCA Cable 21 Connecting via RGB Video Cable 21 Installing the Projector and Screen 22 Set Angle 22 Shift Adjustment 22 Screen Size and Projection Distance 23 Basic Operation Projecting Image 24 Convenient Features during Projection...........26 Setting the Screen Size 26 Masking the Surrounding Area of an Image......26 Settings Setting Menu 28 Procedures for Menu Operation 28 Setting Menu 29 Customizing Projected Images 40 Changing the Initial Setting of Picture Mode .40 Registering User-defined Picture Mode...........41 Registering User-defined Picture Mode from the Menu 41 Troubleshooting Troubleshooting 42 What to Do When these Messages Are Displayed 44 About Warning Indicators 45 Actions to Be Taken for Warning Mode...........45 Replacing the Lamp 46 Procedure for Lamp Replacement 46 Resetting Lamp Time 48 Cleaning and Replacing the Filter 49 Others RS-232C Interface 50 RS-232C Specifications 50 Command Format 50 RS-232C Communication Examples 53 Copyright and Caution 54 About Trademarks and Copyright 54 Caution 54 Mounting this Unit 55 Specifications 56 Dimensions 57 12

  • 1
  • 2
  • 3
  • 4
  • 5
  • 6
  • 7
  • 8
  • 9
  • 10
  • 11
  • 12
  • 13
  • 14
  • 15
  • 16
  • 17
  • 18
  • 19
  • 20
  • 21
  • 22
  • 23
  • 24
  • 25
  • 26
  • 27
  • 28
  • 29
  • 30
  • 31
  • 32
  • 33
  • 34
  • 35
  • 36
  • 37
  • 38
  • 39
  • 40
  • 41
  • 42
  • 43
  • 44
  • 45
  • 46
  • 47
  • 48
  • 49
  • 50
  • 51
  • 52
  • 53
  • 54
  • 55
  • 56
  • 57
  • 58
  • 59
  • 60
  • 61
  • 62
  • 63
  • 64
  • 65
  • 66
  • 67
  • 68
  • 69
  • 70
  • 71
  • 72
  • 73
  • 74
  • 75
  • 76
  • 77
  • 78
  • 79
  • 80
  • 81
  • 82
  • 83
  • 84
  • 85
  • 86
  • 87
  • 88
  • 89
  • 90
  • 91
  • 92
  • 93
  • 94
  • 95
  • 96
  • 97
  • 98
  • 99
  • 100
  • 101
  • 102
  • 103
  • 104
  • 105
  • 106
  • 107
  • 108
  • 109
  • 110
  • 111
  • 112
  • 113
  • 114
  • 115
  • 116
  • 117
  • 118
  • 119
  • 120
  • 121
  • 122
  • 123
  • 124
  • 125
  • 126
  • 127
  • 128
  • 129
  • 130
  • 131
  • 132
  • 133
  • 134
  • 135
  • 136
  • 137
  • 138
  • 139
  • 140
  • 141
  • 142
  • 143
  • 144
  • 145
  • 146
  • 147
  • 148
  • 149
  • 150
  • 151
  • 152
  • 153
  • 154
  • 155
  • 156
  • 157
  • 158
  • 159
  • 160
  • 161
  • 162
  • 163
  • 164
  • 165
  • 166
  • 167
  • 168
  • 169
  • 170
  • 171
  • 172
  • 173

1
Getting started
12
Contents
Getting started
Safety Precautions
.............................................
2
Main Features
...................................................
10
Contents
...........................................................
12
How to Read this Manual/Accessories/
Optional Accessories
.......................................
13
About this Manual
................................................
13
Check the Accessories
.......................................
13
Optional Accessories
..........................................
13
Controls and features
.............................................
14
How to Use the Remote control
......................
17
Loading Batteries
..................................................
17
Effective Range of Remote Control Unit
...........
17
Preparation
Selecting Connecting Devices
....................
18
Connecting
......................................................
19
Connecting via Video Cable and S-Video
Cable
................................................................
19
Connecting via Component Video Cable
........
19
Connecting via HDMI Cable
..............................
20
Connecting via HDMI-DVI Conversion Cable...20
Connecting via SCART-RCA Cable
....................
21
Connecting via RGB Video Cable
......................
21
Installing the Projector and Screen
.................
22
Set Angle
..................................................................
22
Shift Adjustment
.....................................................
22
Screen Size and Projection Distance
...............
23
Basic Operation
Projecting Image
..............................................
24
Convenient Features during Projection
...........
26
Setting the Screen Size
........................................
26
Masking the Surrounding Area of an Image
......
26
Settings
Setting Menu
...................................................
28
Procedures for Menu Operation
......................
28
Setting Menu
......................................................
29
Customizing Projected Images
....................
40
Changing the Initial Setting of Picture Mode .40
Registering User-defined Picture Mode
...........
41
Registering User-defined Picture Mode from the
Menu
...................................................................
41
Troubleshooting
Troubleshooting
...............................................
42
What to Do When these Messages
Are Displayed
.................................................
44
About Warning Indicators
.............................
45
Actions to Be Taken for Warning Mode
...........
45
Replacing the Lamp
........................................
46
Procedure for Lamp Replacement
.................
46
Resetting Lamp Time
.........................................
48
Cleaning and Replacing the Filter
.................
49
Others
RS-232C Interface
...........................................
50
RS-232C Specifications
.......................................
50
Command Format
..............................................
50
RS-232C Communication Examples
................
53
Copyright and Caution
.................................
54
About Trademarks and Copyright
....................
54
Caution
.................................................................
54
Mounting this Unit
..............................................
55
Specifications
..............................................
56
Dimensions
..........................................................
57