JVC DLA-HD250PRO Instruction Manual - Page 26
Convenient Features during Projection, Setting the Screen Size, Masking the Surrounding Area of an
 |
View all JVC DLA-HD250PRO manuals
Add to My Manuals
Save this manual to your list of manuals |
Page 26 highlights
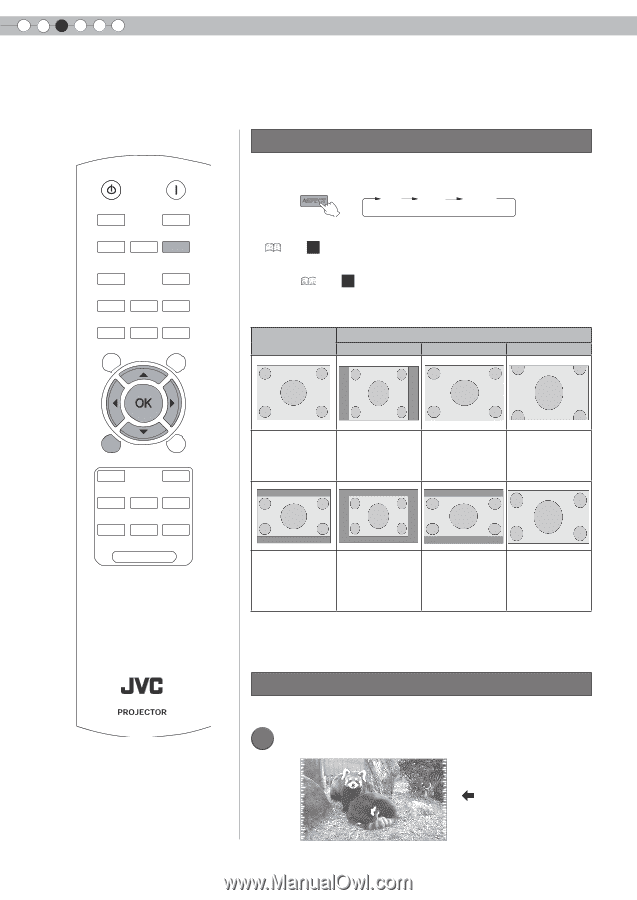
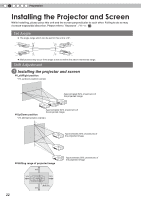
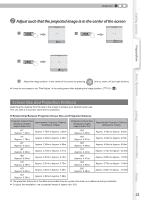
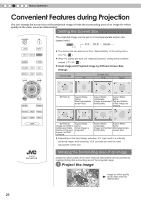
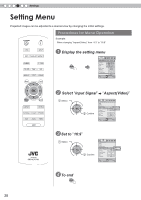
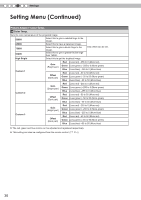
3 Basic Operation Convenient Features during Projection You can change the screen size of the projected image or hide the surrounding area of an image for which quality at the outer area has deteriorated. Setting the Screen Size STANDBY ON LENS INPUT INFO LENS.AP ASPECT GAMMA C.TEMP COLOR TINT N.R BRIGHT CONT SHARP TEST HIDE The projected image can be set to a most appropriate screen size (aspect ratio). ASPECT 4:3 16:9 zoom ● The screen size can also be set from "Aspect(Video)" of the setting menu. ( P34 - 14 ) ● When PC signals are input, the "Aspect(Computer)" setting will be available instead. ( P34 - 15 ) ■ Input Image and Projected Image by Different Screen Size Settings Input Image Screen Size 4:3 16:9 Zoom MENU BACK CINEMA1 CINEMA2 NATURAL STAGE DYNAMIC USER1 USER2 USER3 LIGHT RM-MH2GB SDTV(4:3) Aspect Ratio: Same Most appropriate screen size Aspect Ratio: Aspect Ratio: Landscape Same Image is stretched Top and bottom horizontally of the image are missing SDTV(4:3) Aspect Ratio: Image recorded in Same landscape (black Small image is bands on top and projected bottom) of DVD software Aspect Ratio: Aspect Ratio: Landscape Same Image is stretched Most appropriate horizontally screen size ● Depending on the input image, selecting "4:3" may result in a vertically stretched image, while selecting "16:9" provides you with the most appropriate screen size. Masking the Surrounding Area of an Image Images for which quality at the outer area has deteriorated can be projected by masking (hiding) the surrounding area of the projected image. 1 Project the image Image for which quality at the outer area has deteriorated. 26
-
 1
1 -
2
-
3
-
4
-
5
-
6
-
7
-
8
-
9
-
10
-
11
-
12
-
13
-
14
-
15
-
16
-
17
-
18
-
19
-
20
-
 21
21 -
 22
22 -
 23
23 -
 24
24 -
 25
25 -
 26
26 -
 27
27 -
 28
28 -
 29
29 -
 30
30 -
 31
31 -
32
-
33
-
34
-
35
-
36
-
37
-
38
-
39
-
40
-
41
-
42
-
43
-
44
-
45
-
46
-
47
-
48
-
49
-
50
-
51
-
52
-
53
-
54
-
55
-
56
-
57
-
58
-
59
-
60
-
61
-
62
-
63
-
64
-
65
-
66
-
67
-
68
-
69
-
70
-
71
-
72
-
73
-
74
-
75
-
76
-
77
-
78
-
79
-
80
-
81
-
82
-
83
-
84
-
85
-
86
-
87
-
88
-
89
-
90
-
91
-
92
-
93
-
94
-
95
-
96
-
97
-
98
-
99
-
100
-
101
-
102
-
103
-
104
-
105
-
106
-
107
-
108
-
109
-
110
-
111
-
112
-
113
-
114
-
115
-
116
-
117
-
118
-
119
-
120
-
121
-
122
-
123
-
124
-
125
-
126
-
127
-
128
-
129
-
130
-
131
-
132
-
133
-
134
-
135
-
136
-
137
-
138
-
139
-
140
-
141
-
142
-
143
-
144
-
145
-
146
-
147
-
148
-
149
-
150
-
151
-
152
-
153
-
154
-
155
-
156
-
157
-
158
-
159
-
160
-
161
-
162
-
163
-
164
-
165
-
166
-
167
-
168
-
169
-
170
-
171
-
172
-
173
 |
 |