JVC DLA-HD250PRO Instruction Manual - Page 36
Installation > Lens Control, Installation > Pixel Adjust, Installation > Installation Style
 |
View all JVC DLA-HD250PRO manuals
Add to My Manuals
Save this manual to your list of manuals |
Page 36 highlights
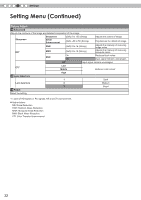
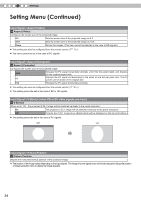
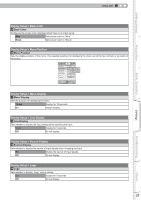
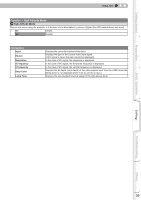
4 Settings Setting Menu (Continued) Installation > Lens Control 21 Lens Control Controls the individual motorized function of the lens when setting up the projector Focus Function for adjusting the lens focus. Zoom Function for adjusting the lens zoom. Shift Function for adjusting lens shift. (Press the up/down/left/right button to shift the screen). Image Pattern Displays the image pattern in conjunction with the above setting items. Display Display for "Focus": On for "Zoom" and "Shift": Off Lock On Off (Picture of big green grids) Do not display the image pattern. (Picture of small green grids) Disables lens adjustment. A warning message appears when the [LENS] button on the remote control is pressed. Enables lens adjustment. Installation > Pixel Adjust 22 Pixel Adjust Makes fine adjustments of 1 pixel unit for each minor color shift in the horizontal/vertical direction of the image. Horiz. Red (Move red to left) 1 to 7 (Move red to right) Horiz. Green (Move green to left) 1 to 7 (Move green to right) Horiz. Blue (Move blue to left) 1 to 7 (Move blue to right) Vert. Red (Move red down) 1 to 5 (Move red up) Vert. Green (Move green down) 1 to 5 (Moves green up) Vert. Blue (Move blue down) 1 to 5 (Move blue up) ● The horizontal and vertical directions are reversed when the image is flipped to the left or right, or flipped up or down. ● To adjust, use still images with distinct outlines. ● As the adjustments are minor, the effect may be difficult to see for some images. Installation > Installation Style 23 Installation Style Flips the image to the left or right, up or down according to the projection state of the projector. Front Select this for tabletop front projection. Ceiling Mount (F) Select this for ceiling front projection. Rear Select this for tabletop rear projection. Ceiling Mount (R) Select this for ceiling rear projection. Installation > Keystone 24 Keystone Compensates for trapezoidal distortion caused by installation. ● If the "Shift Adjustment" is excepting 0%, the image may be projected on the screen incorrectly when trapezoidal distortion is compensated. ( P22) 36
-
 1
1 -
2
-
3
-
4
-
5
-
6
-
7
-
8
-
9
-
10
-
11
-
12
-
13
-
14
-
15
-
16
-
17
-
18
-
19
-
20
-
21
-
22
-
23
-
24
-
25
-
26
-
27
-
28
-
29
-
30
-
 31
31 -
 32
32 -
 33
33 -
 34
34 -
 35
35 -
 36
36 -
 37
37 -
 38
38 -
 39
39 -
 40
40 -
 41
41 -
42
-
43
-
44
-
45
-
46
-
47
-
48
-
49
-
50
-
51
-
52
-
53
-
54
-
55
-
56
-
57
-
58
-
59
-
60
-
61
-
62
-
63
-
64
-
65
-
66
-
67
-
68
-
69
-
70
-
71
-
72
-
73
-
74
-
75
-
76
-
77
-
78
-
79
-
80
-
81
-
82
-
83
-
84
-
85
-
86
-
87
-
88
-
89
-
90
-
91
-
92
-
93
-
94
-
95
-
96
-
97
-
98
-
99
-
100
-
101
-
102
-
103
-
104
-
105
-
106
-
107
-
108
-
109
-
110
-
111
-
112
-
113
-
114
-
115
-
116
-
117
-
118
-
119
-
120
-
121
-
122
-
123
-
124
-
125
-
126
-
127
-
128
-
129
-
130
-
131
-
132
-
133
-
134
-
135
-
136
-
137
-
138
-
139
-
140
-
141
-
142
-
143
-
144
-
145
-
146
-
147
-
148
-
149
-
150
-
151
-
152
-
153
-
154
-
155
-
156
-
157
-
158
-
159
-
160
-
161
-
162
-
163
-
164
-
165
-
166
-
167
-
168
-
169
-
170
-
171
-
172
-
173
 |
 |