JVC DLA-HD250PRO Instruction Manual - Page 34
Input Signal > Picture Position, Input Signal > Aspect Computer
 |
View all JVC DLA-HD250PRO manuals
Add to My Manuals
Save this manual to your list of manuals |
Page 34 highlights
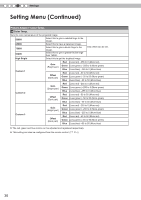
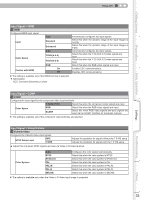
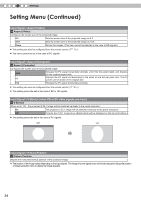
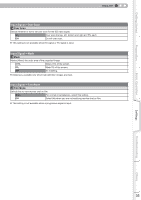
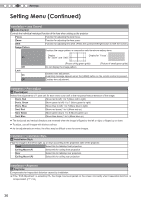
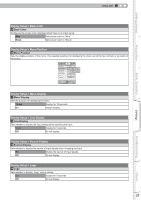
4 Settings Setting Menu (Continued) Input Signal > Aspect (Video) 14 Aspect (Video) Configures the screen size of the projected image. 4:3 Sets the screen size of the projected image as 4:3. 16:9 Sets the screen size of the projected image as 16:9. Zoom Zooms the images. (This item cannot be selected in the case of HD signals.) ● This setting can also be configured from the remote control. ( P16) ● The items cannot be set in the case of PC signals. Input Signal > Aspect (Computer) 15 Aspect (Computer) Configures the screen size of the projected image. Auto Enlarges the PC signal horizontally/vertically until it fits the panel height, and displays it in the original aspect ratio. 1:1 Displays the PC signal corresponding to the panel at one dot per pixel ratio. The PC screen can be shown in the original size. Full Enlarges the PC signal horizontally/vertically. ● This setting can also be configured from the remote control. ( P16) ● This setting cannot be set in the case of SD or HD signals. Input Signal > V-Stretch (when HD or SD video signals are input) 16 V-Stretch When set to "On", the projected 2.35:1 image will be stretched vertically to the panel resolution. On The projected 2.35:1 image will be stretched vertically to the panel resolution. Off Projects the 2.35:1 image as-is. (Black bands will be displayed on the top and bottom.) ● This setting cannot be set in the case of PC signals. "Off" "On" Input Signal > Picture Position 17 Picture Position Adjusts the horizontal/vertical position of the projected image. ● The position of the image varies depending on the input signals. The image of some signals may not be fully displayed. Adjust the position of image using this menu to display the image properly. 34
-
 1
1 -
2
-
3
-
4
-
5
-
6
-
7
-
8
-
9
-
10
-
11
-
12
-
13
-
14
-
15
-
16
-
17
-
18
-
19
-
20
-
21
-
22
-
23
-
24
-
25
-
26
-
27
-
28
-
 29
29 -
 30
30 -
 31
31 -
 32
32 -
 33
33 -
 34
34 -
 35
35 -
 36
36 -
 37
37 -
 38
38 -
 39
39 -
40
-
41
-
42
-
43
-
44
-
45
-
46
-
47
-
48
-
49
-
50
-
51
-
52
-
53
-
54
-
55
-
56
-
57
-
58
-
59
-
60
-
61
-
62
-
63
-
64
-
65
-
66
-
67
-
68
-
69
-
70
-
71
-
72
-
73
-
74
-
75
-
76
-
77
-
78
-
79
-
80
-
81
-
82
-
83
-
84
-
85
-
86
-
87
-
88
-
89
-
90
-
91
-
92
-
93
-
94
-
95
-
96
-
97
-
98
-
99
-
100
-
101
-
102
-
103
-
104
-
105
-
106
-
107
-
108
-
109
-
110
-
111
-
112
-
113
-
114
-
115
-
116
-
117
-
118
-
119
-
120
-
121
-
122
-
123
-
124
-
125
-
126
-
127
-
128
-
129
-
130
-
131
-
132
-
133
-
134
-
135
-
136
-
137
-
138
-
139
-
140
-
141
-
142
-
143
-
144
-
145
-
146
-
147
-
148
-
149
-
150
-
151
-
152
-
153
-
154
-
155
-
156
-
157
-
158
-
159
-
160
-
161
-
162
-
163
-
164
-
165
-
166
-
167
-
168
-
169
-
170
-
171
-
172
-
173
 |
 |