JVC GV-LS2W Detailed User Guide - Page 13
Configuring the initial settings
 |
View all JVC GV-LS2W manuals
Add to My Manuals
Save this manual to your list of manuals |
Page 13 highlights
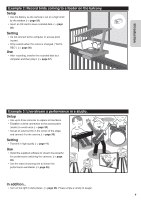
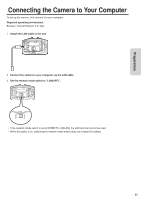
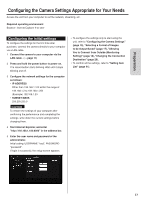
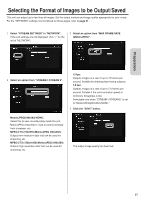
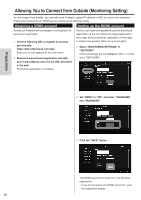
Preparation Configuring the Camera Settings Appropriate for Your Needs Access the unit from your computer to set the network, streaming, etc. Required operating environment Browser: Internet Explorer 9 or later Configuring the initial settings To configure the settings for the first time after purchase, connect the camera directly to your computer via a LAN cable. 1 Connect the camera to your computer via the LAN cable. ( ➭ page 11) 2 Press and hold the power button to power on. The record button starts blinking. Wait until it stops blinking and off. 3 Configure the network settings for the computer as follows: • IP ADDRESS Other than 192.168.1.100 within the range of 192.168.1.2 to 192.168.1.254 (Example) 192.168.1.23 • SUBNET MASK 255.255.255.0 CAUTION To restore the settings of your computer after confirming the performance and completing the settings, write down the current settings before changing them. 4 Start Internet Explorer, and enter "http://192.168.1.100:8000" in the address bar. 5 Enter the user name and password of the administrator. Initial setting: USERNAME "root", PASSWORD "password". If login is successful, the setup screen appears. • To configure the settings only to start using the unit, refer to "Configuring the Camera Settings" (page 15), "Selecting a Format of Images to be Output/Saved" (page 17), "Allowing You to Connect from Outside (Monitoring Setting)" (page 18), "Changing the Connection Destination" (page 20). • To confirm all the settings, refer to "Setting Item List" (page 41). 13
-
 1
1 -
2
-
3
-
4
-
5
-
6
-
7
-
 8
8 -
 9
9 -
 10
10 -
 11
11 -
 12
12 -
 13
13 -
 14
14 -
 15
15 -
 16
16 -
 17
17 -
 18
18 -
19
-
20
-
21
-
22
-
23
-
24
-
25
-
26
-
27
-
28
-
29
-
30
-
31
-
32
-
33
-
34
-
35
-
36
-
37
-
38
-
39
-
40
-
41
-
42
-
43
-
44
-
45
-
46
-
47
-
48
-
49
-
50
-
51
-
52
-
53
-
54
-
55
-
56
-
57
-
58
-
59
-
60
 |
 |