JVC GY-HM150U GY-HM150U ProHD Camcorder 104-page owner's manual - Page 62
Menu Display and Detailed Settings, Basic Operations in Menu Screen
 |
View all JVC GY-HM150U manuals
Add to My Manuals
Save this manual to your list of manuals |
Page 62 highlights
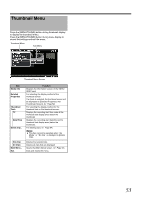
Menu Display and Detailed Settings Basic Operations in Menu Screen Press the [MENU/THUMB] button on the side control panel of the camera recorder to display the menu screen on the LCD monitor and viewfinder. Various settings for shooting and playback can be configured on the menu screen. There are two types of menu screens - [Main Menu] and [Favorites Menu]. [Main Menu] contains all the setting items of the camera recorder, classified according to functions and uses, while [Favorites Menu] allows users to customize the menu items freely. (A Page 76) The operating procedures and main screen displays are the same for both menus. Memo : ● When [Display On TV] in the [A/V Out] menu is set to AOnB, the menu screen is also displayed in the video image of the video signal output terminal. (A Page 73) Operation Buttons Use the operation buttons on the side control panel of the camera recorder to operate the menu. AB C USER1 USER2 SLOT SEL LOLUX/3 DISPLAY C.REVIEW/4 ZEBRA/5 OGRAM A D MENU/ THUMB E E T PR FW REC Name A [USER1] Button B [USER2] Button C [DISPLAY] Button D [MENU/THUMB] Button Description Adds the selected menu or submenu item to the [Favorites Menu]. (A Page 76) Resets settings in the [TC Preset] or [UB Preset] setting screen. This button is disabled in other screens. Switches between the [Main Menu] and [Favorites Menu] screens. Displays the menu screen. ([Main Menu] is displayed by default when pressed.) During normal usage, [Main Menu] is displayed if the previous menu operation ended at [Main Menu], and [Favorites Menu] if the previous menu operation ended at [Favorites Menu]. Press this button to close the menu screen during menu display and return to the normal screen. Name E Press the center of the set lever. F Up/Down/Left/ Right (JKH I) of Set Lever Description Sets the values and items. (Confirm) J : Moves the cursor upward. K : Moves the cursor downward. H : Moves back to the previous item. I : Moves forward to the next item. Display and Description of the Menu Screen ⅥSelecting Menu Items E F A G B H C I D J Name A Cursor B Menu Item C Fixed Item D [Back] Back E Menu Title F Remaining Battery Power Description Indicates the selected item. Use the set lever (JK) to move the cursor. Displays the names of the menu item and sub-menu. Menu items with [...] after them indicates that there is a sub-menu to access. Items that cannot be changed are displayed in gray and cannot be selected. Select [Back] and press the center of the set lever to return to the previous level. Title of the currently displayed menu. (red): Less than 1 % (red): 1 % to 20 % (yellow): 21 % to 30 % (yellow): 31 % to 40 % (green): 41 % to 70 % (green): 71 % to 100 % : External power supply connected. 58
-
 1
1 -
2
-
3
-
4
-
5
-
6
-
7
-
8
-
9
-
10
-
11
-
12
-
13
-
14
-
15
-
16
-
17
-
18
-
19
-
20
-
21
-
22
-
23
-
24
-
25
-
26
-
27
-
28
-
29
-
30
-
31
-
32
-
33
-
34
-
35
-
36
-
37
-
38
-
39
-
40
-
41
-
42
-
43
-
44
-
45
-
46
-
47
-
48
-
49
-
50
-
51
-
52
-
53
-
54
-
55
-
56
-
 57
57 -
 58
58 -
 59
59 -
 60
60 -
 61
61 -
 62
62 -
 63
63 -
 64
64 -
 65
65 -
 66
66 -
 67
67 -
68
-
69
-
70
-
71
-
72
-
73
-
74
-
75
-
76
-
77
-
78
-
79
-
80
-
81
-
82
-
83
-
84
-
85
-
86
-
87
-
88
-
89
-
90
-
91
-
92
-
93
-
94
-
95
-
96
-
97
-
98
-
99
-
100
-
101
-
102
-
103
-
104
 |
 |
