JVC GZ-E100 User Guide - Page 50
Installation Procedure, Windows Vista/Windows 7, Windows XP, Backing Up All Files
 |
View all JVC GZ-E100 manuals
Add to My Manuals
Save this manual to your list of manuals |
Page 50 highlights
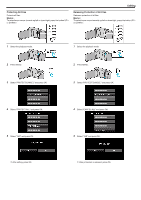
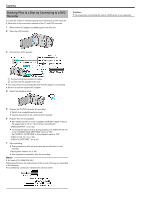
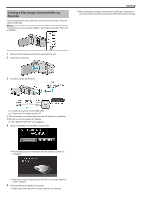
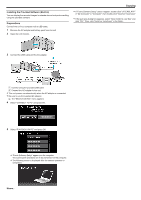
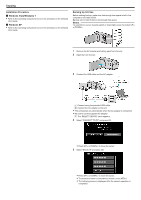
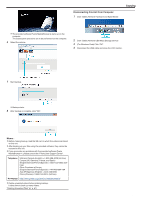
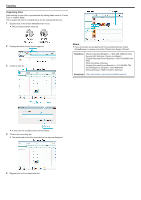
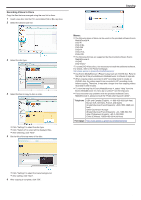
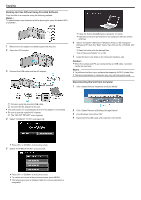
Copying Installation Procedure o Windows Vista/Windows 7 0 Refer to the operating instructions found in the animation on the Detailed User Guide. o Windows XP 0 Refer to the operating instructions found in the animation on the Detailed User Guide. Backing Up All Files Before making backup, make sure that enough free space is left in the computer's hard disk (HDD). Backup will not start if there is not enough free space. Memo : To select/move cursor towards up/left or down/right, press the button UP/< or DOWN/>. 1 Remove the AC adapter and battery pack from this unit. 2 Open the LCD monitor. 3 Connect the USB cable and the AC adapter. . . .. . A Connect using the provided USB cable. B Connect the AC adapter to this unit. 0 This unit powers on automatically when the AC adapter is connected. 0 Be sure to use the supplied AC adapter. C The "SELECT DEVICE" menu appears. 4 Select "CONNECT TO PC" and press OK. 0 Press UP/< or DOWN/> to move the cursor. 5 Select "BACK UP" and press OK. 0 Press UP/< or DOWN/> to move the cursor. 0 To cancel and return to the previous screen, press MENU. 0 The following screen is displayed after the camera operation is completed. 50
-
 1
1 -
2
-
3
-
4
-
5
-
6
-
7
-
8
-
9
-
10
-
11
-
12
-
13
-
14
-
15
-
16
-
17
-
18
-
19
-
20
-
21
-
22
-
23
-
24
-
25
-
26
-
27
-
28
-
29
-
30
-
31
-
32
-
33
-
34
-
35
-
36
-
37
-
38
-
39
-
40
-
41
-
42
-
43
-
44
-
 45
45 -
 46
46 -
 47
47 -
 48
48 -
 49
49 -
 50
50 -
 51
51 -
 52
52 -
 53
53 -
 54
54 -
 55
55 -
56
-
57
-
58
-
59
-
60
-
61
-
62
-
63
-
64
-
65
-
66
-
67
-
68
-
69
-
70
-
71
-
72
-
73
-
74
-
75
-
76
-
77
-
78
-
79
-
80
 |
 |
