JVC KD HDR20 Instructions - Page 13
ENGLISH, EXTERNAL DEVICES, Connecting/disconnecting/deleting a, registered device, Connecting a device - bluetooth
 |
UPC - 046838037481
View all JVC KD HDR20 manuals
Add to My Manuals
Save this manual to your list of manuals |
Page 13 highlights
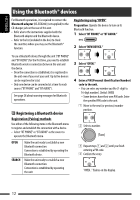
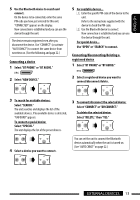
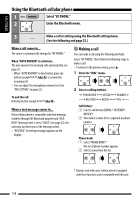
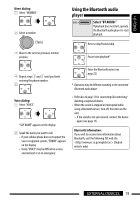
ENGLISH 5 Use the Bluetooth device to search and connect. On the device to be connected, enter the same PIN code you have just entered for this unit. "CONNECTED" appears on the display. Now connection is established and you can use the device through the unit. The device remains registered even after you disconnect the device. Use "CONNECT" (or activate "AUTO CNNCT") to connect the same device from next time on. (See the following and page 22.) Connecting a device 1 Select "BT PHONE" or "BT AUDIO." 5 For available devices... 1 Enter the specific PIN code of the device to the unit. Refer to the instructions supplied with the device to check the PIN code. 2 Use the Bluetooth device to connect. Now connection is established and you can use the device through the unit. For special device... Use "OPEN" or "SEARCH" to connect. Connecting/disconnecting/deleting a registered device 1 Select "BT PHONE" or "BT AUDIO." 2 Select "NEW DEVICE." 2 Select a registered device you want to connect/disconnect/delete. 3 To search for available devices: Select "SEARCH." The unit searches and displays the list of the available devices. If no available device is detected, "UNFOUND" appears. To connect a special device: Select "SPECIAL." The unit displays the list of the preset devices. 3 To connect/disconnect the selected device: Select "CONNECT" or "DISCONNECT." To delete the selected device: Select "DELETE," then "YES." 4 Select a device you want to connect. You can set the unit to connect the Bluetooth device automatically when the unit is turned on. (See "AUTO CNNCT" on page 22.) EXTERNAL DEVICES 13
-
 1
1 -
2
-
3
-
4
-
5
-
6
-
7
-
 8
8 -
 9
9 -
 10
10 -
 11
11 -
 12
12 -
 13
13 -
 14
14 -
 15
15 -
 16
16 -
 17
17 -
 18
18 -
19
-
20
-
21
-
22
-
23
-
24
-
25
-
26
-
27
-
28
-
29
-
30
-
31
-
32
-
33
-
34
-
35
-
36
-
37
-
38
-
39
-
40
-
41
-
42
-
43
-
44
-
45
-
46
-
47
-
48
-
49
-
50
-
51
-
52
-
53
-
54
-
55
-
56
-
57
-
58
-
59
-
60
-
61
-
62
-
63
-
64
-
65
-
66
-
67
-
68
-
69
-
70
-
71
-
72
-
73
-
74
-
75
-
76
-
77
-
78
-
79
-
80
-
81
-
82
-
83
-
84
-
85
-
86
-
87
-
88
-
89
-
90
-
91
-
92
-
93
-
94
-
95
-
96
-
97
-
98
-
99
-
100
-
101
-
102
-
103
-
104
-
105
-
106
-
107
-
108
-
109
-
110
 |
 |