JVC KD HDR20 Instructions - Page 7
Changing the display information, Preparation - hd radio cd receiver
 |
UPC - 046838037481
View all JVC KD HDR20 manuals
Add to My Manuals
Save this manual to your list of manuals |
Page 7 highlights
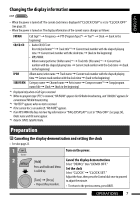
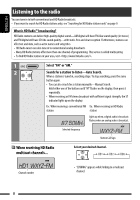
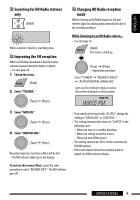
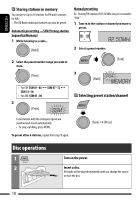
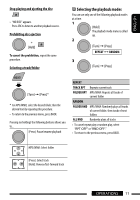
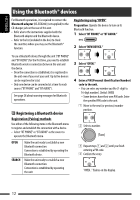
Changing the display information ENGLISH • When the power is turned off: The current clock time is displayed if "CLOCK DISP" is set to "CLOCK OFF" (see page 23). • When the power is turned on: The display information of the current source changes as follows: FM/AM CD/CD-CH IPOD SIRIUS/XM Call Sign*1 = Frequency = PTY (Program Type)*2 = Text*3 = Clock = (back to the beginning) • Audio CD/CD Text: Disc title/performer*4 = Track title*4 = Current track number with the elapsed playing time = Current track number with the clock time = (back to the beginning) • MP3/WMA: Album name/performer (folder name)*5 = Track title (file name)*5 = Current track number with the elapsed playing time = Current track number with the clock time = (back to the beginning) Album name/artist name = Track name = Current track number with the elapsed playing time = Current track number with the clock time = (back to the beginning) Category name = Channel name = Artist name = Composer name*6 = Song/program name/title = Clock = (back to the beginning) *1 Displayed only when a Call Sign is received. *2 When no program type (PTY) is received, "HD RADIO" appears for HD Radio broadcasting, and "ANALOG" appears for conventional FM/AM broadcasting. *3 "NO TEXT" appears when no text is received. *4 If the current disc is an audio CD, "NO NAME" appears. *5 If an MP3/WMA file does not have Tag information or "TAG DISPLAY" is set to "TAG OFF" (see page 24), folder name and file name appear. *6 Only for SIRIUS Satellite Radio. Preparation Canceling the display demonstration and setting the clock • See also page 23. 1 Turn on the power. 2 [Hold] Cancel the display demonstrations Select "DEMO," then "DEMO OFF." Press and hold until Menu Set the clock is called up. Select "CLOCK" = "CLOCK SET." [Turn] = [Press] Adjust the hour, then press the Control dial once to proceed to adjust the minute. • Repeat this procedure. • To return to the previous menu, press BACK. OPERATIONS 7
-
 1
1 -
 2
2 -
 3
3 -
 4
4 -
 5
5 -
 6
6 -
 7
7 -
 8
8 -
 9
9 -
 10
10 -
 11
11 -
 12
12 -
13
-
14
-
15
-
16
-
17
-
18
-
19
-
20
-
21
-
22
-
23
-
24
-
25
-
26
-
27
-
28
-
29
-
30
-
31
-
32
-
33
-
34
-
35
-
36
-
37
-
38
-
39
-
40
-
41
-
42
-
43
-
44
-
45
-
46
-
47
-
48
-
49
-
50
-
51
-
52
-
53
-
54
-
55
-
56
-
57
-
58
-
59
-
60
-
61
-
62
-
63
-
64
-
65
-
66
-
67
-
68
-
69
-
70
-
71
-
72
-
73
-
74
-
75
-
76
-
77
-
78
-
79
-
80
-
81
-
82
-
83
-
84
-
85
-
86
-
87
-
88
-
89
-
90
-
91
-
92
-
93
-
94
-
95
-
96
-
97
-
98
-
99
-
100
-
101
-
102
-
103
-
104
-
105
-
106
-
107
-
108
-
109
-
110
 |
 |
