JVC TKC215V12U Instructions - Page 13
Adjusting Images, continued
 |
View all JVC TKC215V12U manuals
Add to My Manuals
Save this manual to your list of manuals |
Page 13 highlights
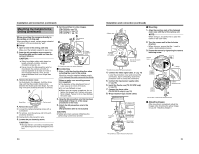
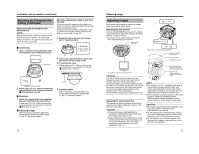
Adjusting Image (continued) Adjusting the field angle/focus/ brightness (Not available on TK-C210FW) Upon determining the imaging direction, adjust the field angle, focus and iris level accordingly. The method of adjustment varies with the camera in use. ‹ TK-C215V4 (A pg. 24) ‹ TK-C215V12 (A pg. 25) Ⅵ TK-C215V4 L H IRIS LEVEL FOCUS ADJUST Iris Level Adjustment Focus Adjust Button Zoom ring N F Focus ring W T *TK-C215V4 is used in the above illustration Adjusting field angle Loosen the fastening screw for the zoom adjustment ring and move the ring to the left/right to adjust the image. Adjusting focus Press the FOCUS ADJUST button. The iris will be opened for 30 seconds. Loosen the fastening screw for the focus adjustment ring and move the ring to the left/right to align the focus. NOTE: ● Set by repeating AAdjusting field angleB and AAdjusting focusB for 2 to 3 times. After adjustment is completed, fasten by tightening each of the fastening screws. ● The electronic shutter functions automatically upon pressing the focus adjustment button and the screen may flicker. However, this is not a malfunction. Adjusting brightness This adjustment only needs to be made when required. Use this to accommodate particular shooting conditions. To darken image : Counterclockwise (L side) To brighten image : Clockwise (H side) NOTE: ● For adjusting the brightness, do not conduct it within 30 seconds after pressing the focus button. ● When adjusting the iris level, set the AGC switch to AOFFB. Otherwise, when the level is turned too far toward L, the AGC function activates increasing sensitivity and the picture may look uneven. 24 Adjusting Images (continued) Ⅵ TK-C215V12 ● 2 types of angle of view may be selected for TK-C215V12. In general, set in a way such that the home position shoots a wide range and the alarm position a narrow range. ● Use the alarm input mode selection switch to set the actions when there is an alarm input. (A pg. 13) CAUTION: ● When setting images on TK-C215V12, ensure that the lens is covered using the dome cover. This camera is equipped with a high magnification lens. When adjustment is not performed through the cover, the lens may go out of focus when the cover is attached. ● When adjusting the focus, ensure that the optical axis of the lens and the center of the dome cover are aligned, and that the screen is not distorted. (See illustration below) Optical Axis POSITION ZOOM/FOCUS SELECT FAR IRIS WIDE TELE ‹ Registering home position For registering the angle of view during monitoring under normal conditions. 4. 2.,3. 1. 1. Check that the [ALARM POSITION] indicator light is turned off. Registration of home position is enabled. Press the [POSITION SELECT] button if the [ALARM POSITION] indicator light is on. 2. Adjust the angle of view. A Adjust the field angle Move the zoom adjustment switch in the [TELE] or [WIDE] direction to adjust the field angle. B Adjust the focus Move the focus adjustment switch in the [NEAR] or [FAR] direction to adjust the focus. NOTE: When the [ZOOM/FOCUS] switch is set to either [TELE/WIDE] or [NEAR/FAR], the iris will automatically open up for about 30 seconds and focus can be easily adjusted. During this interval, the electronic shutter mode is activated and the image may flicker. However, this is not a malfunction. 3. Press the [MEMORY] button for 2 seconds or longer. The [ALARM POSITION] indicator light blinks for 3 times (green) 4. Adjust the brightness. This adjustment only needs to be made when required. Use this to accommodate particular shooting conditions. To darken image : Counterclockwise (L side) To brighten image : Clockwise (H side) NOTE: ● For adjusting the brightness, do not conduct it within 30 seconds after pressing the [ZOOM/ FOCUS] button. ● When adjusting the iris level, set the AGC switch to AOFFB. Otherwise, when the level is turned too far toward L, the AGC function activates increasing sensitivity and the picture may look uneven. Ň Home position registration is completed 25 L H NEAR [MEMORY] LEVEL ALARM POSITION WHT.BAL. R 2 4 B 1 2 3 4 5 6 7 8 LL PHASE RESET/[SPOT]
-
 1
1 -
2
-
3
-
4
-
5
-
6
-
7
-
 8
8 -
 9
9 -
 10
10 -
 11
11 -
 12
12 -
 13
13 -
 14
14 -
 15
15 -
 16
16
 |
 |
