JVC TKC215V12U Instructions - Page 5
Name of Parts
 |
View all JVC TKC215V12U manuals
Add to My Manuals
Save this manual to your list of manuals |
Page 5 highlights
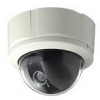
Introduction (continued) Name of Parts Camera A B C I H G TK-C215V12 only F B E D A Mounting hole (elliptical) x 4 Use these when mounting the camera to the electrical box. (A pg. 22) NOTE: When installing the camera onto the electric box, install it using the supplied adaptor ring. B Mounting hole (round) x 4 Use these when mounting the camera to the ceiling or wall. (A pg. 18, 20) C Outer Case Use this in the following cases: ● When mounting the camera directly to the ceiling or on the wall. (A pg. 20) ● When mounting the camera to the electrical box. (A pg. 22) D Dome Cover The dome cover is fragile. Take care when handling it. A E Wiring Hole Break and use this when drawing the cable from the camera unit without drilling a hole in the ceiling. (A pg. 22) F Input Power cable DC 12 V Input: Red (+12 V), Black (GND) AC 24 V Input: Non-polar. (A pg. 15) G Alarm signal cable (TK-C215V12 only) Yellow (ALARM IN), Gray (ALARM GND). (A pg. 15) H Protection Cover Upon connecting the coaxial cable, protect it by insulating the metal part of the BNC connector from the ceiling structure. I Video signal output connector (BNC) (A pg. 14) 8 Camera (Interior) The picture below shows the camera when the dome cover and outer case are removed. Procedures for removal. (A pg. 18 AEmbedding the camera to the ceilingB, Step 3. to Step 4.) Lens (A Next page) J K L U Camera Unit (Rear) T V S R N Q P O N M *TK-C215V4 is used in the above illustration J Fastening Screw (x 3) Screw head of the ceiling mount bracket O to be used when embedding the camera to the ceiling. K [MONITOR] terminal (RCA pin) (A pg. 23) L Camera Unit M Fall Prevention Wire Fastening Hook N Fall Prevention Wire (Supplied) and Wire Mounting Screw Connect the camera unit L and the outer case C using the fall prevention wire fastening hook M. O Ceiling Mount Bracket (x 3) This is used as a bracket when embedding the camera to the ceiling. (A pg. 18) P Camera Fastening Screw Use this to fasten the camera unit L to the outer case C. To remove. (A pg. 18, 20) Q Tilt Lock screw Tighten the screw to ensure that camera's shooting direction does not go out of alignment when it is used in a location with strong vibration. (A pg. 24) R Imaging Direction mark Install the camera by aligning the imaging direction with the arrow mark. S Rotation Knob Rotate the lens unit to adjust the inclination of the image (to be turned). T Rotation Center Mark (A pg. 24) U Pan fastening Screw Ensure to loosen the screw before setting. Further tighten the screw to ensure that camera's shooting direction does not go out of alignment only when it is used in a location with strong vibration. (A pg. 24) V Fall Prevention Wire mounting hole & Screw (Fall Prevention Wire not included.) 9
-
 1
1 -
 2
2 -
 3
3 -
 4
4 -
 5
5 -
 6
6 -
 7
7 -
 8
8 -
 9
9 -
 10
10 -
 11
11 -
12
-
13
-
14
-
15
-
16
 |
 |
