Karcher OC 3 Bike Box Operating instructions - Page 14
Description of the Appliance, Scope of delivery, Start up, Operation
 |
View all Karcher OC 3 Bike Box manuals
Add to My Manuals
Save this manual to your list of manuals |
Page 14 highlights
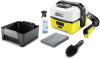
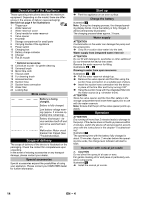
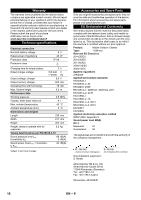
Description of the Appliance These operating instructions describe the maximum equipment. Depending on the model, there are differences in the scopes of delivery (see packaging). See fold-out page 4 for illustrations 1 Trigger gun 2 Water reservoir 3 Water reservoir cover 4 Carry handle for water reservoir 5 Valve opener 6 Fine filter 7 Storage compartment for small parts 8 Carrying handle of the appliance 9 Power switch 10 Charging box 11 Battery charge indicator 12 Charger 13 Flat jet nozzle * Optional accessories 14 Conical jet nozzle - for gentle cleaning 15 Universal brush 16 Micro fibre cloth 17 Viscous cloth 18 Fur cleaning brush 19 Accessories box 20 Suction hose 21 Suction hose connection 22 Water filter 23 Locking flap Blink codes Battery is being charged. Battery is fully charged. Low battery voltage warning (approx. 2 minutes operating time remaining). Battery discharged - device switches itself off and cannot be switched back on. Malfunction: Motor circuit breaker has tripped (See "Troubleshooting"). Scope of delivery The scope of delivery of the device is illustrated on the packaging. Check the content for completeness upon unpacking. In the event of missing accessories or any transport damage, please contact your dealer. Special accessories Special accessories expand the possibilities of using your appliance. Please contact your KÄRCHER dealer for further information. Start up Park the appliance on an even surface. Charge the battery Illustration Note: During the charging process, the charge/operating display blinks. Once the battery is fully charged, it will be permanently illuminated. The charging process takes approx. 3 hours. Water supply ATTENTION Contamination in the water can damage the pump and the accessories. Only fill or suction clear water into the tank. Water supply from integrated water reservoir ATTENTION Do not fill with detergents, pesticides or other additives! Do not immerse the device into water. Remove the water reservoir for filling. Illustrations - Drawing in water from open reservoirs Illustrations Pull the water reservoir straight up. Remove the valve opener and fine filter using the suction hose connection or a suitable pair of pliers. Insert the suction hose connection into the device in place of the fine filter and fix by turning it 90°. Hang the suction hose with the integrated filter into the water source (e.g. rainwater drum). ATTENTION Store the valve opener and the fine filter safely in the storage compartment and insert them again prior to use with the water reservoir. Note: Ensure that the pin of the valve opener points upwards. Operation ATTENTION Dry running of more than 2 minutes leads to damage to the pump. If the device does not build up pressure within 2 minutes, switch the device off and proceed in accordance with the instructions in the chapter "Troubleshooting". Illustration The operating time with the battery fully charged is about 15 minutes. Approx. 2 minutes before the operating time ends, the charge level indicator will start to flash. Operation with conical jet nozzle ṇ CAUTION Do not direct the spray jet at eyes or ears. For gentle cleaning of fur and paws or particularly sensitive components. Illustration Install the conical jet nozzle. 14 EN - 4
-
 1
1 -
2
-
3
-
4
-
5
-
6
-
7
-
8
-
 9
9 -
 10
10 -
 11
11 -
 12
12 -
 13
13 -
 14
14 -
 15
15 -
 16
16 -
 17
17 -
 18
18 -
 19
19 -
20
-
21
-
22
-
23
-
24
-
25
-
26
-
27
-
28
-
29
-
30
-
31
-
32
-
33
-
34
-
35
-
36
-
37
-
38
-
39
-
40
-
41
-
42
-
43
-
44
-
45
-
46
-
47
-
48
-
49
-
50
-
51
-
52
-
53
-
54
-
55
-
56
-
57
-
58
-
59
-
60
-
61
-
62
-
63
-
64
-
65
-
66
-
67
-
68
-
69
-
70
-
71
-
72
-
73
-
74
-
75
-
76
-
77
-
78
-
79
-
80
-
81
-
82
-
83
-
84
-
85
-
86
-
87
-
88
-
89
-
90
-
91
-
92
-
93
-
94
-
95
-
96
-
97
-
98
-
99
-
100
-
101
-
102
-
103
-
104
-
105
-
106
-
107
-
108
-
109
-
110
-
111
-
112
-
113
-
114
-
115
-
116
-
117
-
118
-
119
-
120
-
121
-
122
-
123
-
124
-
125
-
126
-
127
-
128
-
129
-
130
-
131
-
132
-
133
-
134
-
135
-
136
-
137
-
138
-
139
-
140
-
141
-
142
-
143
-
144
-
145
-
146
-
147
-
148
-
149
-
150
-
151
-
152
-
153
-
154
-
155
-
156
-
157
-
158
-
159
-
160
-
161
-
162
-
163
-
164
-
165
-
166
-
167
-
168
-
169
-
170
-
171
-
172
-
173
-
174
 |
 |
