Kenmore 4500 Use and Care Guide - Page 45
Glass Cooktop Cleaning & Maintenance
 |
View all Kenmore 4500 manuals
Add to My Manuals
Save this manual to your list of manuals |
Page 45 highlights
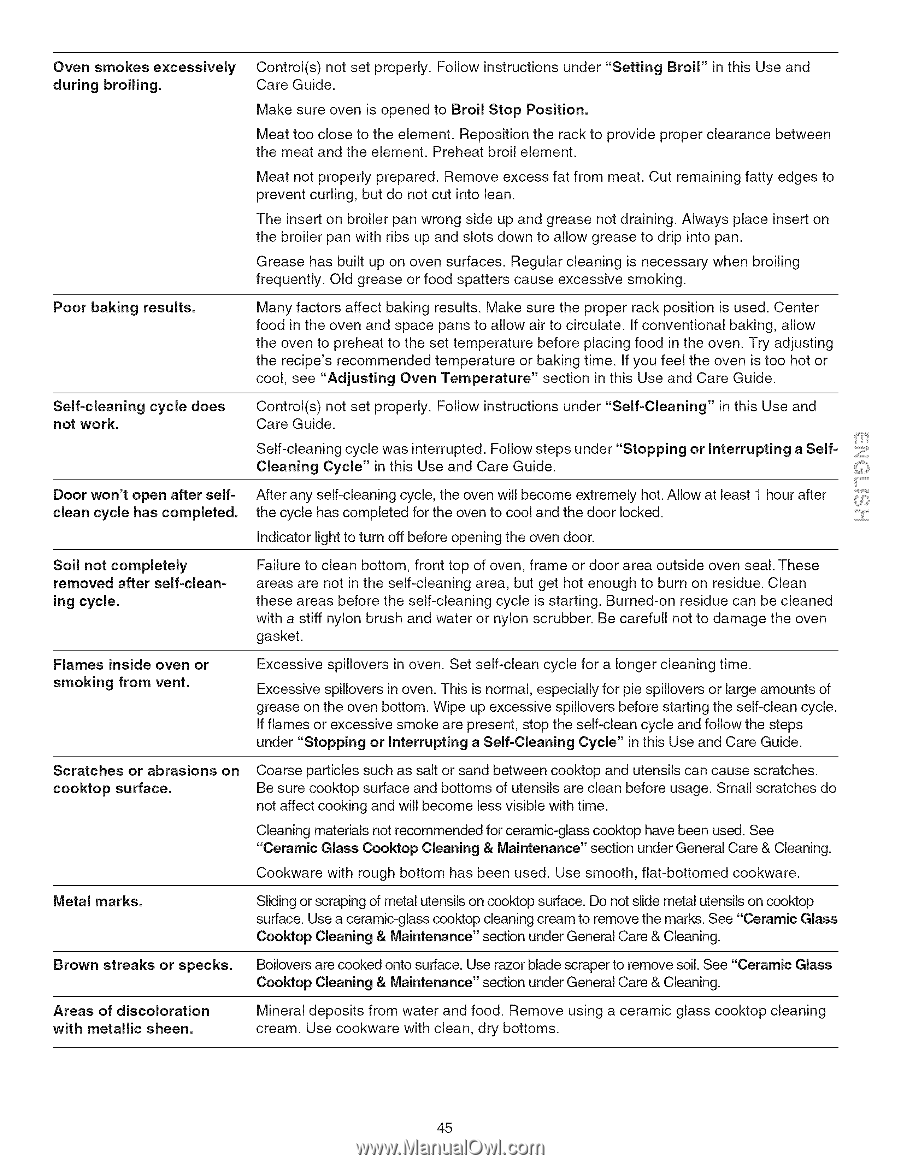
Oven smokes excessively during broiling. Control(s) not set properly. Follow instructions under "Setting Broil" in this Use and Care Guide. Make sure oven is opened to Broil Stop Position. Meat too close to the element. Reposition the rack to provide proper clearance between the meat and the element. Preheat broil element. Meat not properly prepared. Remove excess fat from meat. Cut remaining fatty edges to prevent curling, but do not cut into lean. The insert on broiler pan wrong side up and grease not draining. Always place insert on the broiler pan with ribs up and slots down to allow grease to drip into pan. Grease has built up on oven surfaces. Regular cleaning is necessary when broiling frequently. Old grease or food spatters cause excessive smoking. Poor baking results. Many factors affect baking results. Make sure the proper rack position is used. Center food in the oven and space pans to allow air to circulate. If conventional baking, allow the oven to preheat to the set temperature before placing food in the oven. Try adjusting the recipe's recommended temperature or baking time. If you feel the oven is too hot or cool, see "Adjusting Oven Temperature" section in this Use and Care Guide. Self=cleaning cycle does not work. Door won't open after self= clean cycle has completed. Control(s) not set properly. Follow instructions under "Self=Cleaning" in this Use and Care Guide. Self-cleaning cycle was interrupted. Follow steps under "Stopping or Interrupting a SelfCleaning Cycle" in this Use and Care Guide. After any self-cleaning cycle, the oven will become extremely hot. Allow at least 1 hour after the cycle has completed for the oven to cool and the door locked. Indicator light to turn off before opening the oven door. _..ii.i.l........ ...ii.i...... Soil not completely removed after self=clean= ing cycle. Flames inside oven or smoking from vent. Scratches or abrasions on cooktop surface. Metal marks. Failure to clean bottom, front top of oven, frame or door area outside oven seal. These areas are not in the self-cleaning area, but get hot enough to burn on residue. Clean these areas before the self-cleaning cycle is starting. Burned-on residue can be cleaned with a stiff nylon brush and water or nylon scrubber. Be carefull not to damage the oven gasket. Excessive spillovers in oven. Set self-clean cycle for a longer cleaning time. Excessive spillovers in oven. This is normal, especially for pie spillovers or large amounts of grease on the oven bottom. Wipe up excessive spillovers before starting the self-clean cycle. If flames or excessive smoke are present, stop the self-clean cycle and follow the steps under "Stopping or Interrupting a Self-Cleaning Cycle" in this Use and Care Guide. Coarse particles such as salt or sand between cooktop and utensils can cause scratches. Be sure cooktop surface and bottoms of utensils are clean before usage. Small scratches do not affect cooking and will become less visible with time. Cleaning materials not recommended for ceramic-glass cooktop have been used. See "Ceramic Glass Cooktop Cleaning & Maintenance" section under General Care & Cleaning. Cookware with rough bottom has been used. Use smooth, flat-bottomed cookware. Sliding or scraping of metal utensils on cooktop surface. Do not slide metal utensils on cooktop surface. Use a ceramic-glass cooktop cleaning cream to remove the marks. See "Ceramic Glass Cooktop Cleaning & Maintenance" section under General Care & Cleaning. Brown streaks or specks. Boilovers are cooked onto surface. Use razor blade scraper to remove soil. See "Ceramic Glass Cooktop Cleaning & Maintenance" section under General Care & Cleaning. Areas of discoloration with metallic sheen, Mineral deposits from water and food. Remove using a ceramic glass cooktop cleaning cream. Use cookware with clean, dry bottoms. 45
-
 1
1 -
2
-
3
-
4
-
5
-
6
-
7
-
8
-
9
-
10
-
11
-
12
-
13
-
14
-
15
-
16
-
17
-
18
-
19
-
20
-
21
-
22
-
23
-
24
-
25
-
26
-
27
-
28
-
29
-
30
-
31
-
32
-
33
-
34
-
35
-
36
-
37
-
38
-
39
-
 40
40 -
 41
41 -
 42
42 -
 43
43 -
 44
44 -
 45
45 -
 46
46 -
 47
47 -
 48
48
 |
 |