Kenmore 7800 Installation Instructions - Page 6
Installation Instructions
 |
UPC - 883049211312
View all Kenmore 7800 manuals
Add to My Manuals
Save this manual to your list of manuals |
Page 6 highlights
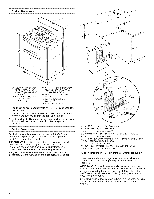
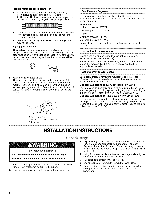
Flexible metal appliance connector: • If local codes permit, a new CSA design-certified, 4 to 5 ft (122 to 152.4 cm) long, 1/2"(1.3 cm) or 3A" (1.9 cm) I.D., flexible metal appliance connector may be used for connecting range to the gas supply line. • A 1/2"(1.3 cm) male pipe thread is needed for connection to the female pipe threads of the inlet to the appliance pressure regulator. • Do not kink or damage the flexible metal tubing when moving the range. Rigid pipe connection: The rigid pipe connection requires a combination of pipe fittings to obtain an in-line connection to the range. The rigid pipe must be level with the range connection. All strains must be removed from the supply and fuel lines so range will be level and in line. Must include a shutoff valve: The supply line must be equipped with a manual shutoff valve. This valve should be located in the same room but external to the range. It should be in a location that allows ease of opening and closing. Do not block access to shutoff valve. The valve is for turning on or shutting off gas to the range. B Gas Pressure Regulator The gas pressure regulator supplied with this range must be used. The inlet pressure to the regulator should be as follows for proper operation: Natural gas: Minimum pressure: 5" WCP Maximum pressure: 14" WCP LP gas: Minimum pressure: 11" WCP Maximum pressure: 14" WCP Contact local gas supplier if you are not sure about the inlet pressure. Burner Input Requirements Input ratings shown on the model/serial rating plate are for elevations up to 2,000 ft (609.6 m). For elevations above 2,000 ft (609.6 m), ratings are reduced at a rate of 4% for each 1,000 ft (304.8 m) above sea level (not applicable for Canada). Gas Supply Pressure Testing Gas supply pressure for testing regulator must be at least 1" water column pressure above the manifold pressure shown on the model/serial rating plate. Line pressure testing above 1/2psi gauge (14" WCP) The range and its individual shutoff valve must be disconnected from the gas supply piping system during any pressure testing of that system at test pressures in excess of 1/2psi (3.5 kPa). Line pressure testing at 1/2psi gauge (14" WCP) or lower The range must be isolated from the gas supply piping system by closing its individual manual shutoff valve during any pressure testing of the gas supply piping system at test pressures equal to or less than 1/2psi (3.5 kPa). A. Gas supply line B. Shutoff valve "open" position C. To range INSTALLATION INSTRUCTIONS Excessive Weight Hazard Use two or more people to move and install range. Failure to do so can result in back or other injury. 1. Remove shipping materials, tape and protective film from the range. Keep cardboard bottom under range. 2. Remove oven racks and parts package from inside oven. 3. To place range on its back, take 4 cardboard corners from the carton. Stack one cardboard corner on top of another. Repeat with the other 2 corners. Place them lengthwise on the floor behind the range to support the range when it is laid on its back. 4. Using 2 or more people, firmly grasp the range and gently lay it on its back on the cardboard corners. 5. Pull cardboard bottom firmly to remove. 6. Use an adjustable wrench to loosen the leveling legs. 7. Place cardboard or hardboard in front of range. Using 2 or more people, stand range back up onto cardboard or hardboard.
-
 1
1 -
 2
2 -
 3
3 -
 4
4 -
 5
5 -
 6
6 -
 7
7 -
 8
8 -
 9
9 -
 10
10 -
 11
11 -
 12
12 -
13
-
14
-
15
-
16
-
17
-
18
-
19
-
20
-
21
-
22
-
23
-
24
-
25
-
26
-
27
-
28
-
29
-
30
-
31
-
32
-
33
-
34
-
35
-
36
 |
 |