Kenmore 7975 Use and Care Guide - Page 17
In-door
 |
View all Kenmore 7975 manuals
Add to My Manuals
Save this manual to your list of manuals |
Page 17 highlights
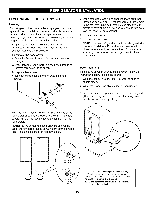
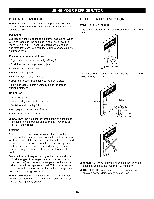
IN-DOOR ICE BANK A CAUTION • Keep hands and tools out of the ice bank door and dispenser chute. You could break something or injure yourself. The icemaker will stop producing ice when the ice bank is full. If you need more ice, empty the ice bank into the extra ice bin in the freezer compartment so the icemaker can keep producing ice. Shake the ice bank occasionally to level the ice in it. Sometimes the ice piles up near the icemaker, causing the icemaker to misread the amount of ice cubes and stop producing ice. NOTE: Storing cans or other items in the ice bank may damage the icemaker. Keep the ice bank door closed tightly. If the ice bank door is not closed tightly, the cold air in the ice bank will freeze food in the refrigerator compartment. This could also cause the icemaker to not produce ice. NOTE: To prevent ice cubes from melting and leaking from the dispenser, ALWAYS empty the ice bin when the icemaker is set to Off for more than a few hours. 1. Push on the latch firmly where noted to close the ice bank door; it will make a clicking sound when it is closed completely. 2. To remove the in-door ice bank, grip the front handle, slightly lift the lower part, and slowly pull out the bin as shown. 3. To reinstall the in-door ice bank, slightly slant the bin during replacement to avoid contact with the icemaker. 4. Avoid touching the automatic shutoff arm when replacing the ice bank. See the label on the ice bank door for details. 17
-
 1
1 -
2
-
3
-
4
-
5
-
6
-
7
-
8
-
9
-
10
-
11
-
 12
12 -
 13
13 -
 14
14 -
 15
15 -
 16
16 -
 17
17 -
 18
18 -
 19
19 -
 20
20 -
 21
21 -
 22
22 -
23
-
24
-
25
-
26
-
27
-
28
-
29
-
30
-
31
-
32
-
33
-
34
-
35
-
36
 |
 |