Kenmore 9791 Installation Instructions
Kenmore 9791 - 27 in. Laundry Center Manual
 |
View all Kenmore 9791 manuals
Add to My Manuals
Save this manual to your list of manuals |
Kenmore 9791 manual content summary:
- Kenmore 9791 | Installation Instructions - Page 1
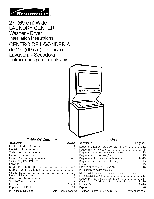
27" (69 cm) Wide LAUNDRY CENTER Washer- Dryer Installation Instructions CENTRO DE LAVANDERiA de 27" (69 cm) de ancho Lavadora - Secadora Instrucciones para la instalaci6n J I i \ Table Of Contents Indice S UBJECT PAGE MA TERIA PA GINA - Kenmore 9791 | Installation Instructions - Page 2
Guide and on your appliance. Always read and obey all safety messages. The instructions in this manual and other literature included with this dryer are not meant to cover every possible condition and situation that may occur. Good safe practice and caution MUST be applied when installing, operating - Kenmore 9791 | Installation Instructions - Page 3
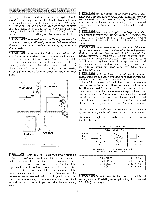
Center NOTE: Do not under any circumstances ] remove grounding prong from plug. CIRCUIT- Individual 30 amp. branch circuit fused with 30 amp. time delay fuses or circuit breakers. Use separately fused circuits for washers and dryers, and DO NOToperate a washer of your laundry center's water - Kenmore 9791 | Installation Instructions - Page 4
and safe operation of your dryer. Failure to follow these instructions can create outdoors some fine lint will be expelled into the laundry area. An accumulation of lint in any area of Regularly inspect the outdoor exhaust opening and remove any accumulation of lint around the outdoor exhaust - Kenmore 9791 | Installation Instructions - Page 5
manual shutoff valve during any pressuretesting of the gas supply piping system at test pressures equal to or less than 1/2 psig (3.45 kPa). DO NOT INSTALL YOUR LAUNDRY CENTER show minimum clearance dimensions and air openings for proper operation in a recess or closet installation. 0 IN. - Kenmore 9791 | Installation Instructions - Page 6
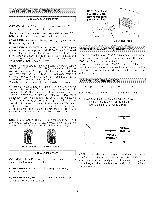
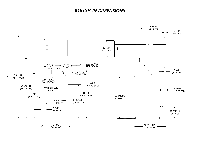
ROUGH-IN DIMENSIONS D 16 ¼ IN, (41,27 CM) U II-- 121/2 IN.--]II_I _ , 93181N. (31.75 CM) _ _1(23"81_C_ VENT_I_ _,_'_ _.____._ GAS SUPPLY PIPE (REAR) 75 1/2IN, (191,77 CM) ELECTRICAL CONNECTION © 54 5/16 IN, (137.95 CM) WATER INLETS J_ (REAR) 43 IN. (109.22 CM) _._/_ DRA(IRNEAORU) - Kenmore 9791 | Installation Instructions - Page 7
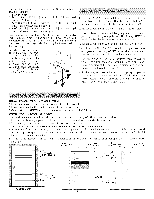
spacer block should be retained. 3. Return laundry center to an upright position. 4. Remove: (a) foam tub blocking pad. (b) tape from dryer door. (c) foam dryer support pads. (d) inlet hoses. (e) enclosure package. 5. From the back of the washer, remove the wire shipping clips securing the drain - Kenmore 9791 | Installation Instructions - Page 8
MUST be properly grounded. Electrical shock can result if the laundry center is not properly grounded. Follow the instructions in this manual for proper grounding. For a grounded cord-connected laundry center: 1. The laundry center MUST be grounded. In the event of malfunction or breakdown - Kenmore 9791 | Installation Instructions - Page 9
terminal block. Tighten the screw securely. GREEN GROUND SCREW SILVER TERMINAL !VON-CANAD/AN ELECTR/CLaundry Center 1. Remove the screw securing the terminal block access cover to the rear panel and remove cover. . Install a U.L approved strain relief connector in the entry hole on the back panel - Kenmore 9791 | Installation Instructions - Page 10
the tabs can be disengaged from the cabinet. Remove the panel and set aside. 7. GAS CONNECTION (Gas/aundry centers on/y) a. Remove the shipping cap from gas pipe at the rear of the dryer. NOTE: DO NOTconnect the laundry center to L R gas service without converting the gas valve. An LR conversion - Kenmore 9791 | Installation Instructions - Page 11
making another attempt to light. 15. If your laundry center does not operate, please review the "Avoid Service Checklist" located in your Owner's Guide before calling for service. 16. Place these instructions in a location near the laundry center for future reference. NOTE: A wiring diagram is - Kenmore 9791 | Installation Instructions - Page 12
qu_ puede suceder si no se siguen /as instrucdones. R/ESGO DE/NCEND/O. Para su seguridad, siga las instrucciones contenidas en este manual a fin de reducir a un minimo los riesgos de incendio o explosi6n o para evitar dahos materiales, lesiones personales o la muerte. GUARDEESTAS /NSTRUCC/ONES - Kenmore 9791 | Installation Instructions - Page 13
Centro de/avanderia EL_'CTRICAS CIRCUITO: circuito independiente individual de 30 A con fusibles de acci6n retardada o disyuntores. Use circuitos con fusibles separados para las lavadoras y secadoras y NO haga funcionar una lavadora y una secadora en el mismo circuito. SUMINISTRO ELECTRICO: trifilar - Kenmore 9791 | Installation Instructions - Page 14
Utilicesolamentdeuctosmet_ilicos rigidos o flexibles de 4" (10,2 cm) de di_imetro (minimo) y una caperuza de salida de uso aprobado, con registrosque giren hacia afuera que seabren cuando la secadora seencuentra en funcionamiento. Cuando la secadora se detiene, los registros se cierran - Kenmore 9791 | Installation Instructions - Page 15
Se puede colocar el ducto de escape de cuatro (4) maneras distintas cuando el artefacto est_ instalado con el fondo paralelo con la pared. 1. Derecho hacia arras. 2. Hacia abajo - ducto rigido, 8 pulgadas (20.32 cm) de Iongitud y 4 pulgadas (10,16 cm) de all,metro & 1 ducto acodado hacia abajo. - Kenmore 9791 | Installation Instructions - Page 16
DIMENSiONES PARA LA INSTALACiON I 25 I/_ IN. (64.13 CM) 2 I/2 IN. 4-- (6.35 CM) D 16 I,_ IN. (41.27 CM) I_-- 121/21N._D,_ _ m 93/81N. (31.75 CM)" _I(23.81,CIM) VEm'_--_t-_ _ LINA DE ALIMENTATION DE GAS (ATRAS) 75 1/2IN. (191.77 CM) Ob 54 5/16 IN. (137.95 CM) 43 IN. (109.22 CM) CONEXIONES - Kenmore 9791 | Installation Instructions - Page 17
1. Eltubo de escape de la secadora DEBEser instalado hacia el exterior (El escape debe colocarse en la parte exterior y no debajo de la casa m6vil.) Debe usarse ducto de metal que no seacombustible. Elducto de metal debe tenor cuatro pulgadas (10,16 cm) de di_imetro y no tenor obstrucciones. - Kenmore 9791 | Installation Instructions - Page 18
de manera correcta. Si la lavanderia no est,1debidamente puesta a tierra sepuede producir un choque el_ctrico. Siga lasinstrucciones indicadas en este manual para la puesta a tierra en forma correcta. _La conexi6n indebida del conductor de puesta a tierra del equipo puede ocasionar un riesgo - Kenmore 9791 | Installation Instructions - Page 19
4.Conecteelconductonreutrodecol rdoenl_ctrico(cacbelentral) al bornecentrapl lateadodeltablerodebornesA. priete firmementeeltornillo. TORNILLO VERDE DE PU ESTAA TERRA BORNE PLATEADO , Desconecte el cable de puesta a tierra neutral del tornillo verde de puesta a tierra situado en la parte superior - Kenmore 9791 | Installation Instructions - Page 20
encender la secadora nuevamente. 15.Si su lavanderia no funciona, consulte la secciOn "Lista de Control de Averias" que se encuentra en su Manual del Usuario, antes de Ilamar para obtener servicio. 16.Conserve estas instrucciones cerca de la secadora para referencia futura. NOTA: Dentro de la
-
 1
1 -
 2
2 -
 3
3 -
 4
4 -
 5
5 -
 6
6 -
 7
7 -
8
-
9
-
10
-
11
-
12
-
13
-
14
-
15
-
16
-
17
-
18
-
19
-
20
 |
 |
27" (69 cm) Wide
LAUNDRY CENTER
Washer-
Dryer
Installation
Instructions
CENTRO
DE LAVANDERiA
de 27" (69 cm) de ancho
Lavadora - Secadora
Instrucciones
para la instalaci6n
J
I
i
\
Table
Of
Contents
S UBJECT
PAGE
Pre-lnstallation
Requirements
...............................
2
Electrical
Requirements
..........................................
3
Water
Supply
Requirements
....................................
3
Drain
Requirements
.................................................
3
Exhaust System
Requirements
.................................
4-5
Gas Supply Requirements
...........................................
5
Location
...................................................................
5
Rough-In
Dimensions
.............................................
6
Mobile
Home
Installation
...........................................
7
Unpacking
..............................................................
7
Electrical
Installation
.................................................
8
Grounding
Requirements
.........................................
8
3 & 4-Wire
Connections
............................................
9
Installation
.......................................................
10-11
Replacement
Parts
.................................................
11
PIN 134809300C
(0904)
Indice
MA
TERIA
PA
GINA
Requerimientos
de instalacion
preliminares
....................
12
Requerimientos
electricos
...........................................
13
Req uerimientos
del su min istro de agua
..........................
13
Requenmlentos
de desagOe
..........................................
13
Req uerimientos
del sistema de escape
.....................
14-15
Requerimientos
del suministro
de gas
.............................
15
Ubicacidn
.......................................................................
15
Dimensiones
para la instalaci6n
.....................................
16
Instalaci6n
en casas m6viles
........................................
17
Desembalaje
........................................................................
17
Instalaci6n
electrica
.....................................................
18
Req uerimientos
para la puesta a tierra
...........................
18
Conexi6nes
electricas
- trifilares
y tetrafilares
..........
18-19
Instalaci6n
..............................................................
19-20
Repuestos
...................................................................
20
Sears, Roebuck and Co., Hoffman
Estates, IL 60179 U.S.A.
www.sears.com