Kenwood KIV-BT900 Instruction Manual - Page 35
Illumination Color Selection, Customization of Clock Display, Display, Setting
 |
UPC - 019048189790
View all Kenwood KIV-BT900 manuals
Add to My Manuals
Save this manual to your list of manuals |
Page 35 highlights
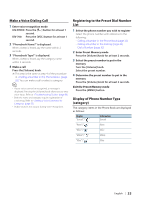
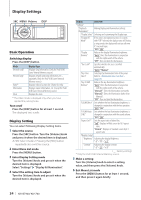
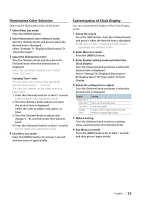
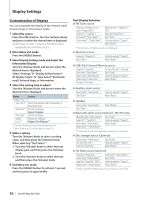
Illumination Color Selection Selecting the Illumination Color of the panel. 1 Enter Menu List mode Press the [MENU] button. 2 Enter Illumination color selection mode Turn the [Volume] knob and press it when the desired item is displayed. Select "Settings" > "Display & Illumination" > "Key Color Select". 3 Select the Illumination Color Turn the [Volume] knob and then press the [Volume] knob when the desired item is displayed. Select the color from "Variable Scan"/ "Color1" - "Color 10"/ "User". Creating "User" color You can create your original color during the selection from "Color1" - "Color10". The color you created can be called when you select "User". 1. Press the [Volume] knob for at least 1 second. Enter the detail color adjustment mode. 2. Turn the [Volume] knob and press it when the desired item is displayed. Select the color to adjust. (red, green, or blue). 3. Turn the [Volume] knob to adjust color (Range: 0 - 9), and then press the [Volume] knob. 4. Press the [Volume] knob for at least 1 second. Exit the detail color adjustment mode. 4 Exit Menu List mode Press the [MENU] button for at least 1 second, and then press it again briefly. Customization of Clock Display You can customize the display of the Clock Display mode. 1 Select the source Press the [SRC] button. Turn the [Volume] knob and press it when the desired item is displayed. ✍✍SRC Select mode 2: Pressing the [SRC] button repeatedly also switches source. 2 Enter Menu List mode Press the [MENU] button. 3 Enter Display Setting mode and Select the Clock Display Turn the [Volume] knob and press it when the desired item is displayed. Select "Settings" > "Display & Illumination" > "Display Select" > "Type Select" > Clock Display. 4 Select the setting item to adjust Turn the [Volume] knob and press it when the desired item is displayed. Display "Display Select" "Type Select" "Text Select" "Graphic Select" Setting Selects the Clock Display mode. Sets the text display. Switches between single and dual clock and between analog and digital display. 5 Make a setting Turn the [Volume] knob to select a setting value, and then press the [Volume] knob. 6 Exit Menu List mode Press the [MENU] button for at least 1 second, and then press it again briefly. English | 35
-
 1
1 -
2
-
3
-
4
-
5
-
6
-
7
-
8
-
9
-
10
-
11
-
12
-
13
-
14
-
15
-
16
-
17
-
18
-
19
-
20
-
21
-
22
-
23
-
24
-
25
-
26
-
27
-
28
-
29
-
 30
30 -
 31
31 -
 32
32 -
 33
33 -
 34
34 -
 35
35 -
 36
36 -
 37
37 -
 38
38 -
 39
39 -
 40
40 -
41
-
42
-
43
-
44
-
45
-
46
-
47
-
48
-
49
-
50
-
51
-
52
-
53
-
54
-
55
-
56
-
57
-
58
-
59
-
60
-
61
-
62
-
63
-
64
-
65
-
66
-
67
-
68
-
69
-
70
-
71
-
72
-
73
-
74
-
75
-
76
-
77
-
78
-
79
-
80
-
81
-
82
-
83
-
84
 |
 |