Kenwood LSF-1010 User Manual - Page 18
Other Ways to Set Up the Satellite Speakers, Offset Mount
 |
View all Kenwood LSF-1010 manuals
Add to My Manuals
Save this manual to your list of manuals |
Page 18 highlights
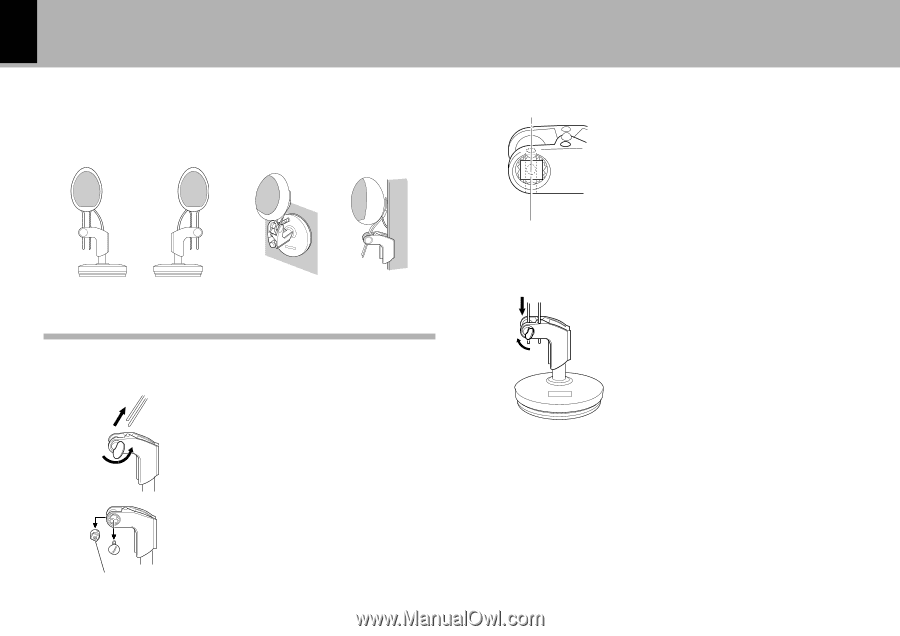
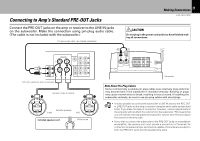
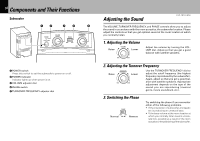
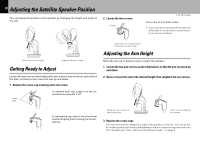
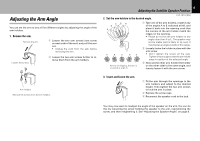
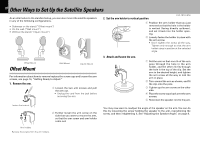
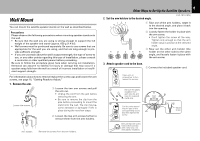
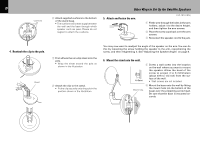
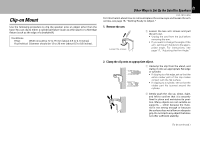
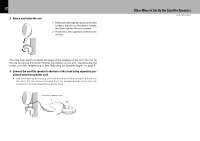
FRANÇAIS DEUTSCH 18 Other Ways to Set Up the Satellite Speakers As an alternative to the standard setup, you can also mount the satellite speakers in any of the following configurations. • Sideways on the stand ("Offset mount") • On the wall ("Wall mount") • Without the stand ("Clip-on mount") 2. Set the arm holder to vertical position. LSF-1010 (EN) 1 Position the arm holder that you just removed so that the hole in the holder is vertical (facing directly up/down), and set it back into the holder opening. 2 Loosely fasten the holder in place with the arm screw. • Don't tighten the screw all the way. Tighten only enough so that the arm holder stays in position at the selected angle. Offset Mount Offset Mount Wall Mount Clip-On Mount For information about how to remove/replace the screw caps and loosen the arm screws, see page 16, "Getting Ready to Adjust." 1. Remove the arm. 1 Loosen the two arm screws and pull the arm out. • Unplug the cord from the jack before removing the arm. 3. Attach and fasten the arm. 1 Set the arm so that one rib of the arm goes through the hole in the arm holder, and the other rib fits through the hole in the top of the clip. Set the arm to the desired height, and tighten the arm screw all the way to lock the arm in place. 2 Turn around the arm as shown, and fit the clip onto the pole. 3 Tighten up the arm screw on the other side. 4 Place the screw caps back over the arm screws. 5 Reconnect the speaker cord to the jack. Loosen the screws. 2 Further loosen the arm screw on the side that you want to mount the arm, so that the arm screw and arm holder come out. You may now want to readjust the angle of the speaker on the arm. You can do this by loosening the screw holding the speaker to the arm, repositioning the screw, and then retightening it. See "Adjusting the Speaker Angle," on page 8. NEDERLANDS ITALIANO ESPAÑOL Arm holders Remove the screws from the arm holders.
-
 1
1 -
2
-
3
-
4
-
5
-
6
-
7
-
8
-
9
-
10
-
11
-
12
-
 13
13 -
 14
14 -
 15
15 -
 16
16 -
 17
17 -
 18
18 -
 19
19 -
 20
20 -
 21
21 -
 22
22 -
 23
23 -
24
-
25
-
26
 |
 |