KitchenAid KBSN702MBS Owners Manual - Page 28
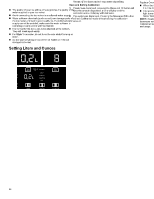
Setting Liters and Ounces, Measured Fill, Water Filtration System, Water Filter Status Indicator
 |
View all KitchenAid KBSN702MBS manuals
Add to My Manuals
Save this manual to your list of manuals |
Page 28 highlights
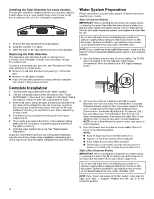
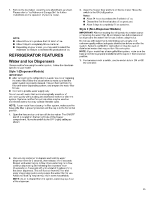
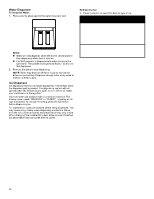
� The quality of your ice will be only as good as the quality of the water supplied to your ice maker. � Avoid connecting the ice maker to a softened water supply. � Water softener chemicals (such as salt) can damage parts of the ice maker and lead to poor quality ice. If a softened water supply cannot be avoided, make sure the water softener is operating properly and is well maintained. � It is normal for the ice cubes to be attached at the corners. They will break apart easily. � For Style 1 ice maker, do not force the wire shutoff arm up or down. � Do not store anything on top of the ice maker or in the ice storage bin/bucket. Setting Liters and Ounces OZ C Hold [Max Freezer] + [FreshChill] buttons to switch between L and OZ. When activated, the corresponding point LED is lit at FULL brightness. The LED will turn off after 10 seconds if it's not in the mode associated to the water amount mode. The L/OZ only turns on when there is an interaction associated to water amount (eg, measured fill, calibration). Measured Fill Calibrate Measured Fill Household water pressure may affect the accuracy of the Measured Fill feature. For optimum performance of your water dispenser, you must first calibrate Measured Fill. Start Calibration Mode 1. Press and hold the Measured Fill button for 3 seconds to enter Calibration Mode. The button will display along with the 0.2 L or 8 oz default settings. 2. Pressing the water pad will dispense water (e.g. into a measuring cup) until the desired amount is dispensed. Releasing the water pad will stop water dispensing. Save and Exiting Calibration 1. If water was dispensed, pressing the Measured Fill button will save the amount dispensed, a tone will play and the calibration amount display will blink twice. 2. If no water was dispensed, Pressing the Measured Fill button will exit Calibration mode without saving the calibration amount. NOTE: The amount of water you select will be dispensed. Be sure that the container is empty and can hold the entire volume. If ice is in the container, you may need to adjust your selection. IMPORTANT: Low water pressure may affect the accuracy of this feature. 1. Press MEASURED FILL to turn the feature on. When the feature is on, the Measured Fill screen appears on the display. 2. To dispense water, press a sturdy glass against the water dispenser pad or place the glass below the water dispenser and press the MEASURED FILL button. Hold the glass close to the water dispenser spout to ensure that the water dispenses into the glass. 3. The Measured fill button can be pressed to loop the preset amounts. Each press advances the preset amount until the end of the options are reached. Example 8 oz to 16 oz to 24oz, END (0.2L to 0.5L to 1.0L, END). NOTE: � The dispenser will automatically turn off Measured Fill after 1 minute of inactivity. When Measured Fill is turned off, any changes you have made will be lost and all defaults will be restored. � Most coffee cups are 4-6 oz (118-117 ml) and are not the same size as an 8 oz (237 ml) measuring cup. You may need to adjust the volume to avoid overfilling coffee cups. � While dispensing water, the digital display will count down how much water remains to be dispensed, according to the volume you selected. The flow of water will automatically stop once the desired volume has been dispensed. Water Filtration System Do not use with water that is microbiologically unsafe or of unknown quality without adequate disinfection before or after the system. Systems certified for cyst reduction may be used on disinfected waters that may contain filterable cysts. Water Filter Status Indicator The water filter indicator, located on the control panel, will help you know when to change the water filter. Replace status: � Replace the water filter cartridge when the water filter status display changes to "Replace." Replace Overdue status: � When the light turns red on the control panel, this tells you that it is time to change the water filter cartridge. � It is recommended that you replace the filter when the status light turns red or water flow to your water dispenser or ice maker decreases noticeably. NOTE: If water flow to your water dispenser or ice maker decreases noticeably, change the filter sooner. The filter should be replaced at least every 6 months, depending on your water quality and usage. 28
-
 1
1 -
2
-
3
-
4
-
5
-
6
-
7
-
8
-
9
-
10
-
11
-
12
-
13
-
14
-
15
-
16
-
17
-
18
-
19
-
20
-
21
-
22
-
 23
23 -
 24
24 -
 25
25 -
 26
26 -
 27
27 -
 28
28 -
 29
29 -
 30
30 -
 31
31 -
 32
32 -
 33
33 -
34
-
35
-
36
-
37
-
38
-
39
-
40
-
41
-
42
-
43
-
44
-
45
-
46
-
47
-
48
-
49
-
50
-
51
-
52
-
53
-
54
-
55
-
56
-
57
-
58
-
59
-
60
-
61
-
62
-
63
-
64
-
65
-
66
-
67
-
68
-
69
-
70
-
71
-
72
 |
 |
