KitchenAid KDRP467KSS Use and Care Guide
KitchenAid KDRP467KSS - 36 Inch Pro-Style Dual Fuel Range Manual
 |
View all KitchenAid KDRP467KSS manuals
Add to My Manuals
Save this manual to your list of manuals |
KitchenAid KDRP467KSS manual content summary:
- KitchenAid KDRP467KSS | Use and Care Guide - Page 1
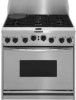
PRO LINE™ DUAL FUEL RANGE Use & Care Guide In the U.S.A., for questions about features, operation, performance, parts, accessories or service, call: 1-800-422-1230. In Canada, for product-related questions call: 1-800-461-5681, for parts, accessories, installation and service, call: 1-800-807-6777 - KitchenAid KDRP467KSS | Use and Care Guide - Page 2
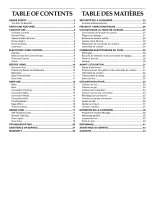
Convection Roast 14 Convection Broil 15 Proofing Bread 15 Keep Warm 16 Timed Cooking 16 RANGE CARE 17 Self-Cleaning Cycle 17 General Cleaning 17 Oven Lights 19 Oven Door 19 TROUBLESHOOTING 20 ASSISTANCE OR SERVICE 21 WARRANTY 22 TABLE DES MATIÈRES SÉCURITÉ DE LA CUISINIÈRE 23 La bride - KitchenAid KDRP467KSS | Use and Care Guide - Page 3
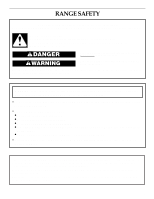
tell you what can happen if the instructions are not followed. WARNING: If the information in this manual is not followed exactly, a fire or instructions. • If you cannot reach your gas supplier, call the fire department. - Installation and service must be performed by a qualified installer, service - KitchenAid KDRP467KSS | Use and Care Guide - Page 4
tip bracket is over rear brace of range. IMPORTANT SAFETY INSTRUCTIONS WARNING: To reduce the risk of fire, electrical shock, injury to persons, or damage when using the s Disconnect the electrical supply before servicing the appliance. range, follow basic precautions, including the s Never Use - KitchenAid KDRP467KSS | Use and Care Guide - Page 5
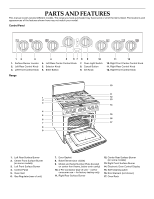
AND FEATURES This manual covers several different models. The range you have purchased may have some or all of the items listed. The locations and appearances of the features shown here may not match your model. Control Panel REAR FRONT REAR ENTER SELECTOR CANCEL SET AUTO OFF OVEN LIGHT - KitchenAid KDRP467KSS | Use and Care Guide - Page 6
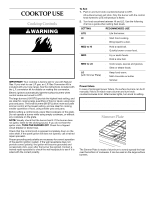
Conversion Kit is included with your new range. See the instructions included with the L.P. conversion kit for details on making this conversion. Electric ignitors automatically light between HI and LO. Use the following chart as a guide when setting heat levels. SETTING RECOMMENDED USE LITE s - KitchenAid KDRP467KSS | Use and Care Guide - Page 7
the medium to low range on the cooktop when lower are off and the oven and cooktop are cool. Do not use oven cleaners, bleach or rust removers. Burner cap: Always If the burner does not light, check cap alignment. If the burner still does not light, do not service the sealed burner yourself. Contact - KitchenAid KDRP467KSS | Use and Care Guide - Page 8
LIGHT on some models). 2. When burner has lit, turn control knob to LO position (or LOW on some models). 3. Remove Use the following chart as a guide for cookware material characteristics. COOKWARE Ceramic or Ceramic glass s Follow manufacturer's instructions. s Heats slowly, but unevenly. s - KitchenAid KDRP467KSS | Use and Care Guide - Page 9
for the Clock/Time of Day. After canceling an operation, "End" will be displayed to show the function was cancelled. The cooling fan might continue operating after a function has ended, but will shut off automatically when the oven has cooled. Clock This is a 12 hour clock and does not show a.m. or - KitchenAid KDRP467KSS | Use and Care Guide - Page 10
range is new. This happens the first time the oven some models). Positioning Racks and Bakeware IMPORTANT: Never place food or bakeware directly on the oven door or in. (5 cm) of space around bakeware and oven walls. Use the following chart as a guide. NUMBER OF POSITION ON RACK PAN(S) 1 Center - KitchenAid KDRP467KSS | Use and Care Guide - Page 11
oven. s May need to increase baking time. Stainless steel s Light, golden crusts s Uneven browning s May need to increase baking time. Stoneware s Crisp crusts s Follow manufacturer's instructions two or three places. Oven Vent 1 1. Oven door vent The oven vent should not be blocked or covered - KitchenAid KDRP467KSS | Use and Care Guide - Page 12
only the broiler pan and grid provided with the range. It is designed to drain juices and help curling. s Pull out oven rack to stop position before turning or removing food. Use tongs to oven rack. To Broil: 1. Close the door. 2. Turn the SELECTOR knob to BROIL. "HI" will appear on the display - KitchenAid KDRP467KSS | Use and Care Guide - Page 13
to a minimum by only opening the oven door when necessary. s Choose cookie sheets guides 2 and 4. When using three racks, place on guides 1, 3 and 5. 1. Turn the SELECTOR knob to CONVECT BAKE. The display will show 325°F (163°C). 2. Turn the SET knob to desired temperature. The convection bake range - KitchenAid KDRP467KSS | Use and Care Guide - Page 14
off in intervals to maintain oven temperature, while the fan constantly circulates the hot air. If the oven door is opened during convection knob to CONVECT ROAST. The display will read 300°F (149°C). 2. Turn the SET knob to desired temperature. The convection roast range can be set between 170°F - KitchenAid KDRP467KSS | Use and Care Guide - Page 15
the center of the oven rack with the longest side parallel to the door. 1. Close the door. 2. Turn the SELECTOR knob to CONVECT BROIL. The display will show "HI." steps above. Before baking, remove the plastic wrap. To Bake: 1. Turn the SELECTOR knob to BREAD BAKING. The display will read 430°F ( - KitchenAid KDRP467KSS | Use and Care Guide - Page 16
ENTER button and the Keep Warm light will glow (if selected). If using the KEEP WARM function after cooking foods, open the oven door to allow the oven to cool, or shorten the cook time as the oven maintains temperature. When END appears in the display and the oven beeps, the Timed Cooking function - KitchenAid KDRP467KSS | Use and Care Guide - Page 17
not clean, rub, damage or move the oven door gasket. The door gasket is essential for a good seal. Prepare Oven: s Remove the broiler pan, grid, cookware and bakeware and, on some models, the temperature probe from the oven. s Remove any foil from the oven because it may burn or melt, damaging the - KitchenAid KDRP467KSS | Use and Care Guide - Page 18
(not included): See "Assistance or Service" section to order. s Liquid detergent OVEN AND ROASTING RACKS s Self-Cleaning cycle: See "Self-Cleaning Cycle" first. Remove racks or they will discolor and become harder to slide. If this happens, a light coating of vegetable oil applied to the rack guides - KitchenAid KDRP467KSS | Use and Care Guide - Page 19
. 1. Disconnect power. 2. Remove glass light cover by grasping the front edge and pulling away from oven. Oven Door For normal range use, it is not suggested to remove the oven door. However, if necessary, follow these instructions. The oven door is heavy. To Remove: 1. Open oven door all the way - KitchenAid KDRP467KSS | Use and Care Guide - Page 20
by a number? Clear the display. See "Display(s) section. If it reappears, call for service. Self-Cleaning Cycle will not operate s Is the oven door open? Close the oven door all the way. s Has the function been entered? See "Self-Cleaning Cycle" section. s On some models, has a delay start Self - KitchenAid KDRP467KSS | Use and Care Guide - Page 21
5:30 p.m. (EST) Our consultants provide assistance with: s Features and specifications on our full line of appliances. s Referrals to local dealers. For parts, accessories and service in Canada Call 1-800-807-6777. KitchenAid designated service technicians are trained to fulfill the product warranty - KitchenAid KDRP467KSS | Use and Care Guide - Page 22
and maintained according to instructions attached to or furnished with the product, KitchenAid will pay for factory specified parts for the porcelain oven cavity/inner door if the part rusts through due to defects in materials or workmanship. KitchenAid will not pay for: 1. Service calls to correct - KitchenAid KDRP467KSS | Use and Care Guide - Page 23
instructions. AVERTISSEMENT Risque possible de décès ou de blessure grave si vous ne suivez pas les instructions se produire en cas de non-respect des instructions. AVERTISSEMENT : Pour votre sécurité, les gaz d'un téléphone voisin. Suivre ses instructions. • À défaut de joindre votre fournisseur - KitchenAid KDRP467KSS | Use and Care Guide - Page 24
La bride antibasculement Dans les conditions de service normales, la cuisinière ne bascule pas bride antibasculement si la cuisinière est déplacée. Voir détails dans les instructions d'installation. Le non-respect de ces instructions peut causer un décès ou des brûlures graves aux enfants et aux - KitchenAid KDRP467KSS | Use and Care Guide - Page 25
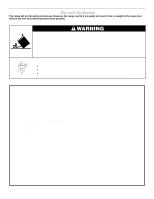
IMPORTANTES INSTRUCTIONS DE SÉCURITÉ AVERTISSEMENT : Pour réduire le risque d'incendie, de choc électrique, de blessures ou de dommages lors de et les autres ustensiles. Essuyer tous les renversements excessifs avant de mettre en marche le programme d'autonettoyage. CONSERVEZ CES INSTRUCTIONS 25 - KitchenAid KDRP467KSS | Use and Care Guide - Page 26
ées peuvent être différents de ceux de votre modèle. Tableau de commande REAR FRONT REAR ENTER SELECTOR CANCEL SET AUTO OFF OVEN LIGHT FRONT REAR FRONT 12 3 1. Témoin de brûleur de surface 2. Commande arrière gauche 3. Commande avant gauche 4 5 67 4. Commande arrière centrale - KitchenAid KDRP467KSS | Use and Care Guide - Page 27
équipement de conversion au gaz propane est compris avec la cuisinière. Voir les instructions comprises avec la trousse de conversion au gaz n'importe quelle position entre HI et LO. Utiliser le tableau suivant comme guide de températures. RÉGLAGE UTILISATION RECOMMANDÉE LITE s Pour allumer le - KitchenAid KDRP467KSS | Use and Care Guide - Page 28
du tube d'arrivée de gaz. Le protéger contre les renversements en utilisant toujours un chapeau de brûleur. 1 Voir la section "Assistance ou service" pour soumettre une commande. Brûleurs de surface scellés IMPORTANT : Ne pas entraver l'écoulement de gaz de combustion et de l'air de ventilation - KitchenAid KDRP467KSS | Use and Care Guide - Page 29
le bouton de commande du brûleur à LITE (ou LIGHT sur certains modèles). 2. Lorsque le brûleur est la tige de soupape à l'aide d'une paire de pinces. 5. À l'aide d'un petit tournevis à lame tableau suivant comme guide pour les caract faïence s Suivre les instructions du fabricant. s Utiliser des - KitchenAid KDRP467KSS | Use and Care Guide - Page 30
une panne de courant. Tourner le bouton SELECTOR (sélection) à la position RESET (remise en marche), appuyer sur la touche "ENTER" et suivre les instructions de réglage de l'horloge dans la section "HORLOGE". Boutons de sélection et de commande de réglage Toutes les fonctions de cuisson sont réglées - KitchenAid KDRP467KSS | Use and Care Guide - Page 31
'à la butée d'arrêt, soulever le rebord avant et la tirer pour la sortir du four. Se servir de l'illustration et du tableau suivants comme guide. ALIMENTS POSITION DE LA GRILLE Tartes congelées, gros rôtis, dindes, gâteaux des anges 1 ou 2 Gâteaux Bundt, la plupart des pains 2 éclairs, pains - KitchenAid KDRP467KSS | Use and Care Guide - Page 32
é dans la recette. Se servir du tableau suivant comme guide. USTENSILES DE CUISSON/ RÉSULTATS RECOMMANDATIONS Aluminium légèrement coloré temps de cuisson. Plats en grès s Croûtes croustillantes s Suivre les instructions du fabricant. Plats en verre, vitrocéramique ou céramique allant au four - KitchenAid KDRP467KSS | Use and Care Guide - Page 33
UTILISATION DU FOUR Cuisson au four 1 2 1. Élément du gril (exemple seulement) 2. Élément de cuisson au four (exemple seulement) La fonction BAKE est idéale pour la cuisson au four, le rôtissage ou pour chauffer les mets en sauce. Durant la cuisson au four ou le rôtissage, les éléments de cuisson au - KitchenAid KDRP467KSS | Use and Care Guide - Page 34
TABLEAU DE CUISSON AU GRIL Pour obtenir les meilleurs résultats, placer l'aliment à au moins 3 po (7 cm) de l'élément du gril. Les durées de cuisson indiquées sont des recommandations et peuvent être ajustées selon les goûts individuels. Les positions recommandées de la grille sont indiquées de la - KitchenAid KDRP467KSS | Use and Care Guide - Page 35
Rôtissage par convection 1 2 3 1. Élément du gril (exemple seulement) 2. Ventilateur de convection (exemple seulement) 3. Élément de cuisson au four (exemple seulement) Le rôtissage par convection peut être utilisé pour faire rôtir les viandes et la volaille, ou pour faire cuire des pains à levure - KitchenAid KDRP467KSS | Use and Care Guide - Page 36
°F (22°C) en-dessous de la température de préchauffage réglée (350°F-390°F). 4. Tourner le bouton SELECTOR à la position RESET lorsque la cuisson est terminée. 36 - KitchenAid KDRP467KSS | Use and Care Guide - Page 37
d'empoisonnement alimentaire Ne pas laisser des aliments dans un four plus d'une heure avant ou après la cuisson. Le non-respect de cette instruction peut causer un empoisonnement alimentaire ou une maladie. La fonction Keep Warm (garder au chaud) permet aux aliments chauds de demeurer chauds avant - KitchenAid KDRP467KSS | Use and Care Guide - Page 38
pas toucher le four au cours du programme d'autonettoyage. Garder les enfants loin du four au cours du programme d'autonettoyage. Le non-respect de ces instructions peut causer des brûlures. IMPORTANT : La santé de certains oiseaux est très sensible aux émanations qui surviennent durant le programme - KitchenAid KDRP467KSS | Use and Care Guide - Page 39
le four et la table de cuisson sont refroidis. Toujours suivre les instructions sur les étiquettes des produits nettoyants. Du savon, de l'eau poli pour acier inoxydable (non inclus) : Voir la section "Assistance ou service" pour soumettre une commande. s Détergent liquide ou nettoyant tout-usage : - KitchenAid KDRP467KSS | Use and Care Guide - Page 40
du four. 5. Rétablir le courant. Porte du four Il n'est pas suggéré d'enlever la porte du four pour une utilisation normale. Toutefois, suivre les instructions suivantes au besoin. La porte du four est lourde. Enlèvement : 1. Ouvrir la porte du four complètement. 2. Relever le verrou de charnière - KitchenAid KDRP467KSS | Use and Care Guide - Page 41
coût d'une visite de service non nécessaire. Rien ne fonctionne ustensile est-il de dimension appropriée? Utiliser un ustensile de cuisson à peu près de la même dimension que la surface de appareil est-il d'aplomb? Niveler l'appareil. Voir instructions d'installation. Le four ne fonctionne pas s Les - KitchenAid KDRP467KSS | Use and Care Guide - Page 42
la section "Affichage(s)". Si le signal réapparaît, appeler le service. Le programme d'autonettoyage ne fonctionne pas s La porte du four prévus s L'appareil est-il d'aplomb? Mettre l'appareil d'aplomb. Voir Instructions d'installation. s La température correcte est-elle réglée? Augmenter ou diminue - KitchenAid KDRP467KSS | Use and Care Guide - Page 43
service, consulter la section "Dépannage". Ceci guide peut vous faire économiser le coût d'une visite de service. Si vous avez encore besoin d'aide, suivre les instructions cision que celle utilisée dans la fabrication de chaque nouvel appareil KITCHENAID®. Pour obtenir des pièces spécifiées par le - KitchenAid KDRP467KSS | Use and Care Guide - Page 44
produit est utilisé et entretenu conformément aux instructions fournies avec le produit, KitchenAid paiera pour les pièces spécifiées aide additionnelle peut être trouvée en vérifiant la section "Assistance ou Service" ou en téléphonant sans frais au Centre d'interaction avec la clientèle KitchenAid
-
 1
1 -
 2
2 -
 3
3 -
 4
4 -
 5
5 -
 6
6 -
 7
7 -
8
-
9
-
10
-
11
-
12
-
13
-
14
-
15
-
16
-
17
-
18
-
19
-
20
-
21
-
22
-
23
-
24
-
25
-
26
-
27
-
28
-
29
-
30
-
31
-
32
-
33
-
34
-
35
-
36
-
37
-
38
-
39
-
40
-
41
-
42
-
43
-
44
 |
 |
PRO LINE™ DUAL FUEL RANGE
Use & Care Guide
In the U.S.A., for questions about features, operation, performance, parts, accessories or service, call:
1-800-422-1230.
In Canada, for product-related questions call:
1-800-461-5681
, for parts, accessories, installation and service, call:
1-800-807-6777
or visit our website at...
www.kitchenaid.com
or
www.kitchenaid.com/canada
CUISINIÈRE À DOUBLE COMBUSTIBLE
PRO LINE™
Guide d’utilisation et d’entretien
Au Canada, pour des questions concernant le produit, composer le
1-800-461-5681
, pour pièces, accessoires, installation et service, le
1-800-807-6777
ou visiter notre site web à
....
www.kitchenaid.com/canada
Table of Contents/Table des matières
................................................
2
Models/Modèles
KDRP467
KDRP407
8300219