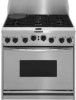
KitchenAid KDRP467KSS Use and Care Guide - Page 9
ELECTRONIC OVEN CONTROL, Displays, Selector and Set Control Knobs, Enter and Cancel, Clock
 |
View all KitchenAid KDRP467KSS manuals
Add to My Manuals
Save this manual to your list of manuals |
Page 9 highlights
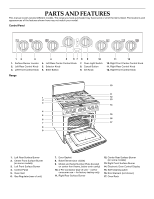
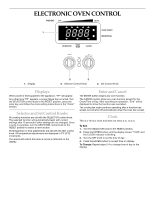
ELECTRONIC OVEN CONTROL PREHEAT 0% 100% KEEP WARM 1 BROWNING DURATION STOP TIME CLOCK SELECTOR SET ENTER CANCEL 1. Display 2 3 2. Selector Control Knob 3. Set Control Knob Displays When power is first supplied to the appliance, "PF" will appear. Any other time "PF" appears, a power failure has occurred. Turn the SELECTOR control knob to the RESET position, press the enter key, and follow the clock setting instructions in the "Clock" section. Selector and Set Control Knobs All cooking functions are set with the SELECTOR control knob. The selected function will automatically begin with current settings after 10 seconds if other settings are not changed. Once a cycle is complete, turn the SELECTOR control knob to the RESET position to select a new function. All temperature or time adjustments are set with the SET control knob. All temperature adjustments are displayed in 5°F (3°C) increments. The speed with which the knob is turned is reflected on the display. Enter and Cancel The ENTER button begins any oven function. The CANCEL button stops any oven function except for the Clock/Time of Day. After canceling an operation, "End" will be displayed to show the function was cancelled. The cooling fan might continue operating after a function has ended, but will shut off automatically when the oven has cooled. Clock This is a 12 hour clock and does not show a.m. or p.m. To Set: 1. Turn the SELECTOR knob to the RESET position. 2. Press the ENTER button until the display shows "12:00" and the CLOCK indicator is blinking. 3. Turn the SET knob to set the time of day. 4. Press the ENTER button to accept time on display. To Change: Repeat steps 2-4 to change time of day to the display. 9
-
 1
1 -
2
-
3
-
 4
4 -
 5
5 -
 6
6 -
 7
7 -
 8
8 -
 9
9 -
 10
10 -
 11
11 -
 12
12 -
 13
13 -
 14
14 -
15
-
16
-
17
-
18
-
19
-
20
-
21
-
22
-
23
-
24
-
25
-
26
-
27
-
28
-
29
-
30
-
31
-
32
-
33
-
34
-
35
-
36
-
37
-
38
-
39
-
40
-
41
-
42
-
43
-
44
 |
 |
