Konica Minolta KIP 2300 KIP 2300 User Manual
Konica Minolta KIP 2300 Manual
 |
View all Konica Minolta KIP 2300 manuals
Add to My Manuals
Save this manual to your list of manuals |
Konica Minolta KIP 2300 manual content summary:
- Konica Minolta KIP 2300 | KIP 2300 User Manual - Page 1
KIP 2300 User Manual Version A.1 - Konica Minolta KIP 2300 | KIP 2300 User Manual - Page 2
carefully before use in order to understand the KIP 2300 Image Scanner completely and to use more efficiently. Keep this User's Manual for future reference. 1. For U.S.A. This device complies with part 15 of the FCC Rules. Operation is subject to the following two conditions: (1) This device may - Konica Minolta KIP 2300 | KIP 2300 User Manual - Page 3
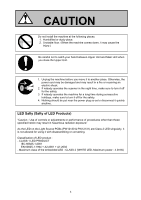
or damage degree is classified and shown as follows when this machine is erroneously used ignoring this USER'S MANUAL. WARNING This caution mark denotes that the failure to follow given instructions in handling the machine could result in a death or serious injury. CAUTION This caution mark denotes - Konica Minolta KIP 2300 | KIP 2300 User Manual - Page 4
3. Install the machine as close as possible to the outlet. 4. When you wish to move the machine to another place, make sure to ask your service engineer. 1. Do not use a multi-wiring connector that might raise the temperature of the outlet abnormally and cause a fire. 2. Do not put anything heavy on - Konica Minolta KIP 2300 | KIP 2300 User Manual - Page 5
CAUTION Do not install the machine at the following places. 1. Humidified or dusty place. 2. Unstable floor. (When the machine comes down, it may cause the injury.) Be careful not to catch your hand between Upper Unit and Main Unit when you close the Upper Unit. 1. Unplug the machine before you move - Konica Minolta KIP 2300 | KIP 2300 User Manual - Page 6
POWER CORD INSTRUCTION The installation of (or exchange to) a power plug which fits in the wall outlet of the installation location shall be conducted in accordance with fallowing: - Konica Minolta KIP 2300 | KIP 2300 User Manual - Page 7
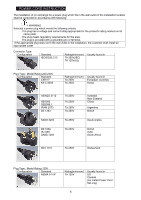
Cord Type Standard SVT 3X18AWG Long - Konica Minolta KIP 2300 | KIP 2300 User Manual - Page 8
Chapter 1 Before Use 1. 1 Installation Requirements 1. 2 Features 1. 3 Specifications 1. 4 Name & Function of Each Part 1. 4. 1 Front view 1. 4. 2 Rear view 1. 5 Specifications for Scan Original 1. 5. 1 Originals Prohibited from Duplication 1. 5. 2 Specifications for the scan original page - Konica Minolta KIP 2300 | KIP 2300 User Manual - Page 9
1. 1 Installation Requirements The following conditions have to be satisfied when installing the KIP2300 Scanner. 1. Satisfy the following input power condition. Voltage Current Frequency 100 - 240V +6%/-10% 6A or higher 50 or 60Hz. KIP2300 can be connected to the outlet simply so far as the - Konica Minolta KIP 2300 | KIP 2300 User Manual - Page 10
Reference Machine Noise Information Ordinance 3. GSGV January 18, 1991 : The maximum sound pressure level is equal or less than 70dB (A) according to ISO 7779. NOTE 1. For U.S.A. This device complies with part 15 of the FCC Rules. Operation is subject to the following two conditions: (1) This device - Konica Minolta KIP 2300 | KIP 2300 User Manual - Page 11
as well as a board type one. The acceptable thickness range is from 0.05mm to 16.0mm. Dual original feeders The lower original feeder accepts all supported thicknesses and sizes of originals. The original is set with face down and ejected to the rear tray. The upper original feeder accepts all sizes - Konica Minolta KIP 2300 | KIP 2300 User Manual - Page 12
1. 3 Specifications Model Type Reading sensor Optical Resolution Range of Scan Resolution Scan mode Scanning method Scan speed KIP2300 Image Scanner Desktop scanner 3 CCD Reduction Optical System (3 CCD of RGB 7450 pixels) Main scanning (horizontal) direction 600dpi Sub scanning (vertical) - Konica Minolta KIP 2300 | KIP 2300 User Manual - Page 13
120W - Stand by 50W - In Power Save Mode 0W 1,366mm (Width) x 543mm (Depth) x 318mm (Height) Weight Environmental conditions NOTE : Original Guides, Original Tray and Pedestal are excluded. About 76kg Temperature 10 - 32 degrees centigrade Humidity 15 - 85%RH (No dew) Acoustic noise Option - Konica Minolta KIP 2300 | KIP 2300 User Manual - Page 14
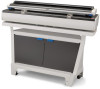
1. 4 Name & Function of Each Part 1. 4. 1 Front view 5 6 2 1 3 11 4 6 10 5 7 B OA R D 9 8 1-7 Chapter 1 Before Use - Konica Minolta KIP 2300 | KIP 2300 User Manual - Page 15
and does not light when it can not accept. And in the Board Original Mode, it blinks green when the scanner detects original size. These guides can be shifter left and right according to the original width, and prevent the original from skewing during scanning. Unlocking the Levers allow for opening - Konica Minolta KIP 2300 | KIP 2300 User Manual - Page 16
1. 4. 2 Rear view 1 23 4 No. Name 1 Rear Counter Rollers 2 USB Terminal 3 HIL Terminal 4 Inlet Function Help to transport the original when ejected. USB cable is connected. - Connected to the PC - Type B Connector - 3.3V max HIL Connector is connected. - Connected to the PC - 3.3V max Power cord - Konica Minolta KIP 2300 | KIP 2300 User Manual - Page 17
1. 5 Specifications for Scan Original 1. 5. 1 Originals Prohibited from Duplication It may be illegal to duplicate or copy certain types of originals and you may be punished by local or regional laws, if copies are made of these types of originals. Please be aware of your local or regional laws and - Konica Minolta KIP 2300 | KIP 2300 User Manual - Page 18
1. 5. 2 Specifications for the scan original Original's thickness which KIP2300 scanner accepts is 0.05 through 16mm. Originals are divided into 2 types such as sheet type and board type in terms of the thickness. - Sheet type : 0.05 through 1.49mm - Board type : 1.50 through 16.0mm Sheet type - Konica Minolta KIP 2300 | KIP 2300 User Manual - Page 19
Folded (Leading edge) Uneven thickness Curled (Diameter of curl must be larger than 80mm.) Irregular shape (Not square) Wet (Ink is not dried) Made of metal or cloth KIP KIP Metal Wet Cloth KIP KIP 1-12 Chapter 1 Before Use - Konica Minolta KIP 2300 | KIP 2300 User Manual - Page 20
Patched Clipped or stapled Rough surface (Carbon paper for example) Punched Dusty Electrically changed Photograph Clipped Stapled KIP KIP Rough surface 1-13 Chapter 1 Before Use - Konica Minolta KIP 2300 | KIP 2300 User Manual - Page 21
Chapter 2 Scanner Hardware Operation 2. 1 Turning ON the KIP2300 2. 2 Scanning an Original 2. 2. 1 Scanning a sheet type original (1) Using the Upper Original Feeder (2) Using the Lower Original Feeder 2. 2. 2 Scanning a board type original 2. 3 Cancellation of Current Scan 2. 2 Turning OFF the KIP - Konica Minolta KIP 2300 | KIP 2300 User Manual - Page 22
2. 1 Turning ON the KIP 2300 1. Prepare a power cable that satisfies the following specifications. 2. Connect the KIP2300 scanner to the outlet via the power cable. WARNING (1) Do not handle the power plug with a wet hand. It may result in receiving an electrical shock. (2) Ground the machine for - Konica Minolta KIP 2300 | KIP 2300 User Manual - Page 23
5. Scanner gets ready when all the initializations are finished, which is shown by continuous lighting of Power Lamp in green. Power Lamp (lights when ready) B OA R D 2-3 Chapter 2 Basic Operation - Konica Minolta KIP 2300 | KIP 2300 User Manual - Page 24
2. 2 Scanning an Original 2. 2. 1 Scanning a sheet type original A sheet type original can be fed from both upper and lower original feeders. - Upper original feeder accepts 0.05 to 0.1mm in thickness. - Lower original feeder accepts 0.05 to 1.5mm in thickness. Upper Original Feeder Sheet type - Konica Minolta KIP 2300 | KIP 2300 User Manual - Page 25
to the width of scan original, align the inside edge of Original Guides to the concerning size lines on the table. Original Guides 3. Confirm that the original is face up. Aligning both side edges with the Original Guides, insert the scan original into the Upper Original Feeder until the leading - Konica Minolta KIP 2300 | KIP 2300 User Manual - Page 26
5. KIP2300 starts scanning automatically or manually according to the operation on the controller software. The original is turned and ejected to the front side via Lower Original Feeder. 2-6 Chapter 2 Basic Operation - Konica Minolta KIP 2300 | KIP 2300 User Manual - Page 27
Indicator is lighting in green. The original can be accepted only when it is lighting in green. Lower Original Feeder Indicator 2. The Original Guides will prevent the original from skewing during scanning. Move them onto the Lower Original Feeder (if on the Upper Original Feeder). Then according - Konica Minolta KIP 2300 | KIP 2300 User Manual - Page 28
3. Confirm that the original is face down. 4. Aligning both side edges with the Original Guides, insert the scan original into the Lower Original Feeder until the leading hits the feeding roller. Wait a few seconds with contacting the leading edge to - Konica Minolta KIP 2300 | KIP 2300 User Manual - Page 29
5. KIP2300 starts scanning automatically or manually according to the operation on the controller software. NOTE The lower original feeder will transport the original very quickly especially when low scan resolution is - Konica Minolta KIP 2300 | KIP 2300 User Manual - Page 30
2. 2. 2 Scanning a board type original An original thicker than 1.5mm needs to be scanned in the board original mode, and it also needs to be fed into the Lower Original Feeder. Board type original (1.5 through 16.0mm) Lower Original Feeder 1. Confirm the Lower Original Feeder Indicator is - Konica Minolta KIP 2300 | KIP 2300 User Manual - Page 31
2. Move the bottom ends of Rear Steel Trays from normal position to low position, which will set the entire Rear Steel Trays to the low (flat) position. Normal position Low position Normal position Low position NOTE Please set the Rear Steel Trays to the low position when a board type original is - Konica Minolta KIP 2300 | KIP 2300 User Manual - Page 32
3. Press BOARD Button to enable the Board Original Feeding Mode. The BOARD Lamp lights in green, and the Power Lamp blinks in green with waiting the insertion of board original. BOARD Lamp (lights) B OA R D Power Lamp (blinks) BOARD Button (Press this to enable the board original mode) 4. The - Konica Minolta KIP 2300 | KIP 2300 User Manual - Page 33
the original from skewing during scanning when placed correctly. Referring to the size lines on the scanner table, place these guides to the locations where the edges of scan original will be. Original Guides 6. Confirm that the original is face down. Backside 2-13 Chapter 2 Basic Operation - Konica Minolta KIP 2300 | KIP 2300 User Manual - Page 34
7. With aligning both side edges with the Original Guides, insert the scan original into the Lower Original Feeder and move it forward until the Lower Original Feeder Indicator starts blinking, which notices that the - Konica Minolta KIP 2300 | KIP 2300 User Manual - Page 35
8. Press the BOARD Button. The Document Press Unit moves down and holds the original firmly. BOARD Button B OA R D Document Press Unit (This moves down.) 2-15 Chapter 2 Basic Operation - Konica Minolta KIP 2300 | KIP 2300 User Manual - Page 36
the width of original then moves the original to the front side for placing it at the start position. 10. KIP2300 starts scanning automatically or manually according to the operation on the controller software. 2-16 Chapter 2 Basic Operation - Konica Minolta KIP 2300 | KIP 2300 User Manual - Page 37
10. The original is ejected to the rear side and stacked on the Rear Steel Tray. 2-17 Chapter 2 Basic Operation - Konica Minolta KIP 2300 | KIP 2300 User Manual - Page 38
a very thick board type original, do not open the scanner upper unit as the following example. Please eject it by pressing the Stop button as instructed in the above. Scanner upper unit 2-18 Chapter 2 Basic Operation - Konica Minolta KIP 2300 | KIP 2300 User Manual - Page 39
2. 4 Turning OFF the KIP 2300 Turn off the KIP2300 scanner pressing the bar ( | ) side of Power Switch on the left. Press this side for turning off. 2-19 Chapter 2 Basic Operation - Konica Minolta KIP 2300 | KIP 2300 User Manual - Page 40
2. 5 Auto Power OFF KIP 2300 has Auto Power OFF feature for energy saving purpose, which automatically switches off the scanner when 15 minutes of inactive period has passed. Please turn on the scanner again with the Power Switch for using the scanner again. Power switch 2-20 Chapter 2 Basic - Konica Minolta KIP 2300 | KIP 2300 User Manual - Page 41
2. 6 Removal of Trays 2. 6. 1 Front Steel Trays The Front Steel Tray can be removed when unnecessary or for saving the space. Please do as instructed in below. Front Steel Tray 1. Remove 4 Front Trays (1). 1 2-21 Chapter 2 Basic Operation - Konica Minolta KIP 2300 | KIP 2300 User Manual - Page 42
2. Remove the Front Tray BKT 3 (2) by twisting as arrow (A) then moving up as arrow (B). 2 B A 2 2 3. Pull up both blue levers (3) to open the scanner upper unit. 3 2-22 Chapter 2 Basic Operation - Konica Minolta KIP 2300 | KIP 2300 User Manual - Page 43
4. Remove the Front Tray BKT 2 (4) on the right. 4 5. Remove the Front Tray BKT 1 (5) on the left. 5 6. Close the scanner upper unit finally. 2-23 Chapter 2 Basic Operation - Konica Minolta KIP 2300 | KIP 2300 User Manual - Page 44
2. 6. 2 Rear Steel Trays The Rear Steel Tray can be removed when unnecessary or for saving the space. Please do as instructed in below. Rear Steel Tray 1. Move up and remove the Rear Steel Trays (1). 1 2-24 Chapter 2 Basic Operation - Konica Minolta KIP 2300 | KIP 2300 User Manual - Page 45
Chapter 3 Troubleshooting 3. 1 Original Misfeed 3. 1 When feeding into upper original feeder 3. 2 When feeding into upper original feeder 3. 2 Error page 3- 2 3- 2 3- 4 3- 5 3-1 Chapter 3 Troubleshooting - Konica Minolta KIP 2300 | KIP 2300 User Manual - Page 46
3. 1 Original Misfeed When the original is mis-fed during scanning, remove it manually as instructed in below. 3. 1 When feeding into upper original feeder 1. Open the document upper cover with holding both sides. Document upper cover Hold here when opening the - Konica Minolta KIP 2300 | KIP 2300 User Manual - Page 47
3. Remove the mis-fed original. Mis-fed original CAUTION Take cere not to catch your hand when closing the document upper cover or scanner upper unit. 3-3 Chapter 3 Troubleshooting - Konica Minolta KIP 2300 | KIP 2300 User Manual - Page 48
3. 2 When feeding into lower original feeder 1. Open the scanner upper unit by pulling up the blue levers on both sides. Blue levers 2. Remove the mis-fed original. Mis-fed original CAUTION Take cere not to catch your hand when closing the scanner upper unit. 3-4 Chapter 3 Troubleshooting - Konica Minolta KIP 2300 | KIP 2300 User Manual - Page 49
3. 2 Error The Power Lamp lights in red when the scanner has any error. See the description of error indicated on the controller monitor, and correct the error appropriately. B OA R D Power Lamp (lights in red when any error occurs.) 3-5 Chapter 3 Troubleshooting - Konica Minolta KIP 2300 | KIP 2300 User Manual - Page 50
Chapter 4 Maintenance 4. 1 Cleaning 4. 1. 1 Document Glass 4. 1. 2 Platen 4. 1. 2 Feed Rollers page 4- 2 4- 2 4- 4 4- 5 4-1 Chapter 4 Maintenance - Konica Minolta KIP 2300 | KIP 2300 User Manual - Page 51
It is recommended to clean Original Glass, Platen and Feeding Rollers once a week or as needed. Dirt of these parts may result in the image problem or getting dirt on the scan original. 4. 1. 1 Document Glass Open the scanner upper unit. Wipe the Document Glass with a soft cloth with a little water - Konica Minolta KIP 2300 | KIP 2300 User Manual - Page 52
Glass can be removed if the thumb screws on both sides (and the brackets) are removed. But do not touch this screw as only the service technician is allowed for removing the Document Glass. If the Document Glass is removed, some foreign substance may drop into the machine, and may cause - Konica Minolta KIP 2300 | KIP 2300 User Manual - Page 53
4. 1. 2 Platen Wipe the entire white part of the Platen with a soft cloth with a little water (or with neutral detergent) first, and wipe it with a dry soft cloth. Platen : Clean the entire white part. 4-4 Chapter 4 Maintenance - Konica Minolta KIP 2300 | KIP 2300 User Manual - Page 54
4. 1. 3 Feed Rollers Wipe the Feed Rollers with a soft cloth with a little water (or with neutral detergent) first, and wipe it with a dry soft cloth. Feed Rollers Feed Rollers 4-5 Chapter 4 Maintenance - Konica Minolta KIP 2300 | KIP 2300 User Manual - Page 55
Feed Rollers 4-6 Chapter 4 Maintenance - Konica Minolta KIP 2300 | KIP 2300 User Manual - Page 56
Feed Rollers 4-7 Chapter 4 Maintenance - Konica Minolta KIP 2300 | KIP 2300 User Manual - Page 57
Image Scanner KIP 2300 User's Manual Version A.1 Published by Katsuragawa Electric Co., Ltd. 21-1 Shimomaruko 4-Chome, Ota-ku, Tokyo 146-8585, Japan All rights reserved. Please note that some articles, illustrations
-
 1
1 -
 2
2 -
 3
3 -
 4
4 -
 5
5 -
 6
6 -
 7
7 -
8
-
9
-
10
-
11
-
12
-
13
-
14
-
15
-
16
-
17
-
18
-
19
-
20
-
21
-
22
-
23
-
24
-
25
-
26
-
27
-
28
-
29
-
30
-
31
-
32
-
33
-
34
-
35
-
36
-
37
-
38
-
39
-
40
-
41
-
42
-
43
-
44
-
45
-
46
-
47
-
48
-
49
-
50
-
51
-
52
-
53
-
54
-
55
-
56
-
57
 |
 |

Version A
.1
KIP 2300 User Manual