Konica Minolta Kodak i1190 User Guide - Page 13
Installation, Installing the scanner
 |
View all Konica Minolta Kodak i1190 manuals
Add to My Manuals
Save this manual to your list of manuals |
Page 13 highlights
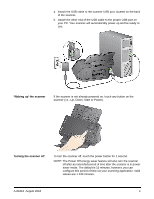
2 Installation Installing the scanner This section provides detailed information of the Installation Guide that is provided with your scanner. Follow these steps in the order they are provided to install your scanner. NOTE: If you have already performed all of the steps in the Installation Guide, skip this section. Installing the Kodak Driver Software: Windows operating systems 1. Insert the Kodak i1100 Series Scanners Installation disk in the disk drive. The installation program starts automatically. NOTE: If the disk does not start automatically, open the My Computer icon on your desktop. Double-click the icon indicating your disk drive, then double-click on setup.exe. 2. Follow the prompts that are displayed until the installation is complete. Installing the Kodak Driver Software: Linux operating systems Linux drivers can be found on the Kodak Alaris website. Visit www.kodakalaris.com/go/IMsupport to obtain the most recent Linux drivers and installation procedures. Install the driver software before connecting the scanner to your PC. NOTES: • Depending on the operating system you are installing on (Ubuntu, Fedora, or SUSE) the installation procedures may be slightly different. • Kodak Scanner software requires QT3. Verify that your system has these installed (e.g., Fedora: Applications>Add/Remove Software). • You must be a super user to install the software. Installing the Kodak Driver Software: Macintosh operating systems Macintosh drivers can be found on the Kodak Alaris website. Visit www.kodakalaris.com/go/IMsupport to obtain the most recent Macintosh drivers and installation procedures. Install the driver software before connecting the scanner to your PC. NOTE: Depending on the operating system you are installing on (10.8, 10.9, 10.10) the installation procedures may be slightly different. A-61816 August 2016 7
-
 1
1 -
2
-
3
-
4
-
5
-
6
-
7
-
 8
8 -
 9
9 -
 10
10 -
 11
11 -
 12
12 -
 13
13 -
 14
14 -
 15
15 -
 16
16 -
 17
17 -
 18
18 -
19
-
20
-
21
-
22
-
23
-
24
-
25
-
26
-
27
-
28
-
29
-
30
-
31
-
32
-
33
-
34
-
35
-
36
-
37
-
38
-
39
-
40
-
41
-
42
-
43
-
44
 |
 |