Konica Minolta Kodak i4200 Plus User Guide - Page 15
Installation, Installing the scanner
 |
View all Konica Minolta Kodak i4200 Plus manuals
Add to My Manuals
Save this manual to your list of manuals |
Page 15 highlights
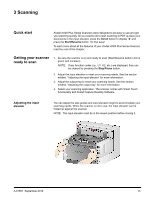
2 Installation Installing the scanner This section provides detailed information supporting the Installation Guide that is provided with your scanner. Follow these steps in the order they are provided to install your scanner. NOTES: • If you have already performed all of the steps in the Installation Guide, skip this section. • When positioning the scanner, be sure to provide adequate clearance at the back of the scanner if you will be using the rear document exit. For more information on the rear document exit, see the section entitled, "Adjusting the output tray" in Chapter 3. A-61651 September 2016 9
-
 1
1 -
2
-
3
-
4
-
5
-
6
-
7
-
8
-
9
-
 10
10 -
 11
11 -
 12
12 -
 13
13 -
 14
14 -
 15
15 -
 16
16 -
 17
17 -
 18
18 -
 19
19 -
 20
20 -
21
-
22
-
23
-
24
-
25
-
26
-
27
-
28
-
29
-
30
-
31
-
32
-
33
-
34
-
35
-
36
-
37
-
38
-
39
-
40
-
41
-
42
-
43
-
44
-
45
-
46
-
47
-
48
-
49
-
50
-
51
-
52
-
53
-
54
-
55
-
56
-
57
-
58
-
59
-
60
-
61
-
62
-
63
-
64
-
65
-
66
 |
 |

A-61651
September 2016
9
2 Installation
Installing the scanner
This section provides detailed information supporting the
Installation Guide
that is provided with your scanner. Follow these steps in the order they are
provided to install your scanner.
NOTES:
•
If you have already performed all of the steps in the
Installation Guide
, skip
this section.
•
When positioning the scanner, be sure to provide adequate clearance at the
back of the scanner if you will be using the rear document exit. For more
information on the rear document exit, see the section entitled, “Adjusting
the output tray” in Chapter 3.