Konica Minolta Kodak i4200 Plus User Guide - Page 51
Replacing the pre- separation pad, Open the scanner cover.
 |
View all Konica Minolta Kodak i4200 Plus manuals
Add to My Manuals
Save this manual to your list of manuals |
Page 51 highlights
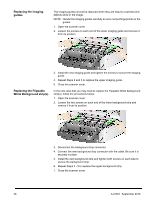
Replacing the preseparation pad To replace the tires: 5. Replace each tire by sliding the tire off the core. 6. Install each new tire by gently pulling it over the core. IMPORTANT:Do not overstretch the tire; it may tear. 7. Reinstall the separation roller. Be sure to line up the slots on the separation roller with the holders. 8. Lower the separation roller holder back in place. 9. Close the scanner cover. Change the pre-separation pad when the frequency of multi-fed documents increases. 1. Open the scanner cover. 2. Remove the pre-separation pad by lifting the pad up and out of position. NOTE: The pre-separation pad fits snuggly in place; therefore, a little force may be required to remove it. 3. Install the new pre-separation pad. Be sure it snaps into place. 4. Close the scanner cover. A-61651 September 2016 45
-
 1
1 -
2
-
3
-
4
-
5
-
6
-
7
-
8
-
9
-
10
-
11
-
12
-
13
-
14
-
15
-
16
-
17
-
18
-
19
-
20
-
21
-
22
-
23
-
24
-
25
-
26
-
27
-
28
-
29
-
30
-
31
-
32
-
33
-
34
-
35
-
36
-
37
-
38
-
39
-
40
-
41
-
42
-
43
-
44
-
45
-
 46
46 -
 47
47 -
 48
48 -
 49
49 -
 50
50 -
 51
51 -
 52
52 -
 53
53 -
 54
54 -
 55
55 -
 56
56 -
57
-
58
-
59
-
60
-
61
-
62
-
63
-
64
-
65
-
66
 |
 |
