Konica Minolta bizhub C287 bizhub C287/C227 Quick Start Guide - Page 146
Information required to register a destination, Registering a destination, Hard Disk, Fax Kit
 |
View all Konica Minolta bizhub C287 manuals
Add to My Manuals
Save this manual to your list of manuals |
Page 146 highlights
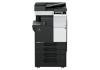
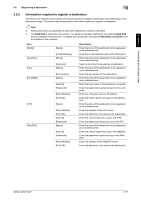
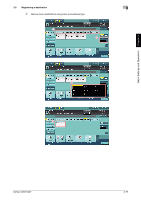
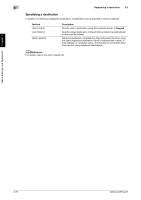
Basic Settings and Operations Chapter 3 3.5 Registering a destination 3 3.5.2 Information required to register a destination The items to be entered or the number of screens required to register a destination vary depending on the transmission type. This section describes specific information required to register a destination. Tips - Setting items that can generally be used with defaults are omitted in this table. - The Hard Disk is optional in some areas. To register a User Box destination, the optional Hard Disk must be installed in this machine. To register a fax destination, the optional Hard Disk and Fax Kit must be installed in this machine. Item [E-Mail] [User Box] [Fax] [PC (SMB)] [FTP] [WebDAV] [Name] [E-Mail Address] [Name] [User Box] [Name] [Fax Number] [Name] [User ID] [Password] [Host Address] [File Path] [Name] [Host Address] [File Path] [User ID] [Password] [Name] [User ID] [Password] [Host Address] [File Path] Description Enter the name of the destination to be registered as an address book. Enter the E-mail address used as the destination. Enter the name of the destination to be registered as an address book. Select a User Box to be used as a destination. Enter the name of the destination to be registered as an address book. Enter the fax number of the destination. Enter the name of the destination to be registered as an address book. Enter the login name of the destination computer. Enter the password required to log in to the computer. Enter the computer name or IP address. Enter the folder name to be used as the destination. Enter the name of the destination to be registered as an address book. Enter the address of the FTP server. Enter the directory to be used as the destination. Enter the user ID required to log in with FTP. Enter the password required to log in with FTP. Enter the name of the destination to be registered as an address book. Enter the user ID required to log in with WebDAV. Enter the password required to log in with WebDAV. Enter the address of the WebDAV server. Enter the directory to be used as the destination. bizhub C287/C227 3-71
-
 1
1 -
2
-
3
-
4
-
5
-
6
-
7
-
8
-
9
-
10
-
11
-
12
-
13
-
14
-
15
-
16
-
17
-
18
-
19
-
20
-
21
-
22
-
23
-
24
-
25
-
26
-
27
-
28
-
29
-
30
-
31
-
32
-
33
-
34
-
35
-
36
-
37
-
38
-
39
-
40
-
41
-
42
-
43
-
44
-
45
-
46
-
47
-
48
-
49
-
50
-
51
-
52
-
53
-
54
-
55
-
56
-
57
-
58
-
59
-
60
-
61
-
62
-
63
-
64
-
65
-
66
-
67
-
68
-
69
-
70
-
71
-
72
-
73
-
74
-
75
-
76
-
77
-
78
-
79
-
80
-
81
-
82
-
83
-
84
-
85
-
86
-
87
-
88
-
89
-
90
-
91
-
92
-
93
-
94
-
95
-
96
-
97
-
98
-
99
-
100
-
101
-
102
-
103
-
104
-
105
-
106
-
107
-
108
-
109
-
110
-
111
-
112
-
113
-
114
-
115
-
116
-
117
-
118
-
119
-
120
-
121
-
122
-
123
-
124
-
125
-
126
-
127
-
128
-
129
-
130
-
131
-
132
-
133
-
134
-
135
-
136
-
137
-
138
-
139
-
140
-
 141
141 -
 142
142 -
 143
143 -
 144
144 -
 145
145 -
 146
146 -
 147
147 -
 148
148 -
 149
149 -
 150
150 -
 151
151 -
152
-
153
-
154
-
155
-
156
-
157
-
158
-
159
-
160
-
161
-
162
-
163
-
164
-
165
-
166
-
167
-
168
-
169
-
170
-
171
-
172
-
173
-
174
-
175
-
176
-
177
-
178
-
179
-
180
-
181
-
182
-
183
-
184
-
185
-
186
-
187
-
188
-
189
-
190
-
191
-
192
-
193
-
194
-
195
-
196
-
197
-
198
-
199
-
200
-
201
-
202
-
203
-
204
-
205
-
206
-
207
-
208
-
209
-
210
-
211
-
212
-
213
-
214
-
215
-
216
-
217
-
218
-
219
-
220
-
221
-
222
-
223
-
224
-
225
-
226
-
227
-
228
-
229
-
230
-
231
-
232
-
233
-
234
-
235
-
236
-
237
-
238
-
239
-
240
-
241
-
242
-
243
-
244
-
245
-
246
-
247
-
248
-
249
-
250
-
251
-
252
-
253
-
254
-
255
-
256
-
257
-
258
-
259
-
260
-
261
-
262
-
263
-
264
-
265
-
266
 |
 |