Konica Minolta bizhub C287 bizhub C287/C227 Quick Start Guide - Page 56
in [Power Key Setting] of Administrator Settings. For [Power Key
 |
View all Konica Minolta bizhub C287 manuals
Add to My Manuals
Save this manual to your list of manuals |
Page 56 highlights
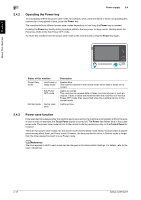
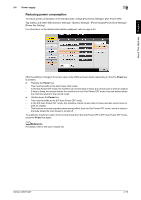
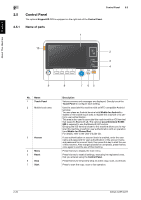
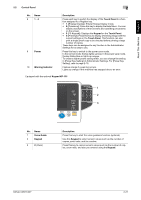
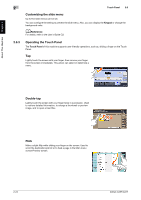
About This Machine Chapter 2 2.5 Control Panel 2 No. Name 8 1 - 4 9 Power 10 Warning Indicator Description Press each key to switch the display of the Touch Panel to a function assigned to a Register key. • 1 ([Enlarge Display]): Enters Enlarge Display mode. • 2 ([Guidance]): Press this key to display the Help Menu. You can display descriptions of the functions and operating procedures on the screen. • 3 ([10 Keypad]): Displays the Keypad on the Touch Panel. • 4 ([Preview]): Press this key to display a finishing image with the current settings on the Touch Panel. This function can also print a single proof copy to be checked before printing a large number of copies. These keys can be assigned to any function in the Administrator Settings to be easy to use. Press this key to switch to the power save mode. In the normal mode, the key lights up blue. In the power save mode, the key blinks blue or lights up orange. To create a higher power saving effect, you can change the setting in [Power Key Setting] of Administrator Settings. For [Power Key Setting], refer to page 2-19. Flashes orange if a warning occurs. Lights up orange if this machine has stopped due to an error. Equipped with the optional Keypad KP-101 1 2 3 No. Name 1 Voice Guide 2 Keypad 3 C (Clear) Description Press this key to start the voice guidance function (optional). Use this Keypad to enter numeric values such as the number of copies, zoom ratio, and fax number. Press this key to cancel numeric values such as the number of copies, zoom ratio, and size you entered using the Keypad. bizhub C287/C227 2-21
-
 1
1 -
2
-
3
-
4
-
5
-
6
-
7
-
8
-
9
-
10
-
11
-
12
-
13
-
14
-
15
-
16
-
17
-
18
-
19
-
20
-
21
-
22
-
23
-
24
-
25
-
26
-
27
-
28
-
29
-
30
-
31
-
32
-
33
-
34
-
35
-
36
-
37
-
38
-
39
-
40
-
41
-
42
-
43
-
44
-
45
-
46
-
47
-
48
-
49
-
50
-
 51
51 -
 52
52 -
 53
53 -
 54
54 -
 55
55 -
 56
56 -
 57
57 -
 58
58 -
 59
59 -
 60
60 -
 61
61 -
62
-
63
-
64
-
65
-
66
-
67
-
68
-
69
-
70
-
71
-
72
-
73
-
74
-
75
-
76
-
77
-
78
-
79
-
80
-
81
-
82
-
83
-
84
-
85
-
86
-
87
-
88
-
89
-
90
-
91
-
92
-
93
-
94
-
95
-
96
-
97
-
98
-
99
-
100
-
101
-
102
-
103
-
104
-
105
-
106
-
107
-
108
-
109
-
110
-
111
-
112
-
113
-
114
-
115
-
116
-
117
-
118
-
119
-
120
-
121
-
122
-
123
-
124
-
125
-
126
-
127
-
128
-
129
-
130
-
131
-
132
-
133
-
134
-
135
-
136
-
137
-
138
-
139
-
140
-
141
-
142
-
143
-
144
-
145
-
146
-
147
-
148
-
149
-
150
-
151
-
152
-
153
-
154
-
155
-
156
-
157
-
158
-
159
-
160
-
161
-
162
-
163
-
164
-
165
-
166
-
167
-
168
-
169
-
170
-
171
-
172
-
173
-
174
-
175
-
176
-
177
-
178
-
179
-
180
-
181
-
182
-
183
-
184
-
185
-
186
-
187
-
188
-
189
-
190
-
191
-
192
-
193
-
194
-
195
-
196
-
197
-
198
-
199
-
200
-
201
-
202
-
203
-
204
-
205
-
206
-
207
-
208
-
209
-
210
-
211
-
212
-
213
-
214
-
215
-
216
-
217
-
218
-
219
-
220
-
221
-
222
-
223
-
224
-
225
-
226
-
227
-
228
-
229
-
230
-
231
-
232
-
233
-
234
-
235
-
236
-
237
-
238
-
239
-
240
-
241
-
242
-
243
-
244
-
245
-
246
-
247
-
248
-
249
-
250
-
251
-
252
-
253
-
254
-
255
-
256
-
257
-
258
-
259
-
260
-
261
-
262
-
263
-
264
-
265
-
266
 |
 |