Kyocera KM-3035 Network Fax Online Manual (Revision) - Page 40
Summary of Delivery Settings, 1 Starting up the Scanner File Utility, 2 Setup Dialogue Box, 3 - scanner setup
 |
View all Kyocera KM-3035 manuals
Add to My Manuals
Save this manual to your list of manuals |
Page 40 highlights
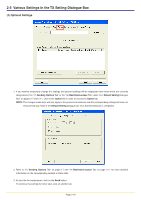
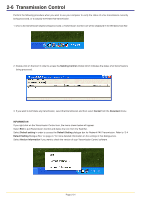
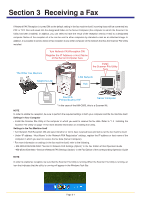
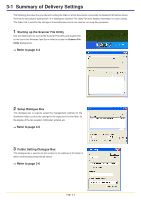
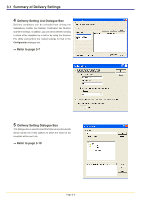
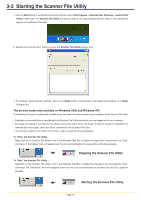
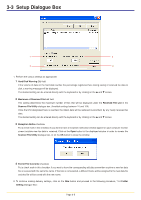
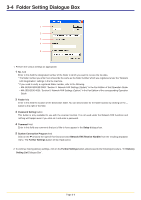
3-1 Summary of Delivery Settings The following describes the procedure for setting the folder in which documents received by the Network FAX will be stored. Refer to the procedures starting from "3-2 Starting the Scanner File Utility" for more detailed information on each setting . The folder that is used for the storage of transmitted documents can also be set using this procedure. 1 Starting up the Scanner File Utility Use the Start button to start up the Scanner File Utility and double-click on the icon in the Windows Task Bar in order to access the Scanner File Utility dialogue box. -> Refer to page 3-4 2 Setup Dialogue Box This dialogue box is used to select the management settings for the destination folder, such as the settings for the capacity of the hard disk, for the display of the fax reception notification window, etc. -> Refer to page 3-5 3 Folder Setting Dialogue Box This dialogue box is used to set the number or the address of the folder in which received documents will be stored. -> Refer to page 3-6 Page 3-2
-
 1
1 -
2
-
3
-
4
-
5
-
6
-
7
-
8
-
9
-
10
-
11
-
12
-
13
-
14
-
15
-
16
-
17
-
18
-
19
-
20
-
21
-
22
-
23
-
24
-
25
-
26
-
27
-
28
-
29
-
30
-
31
-
32
-
33
-
34
-
 35
35 -
 36
36 -
 37
37 -
 38
38 -
 39
39 -
 40
40 -
 41
41 -
 42
42 -
 43
43 -
 44
44 -
 45
45 -
46
-
47
-
48
-
49
-
50
-
51
-
52
-
53
-
54
-
55
-
56
-
57
-
58
-
59
-
60
-
61
-
62
-
63
-
64
-
65
-
66
-
67
-
68
-
69
-
70
-
71
-
72
-
73
-
74
-
75
-
76
-
77
-
78
-
79
-
80
-
81
-
82
-
83
-
84
-
85
-
86
-
87
-
88
-
89
-
90
-
91
-
92
-
93
-
94
-
95
-
96
-
97
-
98
-
99
-
100
-
101
-
102
-
103
-
104
-
105
-
106
-
107
-
108
 |
 |
