Kyocera KM-3035 Network Fax Online Manual (Revision) - Page 44
Folder Setting Dialogue Box - network scanner setup
 |
View all Kyocera KM-3035 manuals
Add to My Manuals
Save this manual to your list of manuals |
Page 44 highlights
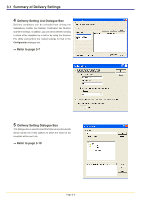
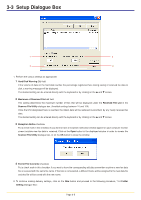
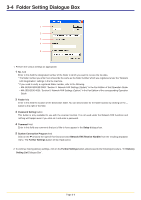
3-4 Folder Setting Dialogue Box 1 2 3 4 5 1. Perform the various settings as appropriate. 1 No. field Enter in this field the designated number of the folder in which you want to receive the fax data. * The folder number you enter here should be the same as the folder number which was registered under the "Network FAX Registration" settings in the fax machine. * If you need to verify a registered folder number, refer to the following. • KM-3035/4035/5035/C850: "Section 9 Network FAX Settings (Option)" in the Fax Edition of that Operation Guide • KM-2530/3530/4030: "Section 8 Network FAX Settings (Option)" in the Fax Edition of the corresponding Operation Guide 2 Folder field Enter in this field the location of the destination folder. You can also browse for the folder location by clicking on the ... button to the right of the field. 3 Password Setting button This button is only available for use with the scanner function. It is not used under the Network FAX functions and nothing will happen even if you click on it and enter a password. 4 Comment field Enter in this field any comments that you'd like to have appear in the Setup dialogue box. 5 System Connection Program field Click on the M arrow to the right of this field and select Network FAX Receive Handler from the resulting dropdown menu. The Further Settings button will be made active. 2. To continue making delivery settings, click on the Further Settings button and proceed to the following procedure, "3-5 Delivery Setting List Dialogue Box". Page 3-6
-
 1
1 -
2
-
3
-
4
-
5
-
6
-
7
-
8
-
9
-
10
-
11
-
12
-
13
-
14
-
15
-
16
-
17
-
18
-
19
-
20
-
21
-
22
-
23
-
24
-
25
-
26
-
27
-
28
-
29
-
30
-
31
-
32
-
33
-
34
-
35
-
36
-
37
-
38
-
 39
39 -
 40
40 -
 41
41 -
 42
42 -
 43
43 -
 44
44 -
 45
45 -
 46
46 -
 47
47 -
 48
48 -
 49
49 -
50
-
51
-
52
-
53
-
54
-
55
-
56
-
57
-
58
-
59
-
60
-
61
-
62
-
63
-
64
-
65
-
66
-
67
-
68
-
69
-
70
-
71
-
72
-
73
-
74
-
75
-
76
-
77
-
78
-
79
-
80
-
81
-
82
-
83
-
84
-
85
-
86
-
87
-
88
-
89
-
90
-
91
-
92
-
93
-
94
-
95
-
96
-
97
-
98
-
99
-
100
-
101
-
102
-
103
-
104
-
105
-
106
-
107
-
108
 |
 |
