LG G4050 User Guide - Page 50
Camera
 |
View all LG G4050 manuals
Add to My Manuals
Save this manual to your list of manuals |
Page 50 highlights
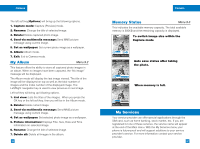
Java Note After selecting the Connect function to access the Java MIDlet Provider's server, you may choose one of many Java programs to download and install into your phone. Once connected to the server, the Go button can be pressed to view the JAD information on a desired program. The Get button will begin the download and install process. The download and install process will take place simultaneously and once download is complete you can immediately run the Java program. The installed Java program can be selected to run at a later time from the Application menu. View Information Menu 8.3 The downloaded programs using the WAP are stored in the phone memory. There is a maximum memory capacity in a phone and once you exceed this memory, you will not be able to store any more programs. The View Information menu allows you to check the available memory capacity in a phone. Memory Status (Menu 8.3.1) Displays maximum memory capacity and total available memory information. Java Version Displays current Java version. (Menu 8.3.2) 94 Camera This feature offers the capability to use the external camera to take photos with the phone. The phone supports 3 modes that can be set to capture images and they are 128x96, 160x120 and 320x240. However Zoom, Brightness, Color/Gray setting, Video Mode and Continuous Capture functions are not supported except for Up/Down Display switching. Within the camera feature, there are Capture Mode, My Album, and Memory Status options. Capture Mode Menu 9.1 In the Capture mode, the "Detecting" message will be displayed. This process takes a maximum of 7 seconds to verify if the camera has been installed properly. The "No Camera" message indicates an improperly installed camera. When the external camera is attached, the phone checks for available memory capacity. If not enough memory is available, the "No Memory" message is displayed. If the camera can't take photos at the current image size setting, then the next maximum available image size can be selected by using the up/down navigation key within the capture mode function. If the is pressed during the capture mode, all photos taken will be automatically stored in the memory. When you press the left soft key from the capture mode function, following options appear. 1. Set size: To change the image size. 2. Shutter sound: To change the shutter sound. Sound 1 / Sound 2 / Sound 3 / No Sound 3. Album: To go to the Album mode. 4. Exit: To exit the Capture mode. When the OK key is pressed from the Capture (Preview) mode, it will take you to the Capture mode where photos can be taken. The right soft key will delete current captured photo image. 95
-
 1
1 -
2
-
3
-
4
-
5
-
6
-
7
-
8
-
9
-
10
-
11
-
12
-
13
-
14
-
15
-
16
-
17
-
18
-
19
-
20
-
21
-
22
-
23
-
24
-
25
-
26
-
27
-
28
-
29
-
30
-
31
-
32
-
33
-
34
-
35
-
36
-
37
-
38
-
39
-
40
-
41
-
42
-
43
-
44
-
 45
45 -
 46
46 -
 47
47 -
 48
48 -
 49
49 -
 50
50 -
 51
51 -
 52
52 -
 53
53 -
 54
54 -
 55
55 -
56
-
57
-
58
-
59
-
60
-
61
-
62
-
63
-
64
-
65
 |
 |
