LG KC550 User Guide - Page 35
Using the flash, Changing the image size - flash
 |
View all LG KC550 manuals
Add to My Manuals
Save this manual to your list of manuals |
Page 35 highlights
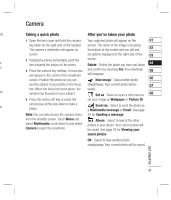
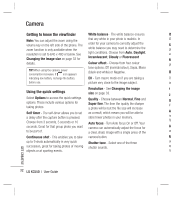
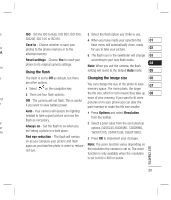
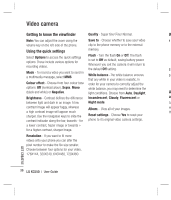
s ISO - Set the ISO to Auto, ISO 800, ISO 400, 3 Select the flash option you'd like to use. ISO200, ISO 100 or ISO 80. 4 When you have made your selection the 01 e Save to - Choose whether to save your flash menu will automatically close, ready he photos to the phone memory or to the for you to take your picture. 02 ht, external memory. 5 The flash icon in the viewfinder will change 03 Reset settings - Choose Yes to reset your according to your new flash mode. no phone to its original camera settings. 04 Note: When you exit the camera, the flash Using the flash setting will revert to the default Auto mode. 05 a The flash is set to Off as default, but there Changing the image size 06 are other options. 1 Select on the navigation key. You can change the size of the photo to save 07 memory space. The more pixels, the larger 2 There are four flash options: the file size, which in turn means they take up 08 nd r Off - The camera will not flash. This is useful if you want to save battery power. more of your memory. If you want to fit more pictures on to your phone you can alter the pixel number to make the file size smaller. Auto - Your camera will assess the lighting 1 Press Options and select Resolution needed to take a good picture and use the from the toolbar. flash as necessary. ur 2 Select a pixel value from the six numerical or Always on - Set the flash to on when you options (320X240, 640X480, 1280X960, he are taking a photo in a dark place. 1600X1200, 2048X1536, 2560X1920). Red eye reduction - The flash will remain on as you compose your picture and flash again as you take the photo in order to reduce red eye. 3 Press OK to implement your changes. Note: The zoom function varies depending on the resolution the camera is set to. The zoom function is only available when the resolution is set to 640 x 480 or below. GET CREATIVE 33
-
 1
1 -
2
-
3
-
4
-
5
-
6
-
7
-
8
-
9
-
10
-
11
-
12
-
13
-
14
-
15
-
16
-
17
-
18
-
19
-
20
-
21
-
22
-
23
-
24
-
25
-
26
-
27
-
28
-
29
-
 30
30 -
 31
31 -
 32
32 -
 33
33 -
 34
34 -
 35
35 -
 36
36 -
 37
37 -
 38
38 -
 39
39 -
 40
40 -
41
-
42
-
43
-
44
-
45
-
46
-
47
-
48
-
49
-
50
-
51
-
52
-
53
-
54
-
55
-
56
-
57
-
58
-
59
-
60
-
61
-
62
-
63
-
64
-
65
-
66
-
67
-
68
-
69
-
70
-
71
-
72
-
73
-
74
-
75
-
76
-
77
-
78
-
79
-
80
-
81
-
82
-
83
-
84
-
85
-
86
-
87
-
88
-
89
-
90
-
91
-
92
-
93
-
94
-
95
-
96
-
97
-
98
-
99
-
100
-
101
-
102
-
103
-
104
-
105
-
106
 |
 |