LG LGLX400 Owner's Manual - Page 24
Key Functions, A. Phone Basics
 |
View all LG LGLX400 manuals
Add to My Manuals
Save this manual to your list of manuals |
Page 24 highlights
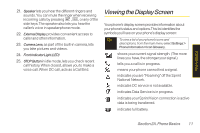
Key Functions 1. Earpiece lets you hear the caller and automated prompts. 2. SignalStrengthIndicator represents the signal strength by displaying bars. The more bars displayed, the better the signal strength. 3. SoftkeyButtonslet you select softkey actions or menu items corresponding to the bottom left and right lines on the display screen. 4. DirectConnectButton. Push to make a Direct Connect call. Then push and hold to talk, release to listen. Also lets you view DC call history. 5. SpeakerKey lets you place or receive calls in speakerphone mode. Default for DC calls is speaker on. 6. SideVolumeButton allows you to adjust the ringer volume in standby mode or adjust the voice volume during a call. The volume key can also be used to scroll up or down to navigate through the different menu options. 7. TALKKey allows you to place or receive calls, answer CallWaiting or use Three-WayCalling. 8. Charger/Accessory Jack allows you to connect the phone to the phone charger and to optional accessories, such as a USB cable. CAUTION! Inserting an accessory into the incorrect jack may damage the phone. Charging with USB You can use your computer to charge your phone. Connect one end of a USB cable to the charging accessory port on your phone and the other end to a highpower USB port on your PC (commonly located on the front panel of the computer). Note Lower USB port is not supported, such as the USB port on your keyboard or bus-powered USB hub. 9. Microphone allows other callers to hear you clearly when you are speaking to them. 10. Keypad 11. BACKKey deletes characters from the display in text entry mode. When in a menu, pressing the Back key returns you to the previous menu. This key also allows you to return to the previous screen in a Sprint Vision session. Section 2A. Phone Basics 9 Phone Basics
-
 1
1 -
2
-
3
-
4
-
5
-
6
-
7
-
8
-
9
-
10
-
11
-
12
-
13
-
14
-
15
-
16
-
17
-
18
-
 19
19 -
 20
20 -
 21
21 -
 22
22 -
 23
23 -
 24
24 -
 25
25 -
 26
26 -
 27
27 -
 28
28 -
 29
29 -
30
-
31
-
32
-
33
-
34
-
35
-
36
-
37
-
38
-
39
-
40
-
41
-
42
-
43
-
44
-
45
-
46
-
47
-
48
-
49
-
50
-
51
-
52
-
53
-
54
-
55
-
56
-
57
-
58
-
59
-
60
-
61
-
62
-
63
-
64
-
65
-
66
-
67
-
68
-
69
-
70
-
71
-
72
-
73
-
74
-
75
-
76
-
77
-
78
-
79
-
80
-
81
-
82
-
83
-
84
-
85
-
86
-
87
-
88
-
89
-
90
-
91
-
92
-
93
-
94
-
95
-
96
-
97
-
98
-
99
-
100
-
101
-
102
-
103
-
104
-
105
-
106
-
107
-
108
-
109
-
110
-
111
-
112
-
113
-
114
-
115
-
116
-
117
-
118
-
119
-
120
-
121
-
122
-
123
-
124
-
125
-
126
-
127
-
128
-
129
-
130
-
131
-
132
-
133
-
134
-
135
-
136
-
137
-
138
-
139
-
140
-
141
-
142
-
143
-
144
-
145
-
146
-
147
-
148
-
149
-
150
-
151
-
152
-
153
-
154
-
155
-
156
-
157
-
158
-
159
-
160
-
161
-
162
-
163
-
164
-
165
-
166
-
167
-
168
-
169
-
170
-
171
-
172
-
173
-
174
-
175
-
176
-
177
-
178
-
179
-
180
-
181
 |
 |
