LG LHB655 Owners Manual - English - Page 20
Wired network setup, Advanced Setting
 |
View all LG LHB655 manuals
Add to My Manuals
Save this manual to your list of manuals |
Page 20 highlights
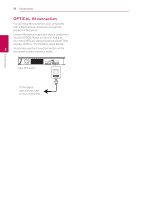
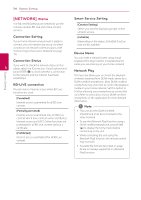
Connecting 20 Connecting Wired network setup If there is a DHCP server on the local area network (LAN) via wired connection, this player will automatically be allocated an IP address. After making the physical connection, a small number of home networks may require the player's network setting to be adjusted. Adjust the [NETWORK] setting as follow. Advanced Setting If you want to set the network settings manually, use W/S to select [Advanced Setting] on the [Network Setting] menu and press ENTER (b). 1. Use W/S/A/D to select the IP mode between [Dynamic] and [Static]. Normally, select [Dynamic] to allocate an IP address automatically. 2 Preparation Before setting the wired network, you need to connect the broadband internet to your home network. 1. Select [Connection Setting] option in the [Settings] menu then press ENTER (b). 2. Read the preparations for the network settings and then press ENTER (b) while [Start] is highlighted. ,,Note If there is no DHCP server on the network and you want to set the IP address manually, select [Static] then set [IP Address], [Subnet Mask], [Gateway] and [DNS Server] using W/S/ A/D and numerical buttons. If you make a mistake while entering a number, press CLEAR to clear the highlighted part. 2. Select [Next] and press ENTER (b) to apply network settings. Network will automatically be connected to the unit. Network connection status is displayed on the screen. 3. Press ENTER (b) while [OK] is highlighted to finish the wired network settings.
-
 1
1 -
2
-
3
-
4
-
5
-
6
-
7
-
8
-
9
-
10
-
11
-
12
-
13
-
14
-
 15
15 -
 16
16 -
 17
17 -
 18
18 -
 19
19 -
 20
20 -
 21
21 -
 22
22 -
 23
23 -
 24
24 -
 25
25 -
26
-
27
-
28
-
29
-
30
-
31
-
32
-
33
-
34
-
35
-
36
-
37
-
38
-
39
-
40
-
41
-
42
-
43
-
44
-
45
-
46
-
47
-
48
-
49
-
50
-
51
-
52
-
53
-
54
-
55
-
56
-
57
-
58
-
59
-
60
-
61
-
62
-
63
-
64
-
65
-
66
-
67
-
68
-
69
-
70
-
71
-
72
-
73
-
74
 |
 |