Lantronix EDS3000PS User Guide - Page 89
Using XML, XML, To Export Configuration, Using Web Manager, Caution
 |
View all Lantronix EDS3000PS manuals
Add to My Manuals
Save this manual to your list of manuals |
Page 89 highlights
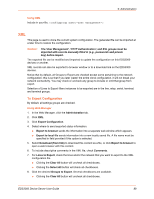
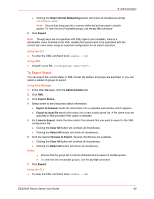
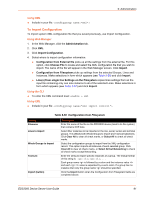
Using XML Include in your file: 9: Administration XML This page is used to clone the current system configuration. The generated file can be imported at a later time to restore the configuration. Caution: The 'User Management', 'HTTP Authentication', and SSL groups must be imported with secrets manually filled in (e.g., passwords and private key) before import. The exported file can be modified and imported to update the configuration on this EDS3000 devices or another. XML records can also be exported to browser window or to a download link on the EDS3000 devices. Notice that by default, all Groups to Export are checked except some pertaining to the network configuration; this is so that if you later 'paste' the entire clone configuration, it will not break your network connectivity. You may check or uncheck any group to include or omit that group from export. Selection of Lines to Export filters instances to be exported are in the line, relay, serial, terminal, and terminal groups. To Export Configuration By default, all settings groups are checked. Using Web Manager 1. In the Web Manager, click the Administration tab. 2. Click XML. 3. Click Export Configuration. 4. Select where to send exported status information: Export to browser sends the information into a separate web window which appears. Export to local file sends information into a new locally saved file. A file name must be specified in field provided if this option is selected. 5. Select Download (from link) to download this content as a file, or click Export to browser to open a web browser with this content. 6. To include descriptive comments in the XML file, check Comments. 7. For Lines to Export, check the lines and/or the network that you want to export to the XML configuration file. Clicking the Clear All button will uncheck all checkboxes. Clicking the Select All button will check all checkboxes. 8. Click the desired Groups to Export. Several checkboxes are available. Clicking the Clear All button will uncheck all checkboxes. EDS3000 Device Server User Guide 89
-
 1
1 -
2
-
3
-
4
-
5
-
6
-
7
-
8
-
9
-
10
-
11
-
12
-
13
-
14
-
15
-
16
-
17
-
18
-
19
-
20
-
21
-
22
-
23
-
24
-
25
-
26
-
27
-
28
-
29
-
30
-
31
-
32
-
33
-
34
-
35
-
36
-
37
-
38
-
39
-
40
-
41
-
42
-
43
-
44
-
45
-
46
-
47
-
48
-
49
-
50
-
51
-
52
-
53
-
54
-
55
-
56
-
57
-
58
-
59
-
60
-
61
-
62
-
63
-
64
-
65
-
66
-
67
-
68
-
69
-
70
-
71
-
72
-
73
-
74
-
75
-
76
-
77
-
78
-
79
-
80
-
81
-
82
-
83
-
 84
84 -
 85
85 -
 86
86 -
 87
87 -
 88
88 -
 89
89 -
 90
90 -
 91
91 -
 92
92 -
 93
93 -
 94
94 -
95
-
96
-
97
-
98
-
99
-
100
 |
 |