Lenovo 6234A1U User Manual - Page 30
Installing a drive in bay 2, shield by using a flat-blade screwdriver to gently pry it loose.
 |
View all Lenovo 6234A1U manuals
Add to My Manuals
Save this manual to your list of manuals |
Page 30 highlights
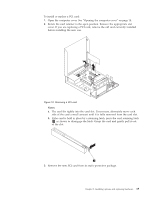
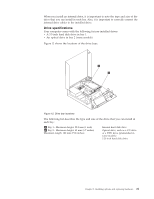
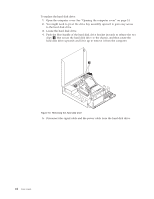
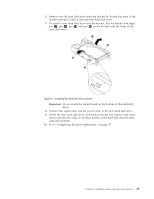
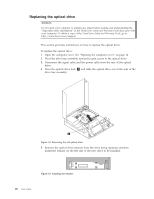
Installing a drive in bay 2 Attention Do not open your computer or attempt any repair before reading and understanding the "Important safety information" in the ThinkCentre Safety and Warranty Guide that came with your computer. To obtain a copy of the ThinkCentre Safety and Warranty Guide, go to: http://www.lenovo.com/support This section provides instructions on how to install a drive in bay 2. To install an optical drive or an additional hard disk drive in bay 2: 1. Open the computer cover. See "Opening the computer cover" on page 14. 2. If there is a metal static shield installed in the drive bay, remove the metal shield by using a flat-blade screwdriver to gently pry it loose. 3. Install the retainer that comes with your drive on the side of the drive. Figure 13. Installing the retainer 4. Slide the drive into the bay until it locks into position. Figure 14. Installing the drive 5. Pivot the drive bay assembly upward to gain access to the cable connections and connect the signal cable and the power cable for the drive. 6. Continue at "Connecting a SATA drive" on page 23. 22 User Guide
-
 1
1 -
2
-
3
-
4
-
5
-
6
-
7
-
8
-
9
-
10
-
11
-
12
-
13
-
14
-
15
-
16
-
17
-
18
-
19
-
20
-
21
-
22
-
23
-
24
-
 25
25 -
 26
26 -
 27
27 -
 28
28 -
 29
29 -
 30
30 -
 31
31 -
 32
32 -
 33
33 -
 34
34 -
 35
35 -
36
-
37
-
38
-
39
-
40
-
41
-
42
-
43
-
44
-
45
-
46
-
47
-
48
-
49
-
50
-
51
-
52
-
53
-
54
-
55
-
56
-
57
-
58
-
59
-
60
-
61
-
62
-
63
-
64
-
65
-
66
-
67
-
68
-
69
-
70
-
71
-
72
-
73
-
74
-
75
-
76
-
77
-
78
-
79
-
80
-
81
-
82
 |
 |
